Do-it-yourself installation of polyethylene pipes
In this article we will tell you how to install polyethylene pipes with your own hands. This will save several times when laying most communications. There are different types of products mentioned, as well as ways to install them. This article will cover all these aspects.
Application area
Polyethylene is widely used in the production of various products. This is a polymer that has a number of very useful properties. For example, it is immune to the action of most acids, gasoline, various oils and other solvents. This means that when exposed to an aggressive environment, the service life of such material can be very long. In industry, this raw material is used in the manufacture of packaging for various food products. The material does not have a detrimental effect on the human body, although it is a product of the oil industry.
![]()
In addition to all of the above, this polymer can be easily processed. In order to make a planned product from it, no special unique conditions of temperature or pressure are required. Pipes are easily obtained from it, which are used for various purposes:
- gas pipelines;
- pipelines for transportation of chemically aggressive substances in industry;
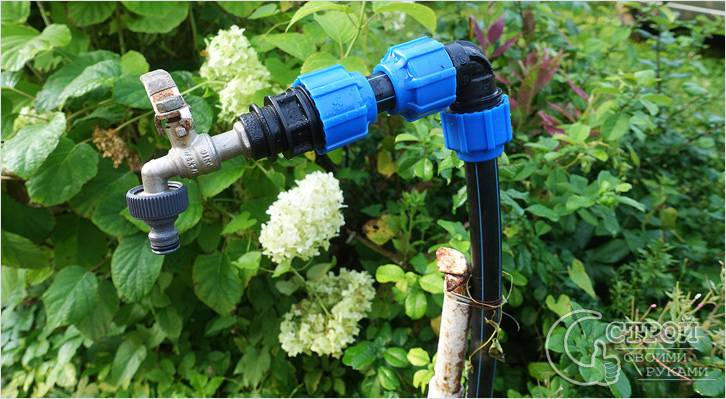
- irrigation systems;
- for transportation of liquids containing abrasive inclusions;
- systems designed to lower the water level.
This widespread use is due to the ease of installation and the high flexibility of the final product.
Types of polyethylene pipes

All polyethylene pipes are divided according to the pressure they can withstand. There are three main types:
- PVD. Such products withstand high pressure. They are used on high-pressure highways and sections. Their diameter can exceed 1 m. They are relevant for the organization of water supply to microdistricts or even cities.
- HDPE. The most common and most common type. Low-pressure plastic pipes are used for plumbing, in which case they most often have a blue stripe along their entire length, or they can be completely painted blue. For laying gas lines, material with a yellow stripe is used.
- The third type is made from recycled materials. Typically, such pipes are used for laying various communication lines. Products serve as sleeves that prevent harmful effects on the cable.

The advantages of such products are:
- resistance to corrosion;
- high flexibility and plasticity during installation;
- ease of connection;
- high mechanical strength;
- the impossibility of the formation of growths and blockages due to the smoothness of the walls;
- resistance to water hammer (short-term excess of the permissible pressure by several times is allowed);
- good dielectric;
- the possibility of installation in a limited space;
- the value of hydrolosses is lower than that of other materials;
- higher density than steel - 8 times;
- welded seams are stronger than the strength of the pipes themselves;
- relatively small weight;
- 50 years of service without the need for maintenance.
Note! Polyethylene is not suitable for organizing hot water and heating systems. This is due to the fact that some of its types lose their strength already at 60 °, and at 100 ° they begin to melt and spread.
Mounting methods

Even a novice can handle the installation, provided they have the necessary tools and basic knowledge. All types of pipe joints of this type are divided into two main categories:
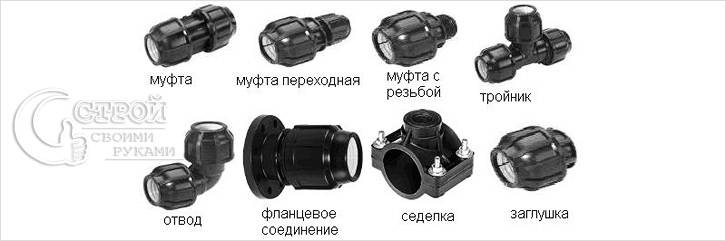
- Detachable. Special fittings have been developed for them. The assembly of the entire structure is possible with the presence of elementary tools that any owner possesses.
- Monolithic. In this case, there are two options that can be applied. One of them involves gluing with a special composition that does not adversely affect the body. The second is soldering. She has her subspecies. It is carried out using a special apparatus that heats the ends, after which docking occurs. Special couplings have also been developed in which spirals are built in (they are also called elements with a mortgage heater) that carry out welding.

Practical guide
The first connection method, discussed above, is often used at home. The tool that will be needed when assembling the entire structure:
- pipe scissors or hacksaw;
- special key with chain;
- fitting;
- roulette.
Note! Often the chain wrench is replaced with a conventional gas wrench or simply tightened by hand. To ensure the highest reliability, it is better to use products designed for this purpose.
The whole installation process will be as follows:
- All pipe is produced in bays, so it will need to be conveniently placed to simplify the task. The required length is measured and cut off from the bay with a hacksaw or scissors.
- The edge that will go into the fitting is well aligned. This must be done so that subsequently there is no skew, and so that the grip is uniform.
- The chamfer is removed under the cone, this will make it easier to pass the sealing gum.
- The coupling is unscrewed from the fitting.
- The sealing ring is removed.
- First, the coupling, and then the sealing ring, is put on the pipe.
- The ring must be turned so that its conical part abuts against the coupling, and the side against the fitting.
- The pipe is wetted with water or soapy water. This will make it easier to fix it.
- The fitting is put on the pipe until it stops. In this case, you need to make sure that the sealing gum that is in it does not wrap inside the hole. If this happens, then you need to remove the fitting and repeat everything from the very beginning.
- Before filling the pipe with earth, it is advisable to check it by applying working pressure.
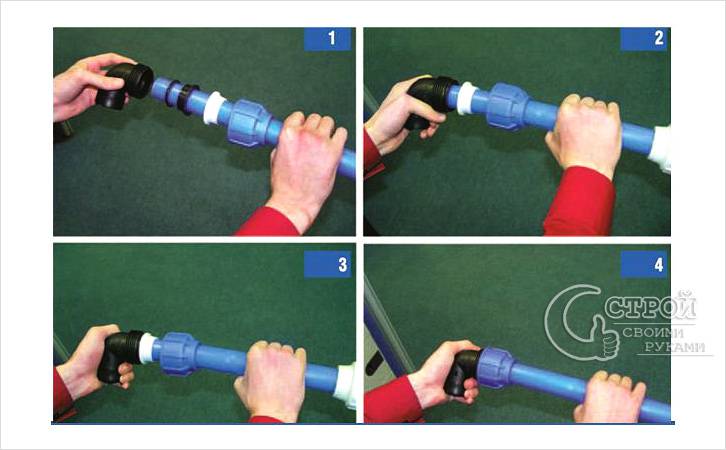
An overview of the compression fitting for polyethylene pipes, see below:
Note! Fittings with metal threads are perfect for switching from a metal pipe to a polyethylene pipe. This will be the key to a high-quality connection that will not fail during a pressure surge.
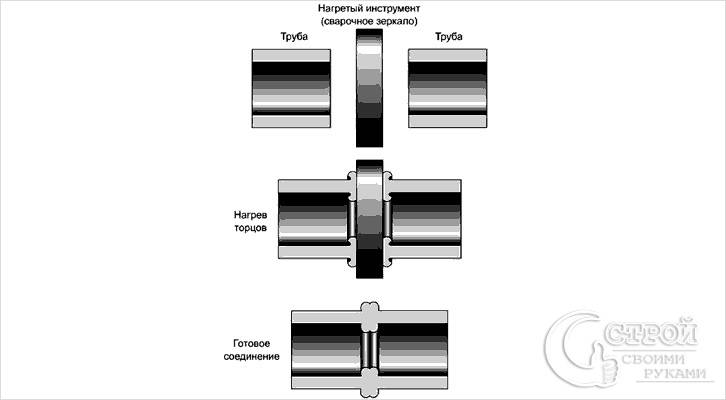
Butt jointing is somewhat more complicated and requires a specialized tool. The main one is the welding machine. It consists of the following blocks:
- Centralizer. A special fixing clip that allows you to position two parts clearly opposite each other. Also, with the help of this element, fixation and clamping are carried out in order to form a high-quality seam.
- Trimmer. A small tool with an electric motor that has two cutting heads. Its purpose is to process the edges so that they have a flat plane.
- Hydraulic block. Designed to carry out the movement of two parts of the centralizer. It has a pressure gauge, which makes it possible to select the required value in bars.
- Heater. This is a kind of soldering iron that melts the edge for subsequent joining.

If you plan to do the installation professionally, then it makes sense to purchase such a device, otherwise it is enough just to rent it. The sequence of actions will be as follows:
- One of the parts to be welded must be movable. If this condition is not met, then the centralizer will not fulfill its role.
- Using a caliper, the ovality of the pipe is checked. The diameter must be the same at any point where the gauge is applied.
- The compliance of the actual wall thickness with the declared one is checked. It must be the same for both elements. If they are unequal, then the soldering will not reach the required strength.
- The elements are installed in the centralizer. Between them, it is necessary to maintain such a distance that in the open position it is possible to safely install the trimmer and the heating element.
- The clamp is carried out in pairs. The rear latches can be tightened slightly more than the front ones. It is better not to overdo it with the latter, so as not to violate the correctness of the butt circle.
- Movement pressure is set. In order to do this, you must first unscrew the valve to bleed the air. Further, twisting it, the value at which the movement begins is determined.
- The compression pressure on the solder is calculated. This is done according to the table, which is usually located on the unit. If it is not there, then you can use the following formula: divide the pipe end area by the total cross-sectional area of \u200b\u200bthe cylinders, multiply the result by 0.15 and add the resistance pressure.
- The parts to be welded are cleaned of sand and other dirt with a damp cloth.
- Edge processing is in progress. To do this, a trimmer is installed close to one pipe. It turns on and with the help of a hydraulic unit, two workpieces are shifted. The process continues until 3-4 turns of solid chips are formed on each side.
- The pressure is released and the parts move apart.
- The cutting tool retracts into place.
- A test docking is being done to make sure the process went as it should.
- Ends are cleaned again. But this time it is necessary to use alcohol or a special solvent.
- The soldering iron turns on and heats up to the required temperature.
- The time of the planned soldering is set on the timer. It is usually also indicated in the table.
- The sting is installed between the pipes.
- The pipes are brought to the soldering iron. It is necessary to wait until an influx of 1 mm thick forms. After that, the pressure is released and the time for welding is recorded.
- After the welding time has elapsed, the soldering iron is removed. There will be 5 seconds to bring the details together.
- After docking, you will need to wait about 5 seconds more under pressure, after which it is reset and a timer is started to cool down.
The cooling process should not be accelerated in any way. Also, during this time, you should not tilt the pipe or try to remove the centralizer. Otherwise, the joint will be broken, and depressurization will subsequently occur.
The video shows the process of butt welding in detail:
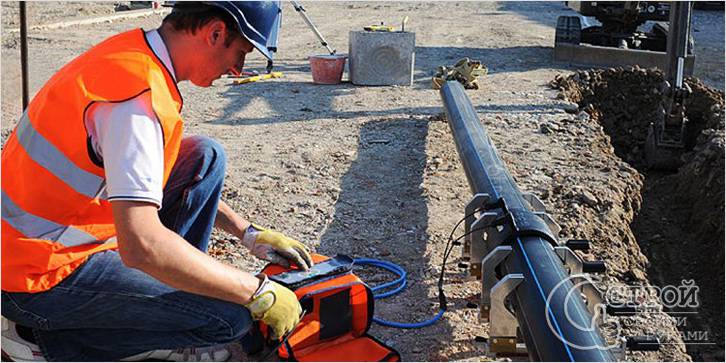
Electrofusion welding is an achievement that allows you to join seams in places where other methods are simply not applicable. The advantages of this solution are:
- high speed of ongoing processes;
- minimum probability of errors;
- high safety of the whole process;
- the possibility of articulation of fixed workpieces;
- the inner diameter of the pipes remains practically unchanged;
- simplifies the process when performing tasks with large pipe diameters;
- the advantage of working with workpieces of various diameters and wall thicknesses;
- minimum consumption of electrical energy when performing tasks.

Of the tools you will need:
- Special cleaning liquid. It can come in a kit with fittings or be purchased separately. The use of acetone or other solvents not intended for these purposes is not recommended.
- Oxide remover. An ordinary scraper or an apparatus that is installed directly on the pipe can act as its role. On larger diameters, the use of the second is preferable. The fact is that it is necessary not only to create a rough surface, but to remove about 0.1 mm of material so that soldering can occur.
- Welding machine. In this case, a special development is used. Its task is to apply a specific voltage to the clutch for a certain period of time. It is assembled on semiconductors, which explains its economy and high performance. On the front panel, as a rule, there is a digital display, which makes it possible to check the correctness of the entered data. The design provides a port for connecting a scanner, it is necessary to automatically enter the required parameters through a barcode that is printed on the fitting. Information about the work done is stored in the internal memory and can later be transferred to a USB flash drive if there is a USB port.
- Retainer or positioner. For this type of connection, it has a slightly different structure than in the previous case. Its main purpose is to compensate for ovality that may be present due to pipe storage in a coil or under load.
- Pipe cutter. In order for the edges to be flat and without jagged, it is desirable to use this particular tool. A hacksaw and a knife will be poor helpers in this case.
- Permanent marker. It should be white or yellow so that the marks made are clearly visible on the pipe.
- Roulette.
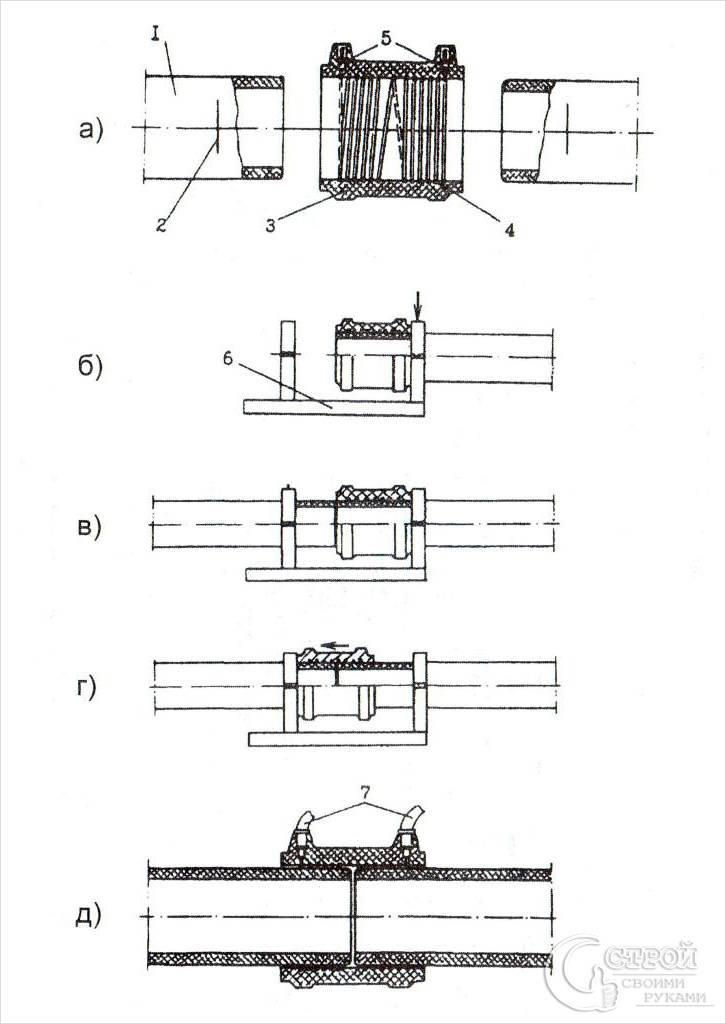
To achieve the ideal result, you will need to follow the following steps:
- Ends are being prepared. To do this, they are cut with a pipe cutter.
- Using a tape measure, the total length of the coupling is measured.
- A label is applied to each pipe. It should be from the edge at a distance of half the size of the fitting plus 2 cm of margin.
- The upper layer is removed, in which the reaction with oxygen has occurred. In order to make it easier to maintain uniformity, it is necessary to apply several longitudinal lines from the mark to the end. As the tool progresses, it will be seen which part is not covered enough.
- The end will be chamfered under the cone to facilitate the entry of the pipe into the fitting.
- A positioner is installed on each of the pipes. It is clamped until the nozzle is perfectly round.
- Both the pipe itself and the inner walls of the fitting are treated with a degreasing composition.
- The coupling is put on the pipe up to half the depth of its size. Usually there is a limiter inside that will not let you go further.
- A second pipe is brought in and inserted.
- The evenness of the entire plane is checked.
- The terminals from the welding machine are connected to special connectors.
- The barcode is read using a scanner.
- The whole process is started. It is important to wait not only for the welding time, but also for the total cooling time, which is also shown on the display. During this period, do not touch or try to change the configuration of the equipment. This may result in a poor quality joint.
- At the end of the procedure, data on the operator, time, temperature and date are applied to the joint.
There are basic mistakes that are very important to avoid. For example, it is necessary that the pipe and fitting are not at an angle. This will cause the molten mass to simply flow out. If the ovality is not compensated, then the coupling will simply be impossible to put on, or a monolithic adhesion will not form. If the pipe is not immersed enough, the spiral will simply melt the material inside, but the articulation will not occur.
Installation of XLPE pipes

This type of pipe is rather an exception to the rule. It withstands temperatures up to 120° and can be safely used for heating and hot water systems. Such material is produced by ion bombardment, which leads to the formation of a unique structural lattice. It is she who is the key to strength. Interestingly, when exposed to temperatures above 400°C, the material decomposes into carbon dioxide and water. Other interesting features are:
- Resistance to low temperatures. The pipe feels good even at -50°. In this case, the physical impact does not have a detrimental effect.
- High elasticity. The pipe can be bent in half without breaking.
- Resistant to cracking during operation.
- High smoothness of the inner surface. This allows you to reduce noise during the circulation of water.
- The product shrinks. When exposed to a sufficiently high pressure, the material tends to expand and after a while take its original shape.
- Abrasion resistance. This means that the pipe can be walled up in a screed and not worry that something will happen to it.

Installation can be carried out using two types of fittings:
- Threaded. In this case, no special tools are required, and the overall process resembles the installation of metal-plastic pipes.
- Crimping. For this option, you will need a special expander and a special hand vise.
The process for the first option boils down to the following steps:
- Using scissors, the pipe of the required size is cut.
- The nut is unscrewed from the fitting and the sealing ring is removed.
- A nut is first put on the pipe and then an o-ring.
- The part of the pipe that will be put on the fitting is flared.
- The sealing ring is moved as close as possible to the fitting.
- Using one wrench, the connector is held, the nut is tightened with the second. It advances the seal to the designated position and presses the pipe walls even more.

With the crimping method, everything happens as follows:
- A ring is put on the pipe. It moves from the edge by the distance that the inside of the fitting will go.
- A head of the required diameter is installed on the expander. It is inserted into the pipe and the handles are compressed. Then they quickly open up, the tool turns a little, sinks a little deeper and again the handles come together. Such actions are carried out until the butt rests against the limiter.
- The fitting is inserted.
- Using a hand vise, the ring is pressed onto the upper part of the joint.
Note! There is another progressive method. Instead of a metal ring, a special polymer is used. It is put on the pipe so that part of it protrudes by 1 mm. Further, the pipe expands with it. When the fitting is inserted, an automatic seating occurs. Within an hour, the stiffness of the joint reaches such a level that it can withstand a pressure of 15 atmospheres.
Perhaps you also had experience when a water supply system was installed from polyethylene pipes or other communications. Share your best practices and tricks acquired in the process. Leave comments on the article.


