We build a hip roof: the process from "A" to "Z
Having your own roof over your head is a vital necessity for every person, regardless of age, gender and occupation. It is equally important that the roof is strong and reliable, for which it is recommended to contact highly specialized professionals, or at least draw up a clear step-by-step construction plan and thoughtfully make the necessary calculations. The hip type of roofing systems, which is beloved by European developers, can become a reliable and aesthetic option.
Hip roof: device, configuration, features
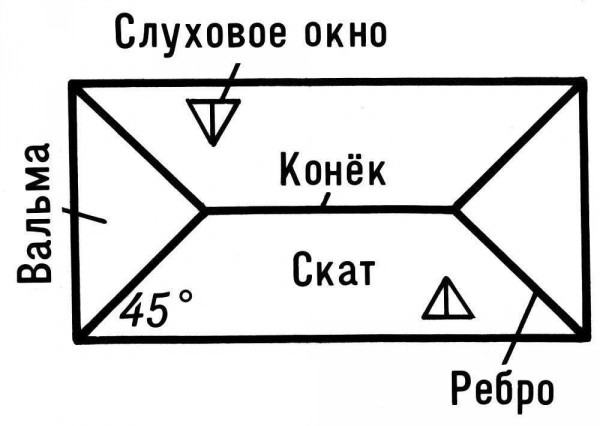
The hip roof consists of four slopes, its top view resembles a sealed envelope.
Hip roof device. View from above
The side slopes are trapezoidal, the slopes at the ends of the building are smaller in size, have a triangular shape and are called hips. The top line formed at the joints of the rafters forms a ridge. Its length is less than the length of the building to be covered. The joints of the side slopes and hips form ribs, the number of which is equal to the number of diagonal rafters. To drain the liquid into the storm sewer, a drain is formed in the roof structure.
Note: additional slopes significantly reduce the height of the ceiling in the room under the roof, which is why this type of roof does not allow the presence of a residential attic in it.
Architectural diversity
Depending on which geometric figure is taken as the basis for the design, the following options for creating a hip roof are distinguished:
Design advantages and disadvantages
The advantages of this type of roofing system include:
- Resistant to strong gusts of wind. A competent approach to the construction of the roof minimizes the likelihood of destruction of the structure on the overhangs.
- Protection of building facades from atmospheric precipitation due to the presence of overhangs on all sides of the building.
- Visual decrease in the height of the building. This effect is valuable if it is necessary to build a house into an existing building without disturbing its balance.
- Originality and high aesthetic qualities.
- The rigid roof structure, obtained through angular ribs, eliminates the possibility of deformation of the roof surface.
However, along with the advantages, the hip design also has its disadvantages, the list of which can include the following:
- Higher time and cost savings compared to a standard gable roof.
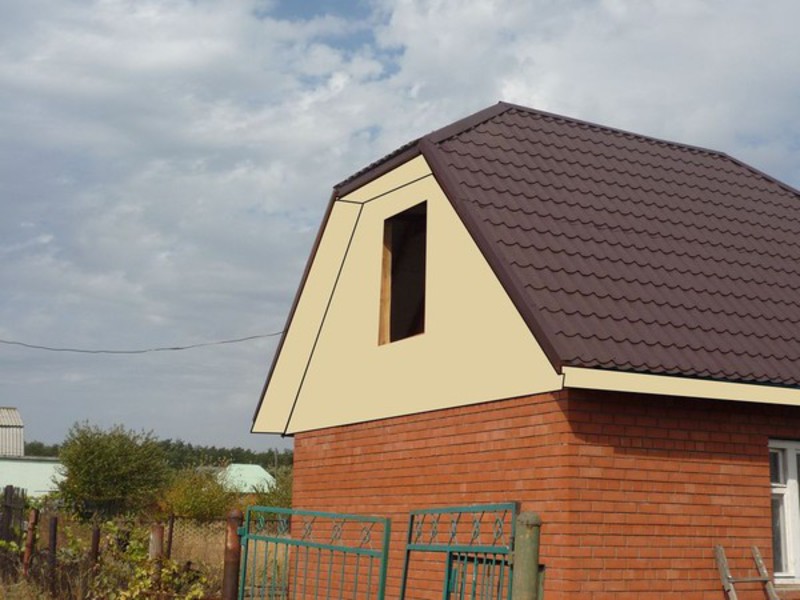
- If sloped skylights are built into the roof, there is a possibility of excess moisture entering the house. To avoid this, you have to constantly cover the windows before the rain, which is not always convenient.
- The impossibility of arranging the attic - the end slopes significantly reduce the area of the room under the roof.
Thorough preparation is the key to effective work
At the preparatory stage of erecting a hip roof, it is worth taking into account the type of material, the strength of the wind and the level of precipitation in the area.
Note: Hipped roofs are especially popular in areas where protection from strong gusts of wind is needed.
When choosing the angle of inclination of the roof, it is worth considering that in an area with a dry and hot climate or strong winds, the angle should be minimal (2–5 °); in climatic regions with heavy rainfall, the slope should be increased.
Before making all the necessary measurements, you can independently make a measuring rod from plywood, which will reduce the likelihood of measurement errors. It is recommended to immediately apply all the dimensions necessary for work on the rail. This will allow you to avoid multiple measurements, thereby saving time, and avoid mistakes that are often made during repeated multiple measurements with a tape measure.
It is recommended to start marking the roof from the centerline. It is located at the top level of the end wall trim. Then it is necessary to measure the thickness of the ridge board (the value of this indicator is divided in half) and outline where the first element of the rafter system will be located. One end of the strip for marking is applied to the line marked for the location of the first part of the rafter system, at the other end of it, the line of the inner side wall is marked, where the intermediate component of the rafter system will be located. By moving the rail to the line of the outer contour of the same wall and installing its opposite end on the resulting overhang, you can find out the exact length of the roof overhang. The exact location of the second component of the rafters is established by transferring the rail to the edge of the side wall and applying a mark between the side wall and the upper end of the strapping.
Payment
The calculation of the structural elements of the hip roof is based on the Pythagorean theorem. The main parameters of a hip roof include:
We select material and tools
The correct choice of material used in the manufacture of rafters has an important effect on the strength and durability of the hip structure. Whether the roof is a reliable shelter from bad weather or a flimsy structure subject to rapid wear depends on the responsibility of the developer. Deciduous and pine species are the most popular in the construction of a hip roof system. To avoid damage to wood by pests, the material must be well dried and impregnated with antiseptic agents. Professionals recommend using soft shingles as a material for the roof surface. It makes it possible to implement a variety of style solutions and saves both money and labor costs for installation. For the strength of the rafter system, roofing masters advise to select material of the same composition and cross-section, as well as to use a single fastener.
The list of required tools and materials should include:
- Screwdriver;
- Level;
- Hammer;
- Roulette;
- Circular Saw;
- Roof nails and screws;
- Pencil;
- Insulation;
- Waterproofing film;
- Wire (diameter 4 mm);
- Antiseptic;
- Marking strip.
After all the necessary measurements and calculations have been made, and the necessary requisites have been prepared, you can begin the installation of the roof structure.
Correct construction of a hip roof with your own hands
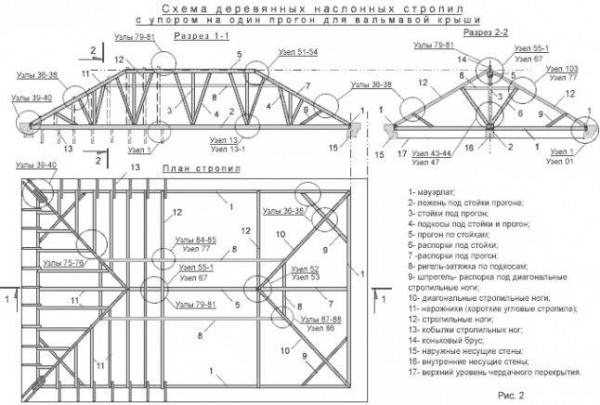
Initially, it is necessary to mount the base of the roof - Mauerlat. With its help, the weight of the roof is evenly distributed along the entire perimeter, therefore, to create a Mauerlat, a large-sized timber from hardwood is needed. To begin with, measure the desired length of the bar, saw off, apply a mark for sawing out the grooves of the connection. A wooden formwork is mounted on the masonry, a layer of concrete is applied to it, into which metal spikes are screwed. The base of the roof will be attached to them. When the concrete hardens, roofing material is laid on it or a layer of bituminous mastic is applied, which serves as a waterproofing.
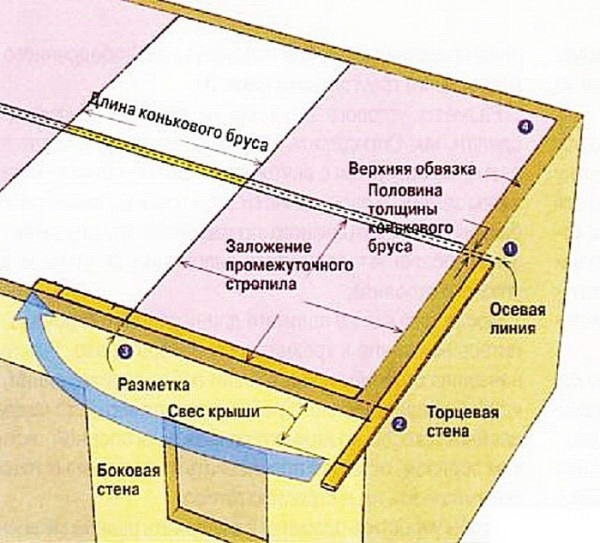
Hip roof marking scheme
Holes for the pins are drilled in the timber, carefully treated with an antiseptic and water-repellent varnish, after which the timber is pushed onto the pins and fixed with anchor bolts. It is not recommended to cut holes for rafters in the Mauerlat and use many studs for fastening, as this can negatively affect its strength.
After the Mauerlat is installed, you should mount the bench to support the ridge, and fix the supports themselves along its line.
A ridge beam is installed on the support posts. It is worth considering that the ridge carries the main load of the central roofing part, so it must have an impressive thickness. After that, you can start installing the rafter system. Sawing is performed in accordance with the calculated parameters. First, diagonal rafters are installed. All rafters are attached to the Mauerlat with special nails, wire, staples and corners.
![]()
The rafters are attached to the Mauerlat using special nails, wire staples and corners
Then the central rafters are mounted. The average distance between them is 60 cm, but the pitch can be adjusted depending on the angle of the slope and the type of roofing material. Corner rafters are attached to the diagonal rafters last.
After installing the rafter structure, a crate is nailed to it, after which a vapor barrier film is attached to the rafters using a construction stapler, and a tape for sealing is attached to the seams. Then the insulation and waterproofing are tightly laid on the rafters, after which wooden strips are attached across the rafters, finally fixing the insulation layer, and the outer covering.
Video: hip roof truss system
Video: mounting the Mauerlat on the armopoyas
Ventilation
Do not forget about roof ventilation, because air circulation is as important as waterproofing or thermal protection. From below, in the wind lining, air is entered, but it is better to make the exit higher, closer to the ridge beam. If the roof has a wooden wind sheathing, the boards are placed a few millimeters apart. Plastic filing should have perforated parts, or soffits. If there is a ready-made filing, and its elements are tightly assembled, it will be useful to mount small ventilation grills into it, placing them along the length of the filing at a distance of about 80 cm from each other.
A detailed study of the installation of the hip roofing system makes it clear that the process is not an easy one, but the effort is worth it. In this case, the main thing is accuracy in measurements and calculations and attentiveness during construction work. With strict adherence to the advice of narrow specialists, the result can be beyond praise. The hip roof has taken a strong position in modern construction due to its practicality and interesting design. In order for the roof to become a reliable protection from the gusty wind and turn the house into a miracle of architectural art, it is necessary to strictly follow the planned plan and check the quality of work at every stage. This will make it possible to correct shortcomings in the shortest possible time and avoid wasting time on correcting errors.


