How to make a broken roof with your own hands. What you should pay attention to when choosing such a design. Phased roof construction
In fact, a broken line is one of the types of a gable roof (where the attic expands the living space). The difference is that the ceiling is higher, therefore, the design is more complicated. Construction is most relevant for large rectangular houses, the minimum roof width according to classical standards is 6 meters, on narrower houses the usefulness of additional space becomes less. Nevertheless, this option is also suitable for small country houses - you can get a full-fledged room without a major overhaul.
With a sloping bottom and a sloping top, a broken-down roof can withstand strong winds just as well as a regular roof. The most popular is the hipped roof - it allows you to maximize the usable space and has a relatively simple rafter scheme. With good insulation, the attic floor is suitable not only for summer living, but also for winter. Moreover, modular installation greatly simplifies the construction - it does not require special equipment, it is enough to cut the rafters and posts at the fracture points at the desired angle and fix the nodes with plywood "kerchiefs" no more than 2 cm in thickness.
The shape can be any, but the most common is a parabola with triangular short and trapezoidal long slopes.
Also popular is a tent with full symmetry in the form of a cone, pyramid or dome (used for complex polygonal buildings).
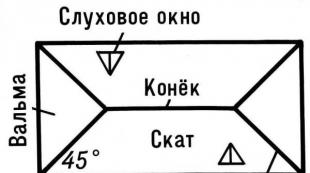
- Gable. Two slopes are directed oppositely, the top and bottom are rectangular, the planes are bent in the center, forming an edge. Most popular in rectangular houses, as the attic fits well into the design.
- Three-slope. Two ends, one with a vertical wall, the second along the break in the profile. The weight is much less due to the absence of a second wall, therefore, the load on the foundation is less. Best for connecting the attic to the roof of another house.
- Four-slope. The most complex type, includes a broken profile on all 4 walls, but weighs less than the rest. For the construction, an accurate calculation of the area and wind load is needed, on the basis of which the choice of materials and the section of the frame is made. Lovers of complex shapes can design 6-7 corners, but technically it is much more difficult and requires additional investment. Variety - a half-hip roof, consisting of an end slope with a cut off the bottom and top.

Roof calculation
For proper construction, 2 calculations are needed - the amount of materials and the bearing capacity of the rafters. In the first case, only geometry is the basis. For the second one should consider:

- roof covering weight;
- temporary load (weight of fences, bridges, windows, people and equipment during construction);
- step of the lathing and rafters;
- the angle of the slopes;
- the length of the spans from the ridge to the cornice;
- weight of insulation, steam and waterproofing, battens, counter battens;
- seasonal load in winter (approximate weight of the snow embankment).
After collecting all the necessary information, using special design programs, you can check whether the section is suitable for the roof, change the parameters and select the most suitable material and appearance in the visualizer.
The rafter system of the sloping roof is wooden (with the exception of alternative non-standard solutions), therefore, you should correctly choose the wood in the right amount. The beam for the Mauerlat, braces and rafter legs must be of suitable humidity, best of all from conifers. Optimum - 20% moisture, without knots and curliness and treated with an antiseptic. After installation on the Mauerlat, everything is fastened with brackets, the beams are fixed on studs 16-22 mm in diameter.
The lathing should be from edged boards. The volume depends on the design and material:
- 300-350 mm for rigid roofs;
- 15-30 mm for soft.
Consider fasteners, brackets, brackets with self-tapping screws for a more secure attachment.

Everything needed on the ground is harvested, including a detailed drawing and an action plan.
Sloping roof construction
Before starting, you should look on the network how the roof is made with your own hands from a photo - visually, everything is remembered much easier. In any case, you need to act, working out the main stages.
- Rafters / beams. An accurate calculation is needed, down to a millimeter, otherwise errors will eventually bring down the load-bearing part and break the rafters. The system of beams is set in the following way: the extreme ones - along two lines vertically, then - intermediate ones with a maximum distance of no more than 3 m.
- Wall frame. Runs from the boards are superimposed on the racks, after which the rest of the racks are placed. This is the frame for the side walls of the attic. The runs are secured with puffs, for the installation of the upper slopes and safe movement, supports are placed under the puffs. Then they are fastened with a board, additional ones are placed on top. Stiffening joints, side rafters and roof rafters (not available only in a 2-pitched roof).

Based on the rafter template, the board trim is temporarily attached to the extreme crossbar in a vertical form - this will be a rafter board. The top corner is exactly in the center of the roof. 2 more templates of the same shape are fastened with a strut at an angle and the rest of the rafters are placed. 4 braces of different directions are enough, the rest are fastened with an inch board. This will give stability to the work.
The photon frame, sheathing, cornices, ebbs, lathing and overhangs are installed. In a sloped area, insurance is important.
- Sheathing / insulation. Waterproofing is installed as a "roofing pie" - several layers of material, used specifically for a sloping roof, then the roof. A special film is applied to the crate, then a heater, roofing paper is put on it. Everything is fastened with dowels and a second layer of lathing is applied. Everything is superimposed on the counter racks. After insulation, the roof is laid. Although the design and features of a sloping roof differ from the usual, the roofing material and installation are standard. The best choice is iron or tiles for heat dissipation in the summer.
- The last stage is the gutters. They are needed to preserve the foundation, the absence will halve the service life of not only a house with a sloping roof, but any other.
- Window. Natural lighting and ventilation are needed in any case. Installation depends on the incidence of light, there are special double-glazed windows for attics. It should be remembered that installation at an angle (including in the roof) adds unnecessary stress. The best materials for windows are wood and PVC. the opening mechanism must be reliable and convenient, the slopes are made with a small protrusion above the surface.
- Interior decoration. The best option is drywall. Sometimes it is replaced with clapboard (more often - in country houses), but it requires additional lathing. Another alternative is plywood. For large rooms you need a frame made of bars, small ones can be sheathed without it. The slopes are sheathed first, then the gables.
- Frame. The step of the guides is no more than 60 cm. The sheets are fastened with self-tapping screws every 25 cm. The drywall is not attached end-to-end, because the roof may move slightly due to loads, it is better to leave a gap of 4-5 mm. After sheathing, the most difficult thing remains - to choose and paste the wallpaper.

With a constructive approach and careful preparation, a broken roof with your own hands is a completely feasible task. It will be even easier if you involve specialists (for consultation or direct assistance). The main thing is the correct choice of all the necessary materials and an accurate calculation.


