How to install a drain in the bathroom with your own hands - detailed instructions
Proper installation of a do-it-yourself bathroom drain allows you to minimize the possibility of overflowing the water bowl in the water treatment room. This room needs to be kept in order, as water can fill the tub faster than it drains. However, there is not only the possibility of flooding the floor, but also flooding the neighbors. The piping or drain-overflow system allows you to organize the drainage of water from the bath into the sewer channel.
Standard drain design and semi-automatic
The design includes several tubes with hoses connected to the sewer pipe system, as well as 2 bath openings:
- Upper.
- Lower.

The top drain is provided to regulate the volume of water in the bath and reduce the chance of overflow. Another hole is located at the bottom of the bowl, it performs the function of draining. The following items are included with the standard drain model:
- siphon in the form of a pipe;
- necks for drain and overflow;
- a tube for connecting the siphon to the sewerage system;
- corrugated hose for overflowing water into the siphon.

The siphon, or pipe, is a shutter against the penetration of pungent odors into the apartment from the sewer in the bathroom. To fill the bowl with water, you will need to cover the hole from the bottom with a cork. Proper operation of the drain system requires the timely replacement of seals that have already worn out. The semiautomatic device differs from the standard overflow model in a modernized design that includes all of the listed elements, as well as additional ones:
- Plug-valve.
- The cable responsible for controlling the cork.
- Rotary ring, valve, button, handle.
- A mechanism that allows you to lower and raise the cork.

For the whole system to work, the cable must be stretched and loosened. This is done by turning the valve or pressing a special button. In the design of the semi-automatic device, the drain-overflow hole is located behind the control unit.
Among the advantages of this system is the design and convenient operation of the structure. The disadvantage of the semi-automatic system is its not too high level of reliability.
Automatic drain device
If the budget allows, you can buy an expensive automatic model. It will also be beneficial to purchase an inexpensive standard model. Prices for automatic constructions are $20-55. A distinctive feature of the automatic mechanism is associated with the presence of a special valve. After pressing it, the plug automatically closes the drain hole in the tank.

The provided lock of the valve allows to keep its position. To drain the water, you need to press the button. Automatic lowering and raising of the valve occurs as a result of spring compression. The automatic drain system has the following main features:
- Drainage is controlled by feet.
- The visible part has a compact size.
- The presence of a large assortment of buttons.
The automatic drainage system is often used to equip baths for children. As a result, the water container does not need to be turned over manually to drain the water. The main disadvantage of an automatic bathroom drain and overflow device is the difficulty of replacing the button.
If a valve breaks down, the system is completely renewed. This is a rather serious drawback, since the price of an automatic bathroom drain device ranges from $ 60-280.
Replacing an old siphon and caring for it
If a puddle of water regularly appears on the floor in the bathroom after it does not drain completely into the sewer system, this means that the siphon has begun to leak. In this situation, you can not hesitate, that is, you will need to immediately start replacing the old siphon with a new part.

Otherwise, a breakdown will lead to mold due to an increase in humidity levels, an unpleasant odor and many other problems. Replacing the siphon and connecting the bath to the sewer with your own hands is done in the following sequence:
- The worn-out drainage system is being dismantled.
- The presence of burrs at the location of the neck is checked.
- The rubber gasket is installed.
- The drain pipe is pressed tightly against the gasket with the back.
- The gasket is placed on the front side of the siphon.
- A screw is inserted and carefully tightened.
- The drain and overflow neck is reinforced with corrugation.
- The siphon is connected to corrugated hoses.
- The hose discharged into the sewer is fixed to the siphon with a union nut.
The installed system does not require special care, so just read some tips to keep your drain in perfect order:
- semi-automatic and automatic require periodic processing of parts, which allows you to maintain the shine of the metal;
- regular inspections are organized in order to identify possible leaks;
- broken sealing requires changing the seal or tightening the joints;
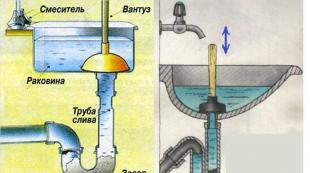
- a clogged siphon is cleaned with a plunger or with a small brush attached to a wire;
- elimination of blockages is carried out with the help of alkali contained in chemicals.
The listed measures are applied when there are problems with blockages, so the system needs periodic inspection and prevention.
What to pay attention to
From the very beginning, you need to figure out how to remove the old siphon. To do this, you need to have a set of wrenches for clamping nuts. They are easily unscrewed with a tool, and the entire system is disassembled into a certain number of component parts.

A mandatory element is the draining of water, which performs the function of a water seal by unscrewing the plug. In some cases, the nuts "grow" to the thread and it is almost impossible to unscrew them manually. Here the Bulgarian will come to the rescue.
Before you remove the old siphon yourself, you need to familiarize yourself with the drain diagram in the bathroom. To unscrew the clamping nuts, you will need to use a set of wrenches, which will make it easy to disassemble the old system into a certain number of components. In the process of fastening the drain and overflow neck, it is necessary to tighten the screw. It is important not to damage the element by calculating your forces.
In order for the fastening of parts to be reliable and there to be no leakage, silicone sealant will be required to coat the joints. It is necessary to use it before starting the assembly, since it is able to dry quickly. Drain replacement can be performed in a supine or sitting position.
When replacing a siphon, one should remember the rule, which is that the tightness of the tank will depend on the quality of work. Only a well-made repair will solve the problem with the drain. Expert advice will help you figure out how to properly replace the siphon yourself.

Proper installation of a drain in a bathroom requires the following recommendations:
- When carrying out work, the sequence must be observed.
- Seals will be required to process various joints.
- In the process of twisting parts, care must be taken.
- Tightening the threaded elements by hand ends with tightening them 1/4 of a full turn.
Connecting the bathroom to the sewer requires even tightening of the nut, so its stability should be checked every time. Do-it-yourself installation of the siphon in the bathroom should be started only after the bowl is securely fixed, which, if necessary, will need to be leveled and fixed. There should be a gap of 15 cm or more between the tank and the floor.


