How to cover the roof with metal tiles? Installation of a metal roof: instructions
Installation of a roof from a metal tile is that category of works which implies strict adherence to certain recommendations. Improper installation can lead to unpleasant consequences. The cost of a roof made of metal is on average 200-700 rubles / m 2. This price is offered by companies engaged in professional laying of the coating. However, you can cover the roof with metal tiles yourself.
A set of necessary tools
To work you will need the following:
- Electric jigsaw.
- Circular saw (with carbide teeth).
- Scissors for metal (manual).
- Hacksaw with fine teeth.
- Nibblers (electric).
- Roulette.
- Marker.
- Long rail.
- Hammer.
- Screwdriver.
When installing a roof made of metal, you can not use abrasive wheels, that is, a grinder. The polymer coating and zinc are burned out by high temperature. This leads to the formation of rust stains and active corrosion. Sawdust remaining on the surface can damage the metal tile. Accordingly, they must be removed after completion of work.
Basic Rules
When working with metal tiles, it is recommended to use EPDM galvanized self-tapping screws with a rubber gasket. They are screwed in with a drill with a reverse and speed control or a screwdriver. Scratches must be treated with the same paint that is applied to the metal tile.
Preparatory stage
After the rafters are installed, it is required to measure the roof slope. This is done to ensure that there are no inconsistencies with the project. Measurement of the diagonals will allow you to check the plane and squareness of the roof. Minor defects can be hidden by additional elements at the ends. The slope of the roof during the laying of tiles should not exceed 14 degrees.
Determining the length of sheets
When calculating the metal tile on the roof, it is necessary to take into account the size of the slope. The required length is the distance between the ridge and the eaves. To overhang the sheets, add 4 cm to it. If the length of the slope exceeds 7 m, then the sheets are divided into two parts or more. Since the roof is covered with metal tiles with an overlap of 150 mm, this distance must also be taken into account. During the fixation of long pieces, it is possible to reduce the number of joints. However, in this case, the process itself will become much more complicated.
General requirements
According to GOST, metal tiles should be stored in rooms without heating. In this case, it is necessary to protect the material from adverse climatic conditions. This refers to direct sunlight and rain. Factory packaging profiles are laid on flat ground. Bars are used as a stand. The recommended thickness is 20 cm, the step is 50 cm. If the storage period has already exceeded a month, then it is best to unpack the sheets of metal and stack them in piles. The recommended height is up to 70 cm. The shifting of sheets is carried out using a rail.

Ventilation, heat and vapor barrier: the main nuances
Not everyone knows how to properly cover the roof with metal tiles. Certain mistakes in the arrangement entail very unpleasant consequences. In order to avoid them, you need to know some features of such a roof. Condensation may appear on the inner surface of the sheets. This is due to daily fluctuations in temperature. In some cases, vapors appear rising from the lower part of the structure. This happens as a result of an increase in humidity in the under-roofing room. Under the influence of the above factors, the insulation gets wet. As a result, a decrease in its thermal parameters is observed. The following may also happen:
- In some cases, the roof freezes through.
- Rotting processes begin in the crate and wooden rafters.
- Mold occurs.
- The interior of the building may be damaged.
Prevention of undesirable consequences
To avoid unpleasant consequences, you need to do the following:
- Organize natural ventilation of the under-roof space.
- Take care of the vapor barrier (this will protect the insulation from moisture rising from the room).
- A waterproofing membrane or film must be used to prevent the effects of condensation.
- It is necessary to take care of a thick layer of insulation.

Requirements for laying materials
Rolled waterproofing should be rolled out on a heater between the cornice and the ridge in a horizontal plane. The recommended overlap is 15 cm. The indicator colored strip must be turned outwards. The film is laid with a sag of 2 cm. This is done to provide a gap for the insulation. If you violate these requirements, the film will lose its protective properties. To equip the heat-insulating layer, the insulation is overlapped. To ensure tightness, its pieces must be connected. It is best to use adhesive tape.
It is necessary to make a special gap. The recommended height is 4 cm. This will separate the metal tile from the waterproofing. Thus, natural ventilation will be provided. The gap is created using this to allow air to circulate between the ridge and the eaves. The filing for overhangs also requires the design of gaps - up to 5 cm. Care must be taken to release special holes in the ridge seal.
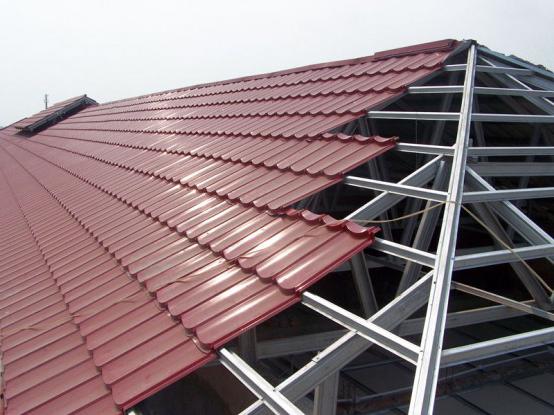
Features of the supporting frame
Since the roof is covered with metal tiles on the crate, you need to know a number of nuances in its construction. It is created using boards in combination with bars. The cross section of the latter is 5x5. First of all, the falling bars along the waterproofing film are nailed to the rafters from the ridge to the eaves. Boards must be fastened with strict observance of the recommended distances. The step of the crate must also be taken into account. In some places, a solid frame is required. In particular, this applies to the space next to chimneys, skylights and in valleys.

Features of a continuous crate
For its arrangement, two additional boards are nailed to the sides of the ridge bar. It is also required to make the end elements higher than the ordinary crate. The recommended height is equal to the size of the profile of the metal tile. The lower valleys must be fixed on a continuous crate at the points of internal joints. In this case, it is best to use self-tapping screws. It is required to make an overlap at the joints of the planks. It is determined in accordance with the slope of the roof. Then the laying of the coating sheets is carried out, which are cut in advance. After that, it is necessary to lay the upper bar of the valley.
Working with additional elements
It is worth paying special attention to the junction points. These points are very vulnerable. The metal tile must provide a tight connection to the exit points of pipes and walls. For this, an internal apron is provided on the roof slope. Its basis is the lower junction bars. They are applied to the walls of the pipe. Next, the top edge of the bar is marked. The strobe makes its way along the intended line. For this, a grinder is used. The shtroba must be washed and cleaned of dust. The lower junction bar should be cut in accordance with the calculations. It is installed and secured with self-tapping screws.
The installation of the apron can be done in a similar sequence. It is necessary to provide overlaps of 15 cm. They will exclude possible leaks. In the bar inserted into the strobe, it is necessary to seal the edge. In order to direct the water in the right direction (meaning the valley or cornice), a “tie” is inserted under the bottom of the apron. This is a flat sheet with rounded edges (sides). They are bent with pliers and a hammer. Then the roof is roofed with metal tiles along the inner apron and "tie".
After the laying of materials near the chimney is completed, you can proceed to the next step. This is the manufacture and installation of a decorative outer apron. Installation is carried out similarly with the internal. However, in this case, the upper edge is attached to the wall, and does not wind up in a strobe. Installation of gutters for downpipes involves the installation of holders on the bottom board of the crate. Accordingly, if snow melts, the load will be reduced. The gutter is inserted and fixed in the holders. In this case, the cornice strip must be connected to the crate. It is necessary that its lower edge overlaps the end of the gutter. The waterproofing membrane must be laid over the eaves film. Thus, the condensate will drain into the gutter.

Work algorithm
The roofing of the roof with a metal tile starts from the butt. The first sheet is fixed with a self-tapping screw near the ridge. The offset relative to the eaves is 4 cm. Since different specialists cover the roof with metal tiles in different directions, it is necessary to say about the features of the overlap. When laying from right to left, the second sheet overlaps the first from above. If the installation is done in the reverse order, then the overlap is done the other way around. The sheets themselves are fastened with self-tapping screws. They should be located in the upper section of the overlap. In this case, the sheets are not screwed to the crate. They must rotate relative to the axis of the self-tapping screw, with which the first sheet was fixed near the roofing ridge. The installation of the third element is carried out in a similar way.
All connected sheets must be aligned strictly parallel to the eaves. If docking is required along the length, then the order of work changes. All sheets (1-4) must be connected and aligned with the end of the roof. Fixation is carried out in a wave. Self-tapping screws are screwed in a checkerboard pattern. Sheets are fixed through a wave. Up to 8 self-tapping screws are required per square meter of coverage.

Installing additional items
Since the roof is covered with metal tiles according to a certain technology, it is necessary to know that the ends must be fixed with appropriate strips. They can be trimmed if necessary. Fastening is also carried out by means of self-tapping screws. The shaped seal can be placed on the ridge after the air vent is cleared. Then a flat or round bar is attached to it through the wave. Installation should be carried out with the following overlap - 10 cm. A vertical protective grille should be mounted on the roof. In the future, this will make it possible to move around the structure. With the help of galvanized screws, the fence grate is attached. They must be screwed into the support beam through the gasket and the cover sheet at the places of wave deflections. Then the support is securely fixed. Next, a fence is fixed on it. After that, a thorough sealing of the joints is carried out.
Finally
Laying metal tiles in accordance with all the rules will ensure the duration of its operation. All materials and tools must be prepared in advance. Accurate calculations will help to avoid inconsistencies. To protect the roof, ventilation, heat and vapor barrier are necessary. The crate must be arranged before laying the sheets. When installing it, it is necessary to use boards and timber of certain sizes. The inner apron is installed where there is a chimney outlet to the roof. Sheets are fixed in accordance with a certain order. The device of a roof made of metal tiles (a photo of the structure can be seen in the article) is, in general, a simple task. In order for the design to serve for a long time, it is necessary to strictly follow the recommendations.


