Installation of heating pipes
By installing heating pipes with their own hands in their own home, the owners are trying to make living conditions for their family as comfortable as possible at any time of the year. Ensuring high-quality installation of this system is a complex task that requires accuracy and attention.
In our article, we will consider the main stages and features of the heating pipeline device, we will present detailed instructions for its installation.
Stages of installation of the heating system
The device of the heating system must be carried out in strict accordance with the Sanitary Norms and Rules (SNiP 41-01-2003). This document provides for three installation steps:
- Creation of a heating system project. At this stage, there is:
- selection of materials and equipment;
- calculation of pipe diameters.
- Preparation of premises for the installation of equipment.
- directly.
Installation work must be carried out in such a way as to ensure the thermal and hydraulic stability of the heating system, guarantee its operation without accidents for at least 25 years.

Pipes for heating systems
Which pipes to choose for creating a heating system, in each case, is decided depending on the total size of the premises requiring heating, on the wishes and financial capabilities of the customer.
The total price (estimate) of the heating system installed in the house directly depends on the material of the pipes intended for use:
- Copper. Durable material - copper pipes can last up to 50 years. It has fairly good technical characteristics, but has a fairly high cost.
- Cross-linked polyethylene. A material that is used not only for the installation of a traditional water heating system, but also for the installation of underfloor heating.
- Polypropylene. The most popular and affordable material with excellent characteristics, used for heating cottages and houses in most cases.
Other types of pipes in relation to the heating system are considered less relevant today.
Heating system wiring
Important components of the installation of the heating system are also the distribution of heating pipes (single or multi-level) and the estimated number of radiators.
There are the following possible options for distributing heating pipes:
- Single pipe wiring. Suitable for small (up to 150 m2) rooms. With this type of wiring, only one pipe goes from the riser - first to the first radiator, from it to the next, etc. As a result, the temperature of each subsequent battery will be lower than the previous one. For this reason, it is often necessary to increase the number of sections in the radiators farthest from the beginning in order to ensure sufficient heating of the room.
- Tee wiring. This type of wiring allows you to connect several heating batteries to a single riser at once.
- Collector wiring. At the same time, direct and return pipes are connected to the heating riser, collectors are installed, radiators are connected to the collectors - each of them with a separate pipe.
Try to arrange the collectors in such a way that the length of the pipes from them to the batteries is the same.
Welding of polypropylene pipes of the heating system
Plastic (polypropylene) pipes have recently become the most used for creating water heating systems in houses.
You can entrust the installation of heating with plastic pipes to specialists who have all the necessary equipment for welding. But the process of welding polypropylene pipes is not very complicated and is quite accessible to everyone to do it themselves. The main thing is to follow the step-by-step recommendations.
The whole welding process consists in heating the pipe and the coupling, followed by a neat connection of the parts. In this case, strong adhesion occurs due to the mixing of the heated polypropylene of the two connected elements and the formation of a monolithic structure at the junction. The characteristics of the seam in this case practically do not differ from the properties of the original parts.
You can get an idea of how to weld plastic pipes by watching the following video:
First stage
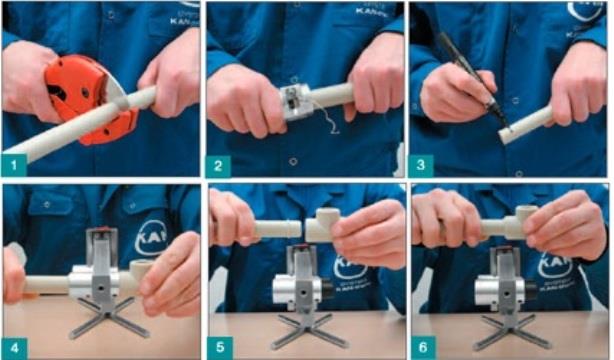
At the initial stage, the parts to be joined are prepared for soldering. In this case, it is necessary:
- Cut the pipes into pieces of the required length.
- Remove the chamfer from the outside of the pipe.
- Remove dirt from the parts to be joined, degrease them.
The chamfer parameters are regulated by both Russian and foreign standards:
- according to the German standard: chamfer slope - 15 degrees, depth - 2-3 mm;
- according to the Russian standard: chamfer slope - 45 degrees, depth - 1/3 of the pipe thickness.
To make a chamfer, you can use any tools that will allow you to remove the required layer of material fairly evenly.
In addition, you will need to find (purchase) and prepare an apparatus for soldering plastic pipes:
- Install the device on a stable special stand.
- Set the temperature controller to 260 °C. This temperature will ensure uniform and safe melting of polypropylene and will not damage the Teflon nozzles of the unit.
Soldering technology for polypropylene heating pipes
Instructions for welding polypropylene pipes involves the following sequence of actions:
- Wait for the soldering iron to heat up to a certain temperature (usually 260 degrees).
- At the same time, put the fitting on the mandrel (special nozzle on the soldering iron) and insert the pipe into the sleeve.
- Maintain the heating time specified in the instructions for the device. It depends on the wall thickness of the pipe and its diameter.
- At the same time, remove the parts from the nozzles and connect them.
- Wait for spontaneous cooling of the assembled structure.
This, in fact, ends the process. The system is now ready for performance testing.
Features of welding polypropylene pipes
However, there are some features that should be considered in the production of welding work:
- The nozzles of the welding machine are made in such a way that they form a cone with a slight inclination (up to 5 degrees) and have a diameter equal to the nominal diameter of the pipe only in the middle. Therefore, the pipe will fit into the sleeve with some effort. The same applies to fitting the fitting on the mandrel. Insert the pipe into the sleeve until it stops. You can't push any further!
- To designate a “border” that should not be crossed and to control the correctness of the process, you can mark a distance on the outside of the part equal to the depth of the sleeve.
- It is necessary to connect heated parts as quickly as possible to avoid cooling of the molten material.
- It is impossible to displace (shift, rotate) the hot connected parts of the system relative to each other. Otherwise, you can get a poor-quality connection, which will soon fail.


