How to make a built-in wardrobe with your own hands (instruction)
There is not always enough money to buy a closet, which is necessary in every apartment. Another problem that people face is the lack of free space. You can solve problems by making a built-in wardrobe with your own hands. This option of space zoning is used in houses and apartments where there is free space along the wall, in a corner or a niche.
Built-in wardrobes have sliding doors, which significantly saves space in the apartment. In addition, such a piece of furniture fits perfectly into any interior, making the room more cozy and comfortable. Sliding wardrobes perfectly hide flaws, integrates with other shelves, lockers, hangers.
For the proper organization and layout of the built-in wardrobe, you need to understand the dimensions, configurations, fittings, drawings.
Built-in wardrobes are divided into several types:
- They are made in the dead end of the corridor, hallway or any room of the apartment.
- They are built into the corners, combining a wardrobe with a dressing room.
- Created in a niche, one of the most popular options for built-in wardrobes.
- They are arranged along the entire wall, the so-called straight option. Looks great in a narrow and wide passerby, corridor and room. The straight design should have sliding doors so as not to interfere with the movement of the occupants.
- They are made in the form of a walkway between the bathrooms and bedrooms, two adjacent rooms. It looks good in apartments in which there is a small corridor in front of the room. Its functional purpose is minimal, so you can combine the closet with the bedroom, separating them with sliding doors. The bedroom will have its own dressing room, where you can move things, a table and put a large mirror there.
The basic forms for a built-in wardrobe in a wall or niche are the corner or straight version of this piece of furniture. When installing a wardrobe in a niche or wall, you need to take into account the important features of assembly and installation:
- The distance between the side walls, which are needed for the installation of doors. In particular, the rear wall may have bumps, chamfered corners, create them, which will create problems with the installation of the roller system.
- Ceiling height.
- A cabinet in a niche may not have side walls, and a built-in cabinet along the wall excludes the presence of a rear wall and one of the side partitions. This is a great way to save material.
Size calculation

To properly install the cabinet along the wall or place it in a niche, you need to correctly measure all the necessary parameters - width, height, depth of the compartment, shelves, cabinets, drawers. First of all, installing a built-in wardrobe requires determining the correct height. Usually this type of furniture is installed directly under the ceiling. So you can avoid the occurrence of dust, cobwebs and dirt, which must be constantly fought. The height of the cabinet must be measured at several points, since the ceiling has a curvature with an error of a few millimeters.
A cabinet in the entire wall or in a niche can have different depths:
- If there are only one shelves, you should not make a very deep compartment. The depth can be 30 centimeters, but no more.
- If you plan to install hangers that will stand perpendicular to the doors, then this parameter should not exceed 60 centimeters.
- In one case or another, it is necessary to add another 10 centimeters, allotted for the width of the doors.
The following factors influence the width calculation:
- Edge thickness.
- Installation of internal hinges.
- Guide width.
- Potholes, bumps and sockets in the wall.

Installation of a built-in wardrobe in a niche requires adding or subtracting 5 centimeters from the width, which will allow you to accurately insert the compartment into the recess in the wall.
Making a drawing
To make a built-in wardrobe, you need to draw up a diagram and drawing. First you need to plan the interior space - shelves, hangers, bedside tables. If the shelves are made of chipboard, then their thickness will not exceed 16 mm (standard chipboard thickness).
The interior space in the drawing must be divided into two parts. Shelves and drawers will be located in one compartment, and in the second you can put bedside tables and place a bar for hangers.

The drawing should also take into account how often certain things will be used. On the lower tiers, it is necessary to install shelves and drawers in which clothes, accessories, shoes will be located, which residents constantly take out of the closet.
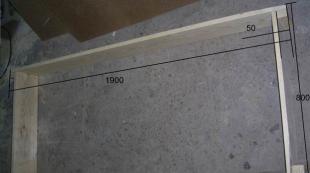
 Dimensional drawing example
 The width of the area allotted for the bar and hangers should be 1 meter. The bar is mounted on top, and boxes are placed below, which should have a height of up to 50 centimeters. If shelves are made, then a distance of 30 cm must be made between them.
Schemes of a cabinet built into a niche or equipped along a wall should also take into account the sliding door system. The drawing must correctly reflect the proportions of the ratio of height and width. It is easy to calculate the required parameters. One part of the width corresponds to four parts of the width of one sliding door leaf.
The width and thickness of the doors must have enough space for the installation of rollers, which require no more than 10 cm of space for installation. Doors are made of chipboard, the thickness of one sheet should be 1.6 centimeters.

Thus, all measurements taken earlier must be applied to the drawing, which will allow you to correctly and without problems assemble the structure, put it in place. It is worth spending a little time on drawing up a drawing, so that later, according to the project, you can carry out a phased assembly of the product with your own hands at home.
Applicable materials
An important preparatory moment before assembling the cabinet is the choice of material from which the built-in wardrobe will consist. It is best to use natural wood, which is durable in operation. But the price of wooden boards is high, which makes it difficult for every person who wants to assemble a wardrobe on their own to use them. In addition, one must also take into account the fact that in niches and near the wall there is always the highest level of humidity, due to which the surface of the wood can swell and begin to rot.
The following types of materials are excellent substitutes for natural solid wood:
- Plywood.
Plywood is made from veneer, sheets are then glued together under pressure. The number of layers in plywood can be different, but it must be a multiple. This material is quite durable, but also exposed to moisture. The cost of plywood is lower than that of wood, which is why it is used for the manufacture of cabinet furniture at home. Before assembling a wardrobe from plywood, the sheets must be treated with drying oil.

A full-wall sliding wardrobe can be made from chipboard panels, which are made from pressed wood shavings with impurities of various resins. They contain various chemical compounds, so chipboard sheets should only be purchased from certified stores. But it should be borne in mind that chipboard does not hold the shape of the structure and fasteners well.
For several years, chipboard has been competing with finely dispersed fraction (MDF), which is durable and is created in accordance with modern requirements for the manufacture of MDF. Sheets are made from wood dust, squeezed under a very high temperature. As a result, the material releases lignin material, which binds wood particles together. MDF perfectly holds both fasteners and accessories.
Fittings and tools
It is impossible to assemble a wardrobe at home without the necessary tools and accessories. The following parts must be purchased from a specialist shop:
- Two sets of monorail rails to be installed on top and bottom of the cabinet. Sliding doors will move along them.
- A set of rollers capable of holding doors.
- Stoppers.
- Door hinges.
- Pins for mounting.
- Screws, including short ones, the length of which should not exceed 1.6 cm.
- Terminals and adhesive tape (preferably double-sided).
- Brackets and caps for screws that have a hexagonal female thread.
- Brush seal, which is used as a dust protection.
- Dowel.
- Edges.
You will also need shelves, doors, drawers and cabinets, which can be plastic, furniture panels and baskets.

To make a cabinet, you will need an electric drill, which is needed in order to make holes in the wall and MDF chipboard sheets. It will need drills of various diameters and functional purposes, since you need to drill ends, shelves, doors. You also need a reverse screwdriver with different nozzles, a screwdriver, an awl, a tape measure, a square, a vacuum cleaner, a hammer, pliers, a stationery knife, adhesive tape, a special building hair dryer, a vacuum cleaner (to remove dust).
Cabinet installation at home
One person will not be able to assemble the closet himself and build it into a niche or place it along the wall. You will need the help of another person who will supply small parts, cut off adhesive tape, change tools.
A sliding wardrobe in the entire wall or in a niche should be mounted in stages:
- First, assemble the main structure by drilling holes in the top panels, side and base. After that, the cabinet is assembled piece by piece.
- Secondly, reinforce the side walls with metal or plastic furniture corners.
- Thirdly, make recesses for the pins to be inserted and secured. Shelves are attached to the top.
- Fourth, assemble the sliding system. First you need to fix the guide rails. After that, it is necessary to fix the rollers, which are inserted into the upper guide, and then onto the lower one, for which you need to raise the door. And only then are the far and near sashes hung in turn.
- Fifth, check how the doors “walk”, which will allow you to install and adjust the stoppers.
When the whole structure is assembled, you can put things on shelves and boxes.

Thus, the built-in wardrobe is not a problem to assemble on your own. It is necessary to follow the instructions exactly, performing all the steps step by step.
