How and with what to cut curves and circles
Often, when repairing or installing various wooden products, it is required to drill a perfectly round hole. In this article we will try to highlight all the ways in which such a hole can be cut. Options will be considered with the use of special tools, as well as without them.
How to cut plywood
A hacksaw with a very narrow blade, a jigsaw, a drill saw, and a round file are hand tools that can be used to cut curves.
It is the narrow blade that provides the hacksaw with maneuverability, but for the same reason it is extremely difficult to guide. It is necessary to have a firm hand and an attentive eye in order to prevent deviations from the markup. At the same time, do not try to work quickly. On the contrary, it is better to advance in small jerks. This will help you more confidently hold the handle of the saw and guide it exactly along the given line.
It is better to cut small round or oval holes and “narrow” curves with the help of special tools - a drill saw and a round file, which can also be used to clean rounding.
However, the most suitable tool for cutting rounded parts and holes is to recognize an electric saw. Its advantage is not only that it saves time and effort. The included set of interchangeable blades with different teeth allows you to choose a blade for sawing almost any type of workpiece, whether it is wood, plywood or chipboard. In other words, the electric saw can rightfully be called a universal tool.
Round corners of furniture
Hitting the sharp corner of the table can even hurt you. Therefore, we recommend cutting corners where possible. For homemade furniture, they must be rounded from the very beginning.
Cutting circles and curved lines is no more difficult than making an absolutely straight cut on a workpiece, but on one condition: you have the right tool in your hands and you are good at it.
Mark drop-down parts
It may happen that the holes that you drilled to insert a narrow blade of a manual or electric saw will be in useful areas. To avoid such errors, you should mark all the drop-out parts of the workpiece with hatching.
What is suitable for the template
You can make a circle on the workpiece not only with a compass. For this purpose, any object of a similar shape will do. It can be a saucepan, a plate, a cup or a bowl. However, when undertaking work related to the repair of furniture or some piece of furniture, calculate in advance the need for details of rounded contours or with round holes. It may be sufficient to make only minor changes to the design.
Instead of a compass
A school compass can also be useful in a home workshop, but its radius of action is small. And if you need to draw a circle of large diameter?
An easy way is to do it with string, a nail and a pencil. The nail is carefully driven into the workpiece, the rope is fixed on it at one end, and the pin is fixed at the other end. The length of the rope determines the radius of the circle being drawn. The only condition is that the rope must be taut along the entire path of the pencil. Then the distance from the center (nail) to the circumference in all sections of the markup will be the same.
Strip of cardboard or slats
An equally simple, but more reliable way is to use a strip of cardboard instead of a rope or, even better, a wooden plank. Drill two holes in this bar (strip) - one, smaller, for a nail, the other, larger, for a pencil. The distance between their tips should correspond to the radius of the desired circle. It remains only to install a nail in the right place and turn the bar around the axis.
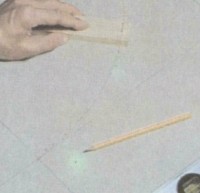
Two sharpened nails and a wooden plank or a strip of thick cardboard can replace the compass.
How to draw ellipses
An ellipse is a rather complicated shape, but to draw it on paper, you only need two buttons, a piece of string and a sharpened pencil.
Fix two buttons on the surface of the workpiece at a certain distance from each other. Take a piece of string, tie both ends in a knot and hook the string around the button heads. Now draw a line with a pencil that the stretched rope allows you to describe. You can change the shape of the ellipse as you wish.
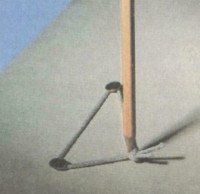
The distance between the two focal points of the ellipse is indicated by buttons. If you lead a pencil within the boundaries allotted to it by a rope, then an ellipse outline will appear on paper.
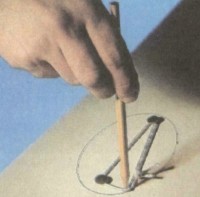
The shape of the ellipse can be larger or smaller, thicker or narrower, depending on the distance between the buttons and the length of the rope.
Templates
Wine glasses, cups, plates, pots or baking dishes - in any household there are many round-shaped objects that can be used to mark a circle. If you are making something and decide to give your product a rounded shape, then first look to see if there is a suitable template among the household utensils. To be sure, select a few items and take them to the workshop. There you can immediately try them on the workpiece and determine what is most suitable. After some practice, you will be able to make rounded lines from several round objects with different radii. Arcs of a circle can be drawn sequentially, or you can draw bridges-transitions between individual arcs.
preliminary drawing
Before attempting to draw a curve on a blank, design it on a large piece of paper or a piece of corrugated cardboard. Only after a satisfactory result has been achieved in all positions, can you cut out a template from paper and mark it on the workpiece.
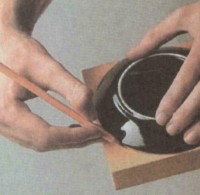
You can draw circles and fragments of a circle using a cup or plate, simply tracing them with a pencil.
Sink insert according to the template
The sink is one of the most important pieces of kitchen equipment. If you decide to embed the sink into the countertop of the kitchen worktop yourself, then the first thing to do is to prepare an exact template.
First, transfer the outer contour of the sink onto a thick sheet of paper. Next, measure the width of its sides, with which it will rest on the countertop. Usually it is 2-3 cm. Now step back from the outline drawn on the paper, inward to the width of the rim and draw a parallel line. This will be the cutting line.
When marking, make sure that the position on the plate of the template itself is correct. Of course, if all the corners of the shell are symmetrical, then nothing terrible will happen if it turns out to be, according to the markup, as if in a mirror image. But if the shell is trapezoid and the roundings at the front corners are different from the roundings at the back, then in no case confuse the front and back.
In a similar pattern, make templates and cut out holes for wall lights or for a speaker mounted on wooden panels.
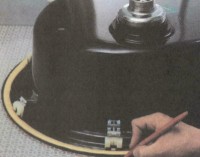
The line drawn around the sink is auxiliary. The second, drawn parallel closer to the center, is the sawing line.
electric hacksaw
If you need to cut a rounded part and saw through a round hole in the workpiece, then an electric saw is the most suitable tool. With its help, you will save time and effort, since such a saw has great advantages over a manual one. So, the blade of the electric cutter is narrower, which provides increased maneuverability. Further, it has interchangeable blades with different teeth, which allows you to process workpieces of any type, that is, wood, plywood, chipboard (it is no coincidence that the tool is also called a jigsaw).
To cut a section inside the workpiece, a hole is first drilled for a hand saw. But if you have an electric saw, then this is not necessary. The tool is brought to the workpiece with a slight forward inclination and is turned on in this position. The saw cuts the hole itself. Just do not put too much pressure on the body - this can lead to breakage of the saw blade.
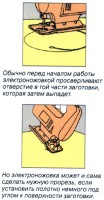
Lead in a circle
This device, simple in design, makes it much easier to cut round holes or arcs. It is enough to mark the center of the circle on the workpiece, fix the fixture at the mark and connect the rod coming from it with the electric saw. The divisions on the rod help to set the saw blade at the distance from the center of the circle, which is necessary. As a result, without preliminary marking, you can cut a circle or saw through an arc with a radius of 5 to 20 cm.
The device (more precisely, its “sole”) is attached to the surface of the workpiece with screws. They must be well tightened. If the mount is not rigid, starts to hang out, then an even circle will not work.
Suitable for lefties too
Left-handers can also use the device, since the guide rod is attached to the movable unit both on the left and on the right. So saw at your own discretion - clockwise or counterclockwise.
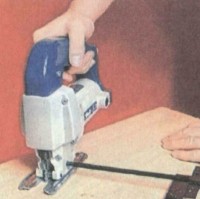
Using such a device, it is possible to cut a round hole in the workpiece with a diameter of 10 to 40 cm without preliminary marking.
jigsaw
When cutting holes or curves in small workpieces, sometimes a jigsaw is indispensable. Interchangeable blades with teeth of different shape and arrangement allow you to work with wood of various densities. However, it should be borne in mind that the depth of cut is limited by the arc of the jigsaw, that is, the saw blade will not be able to move further than 30 cm from the edge of the workpiece.
Very thin, narrow saw blades can be easily damaged if the jigsaw is not used correctly. It is necessary to drive the saw with neat, methodical movements. The main thing is to prevent the canvas from skewing. Otherwise, small and light workpieces will begin to move with the saw, which may eventually cause the blade to burst.
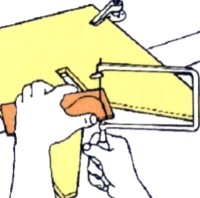
The thinnest jigsaw blade will “master” the narrowest curve, but only in small workpieces, since the advancement of the blade is limited by the jigsaw arc.
Boring saw
Neither a manual nor an electric saw will help if you need to cut a small hole in the workpiece - less than 10 cm in diameter. A jigsaw can also be useless if the workpiece is large. In this case, the most suitable tool is a drill saw. With its tip, it bites into a tree like a drill and thus makes a “starting” hole for further cutting. Outwardly, the saw is similar to a round file, with the difference that its core goes around the cutting edge in a spiral.
Drill saws are available with interchangeable nozzles of various diameters, designed for processing both softwood and hardwood, as well as a variety of materials from it.
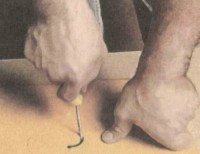
The working body of a drill saw is a metal rod with a cutting edge, like a gimlet, and a cutting edge that goes around the rod in a spiral.
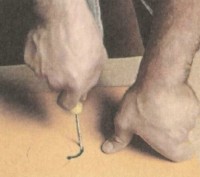
This is what the narrowest of hand saws looks like. Thanks to the fastening unit, the blades in the hacksaw can be changed depending on the nature of the material being processed.
Drill attachment
One of the most popular and convenient options for cutting a hole is a special nozzle for a drill. It is made in the form of a crown crest and has a rounded shape. With this nozzle, holes are cut quickly and they are quite even.
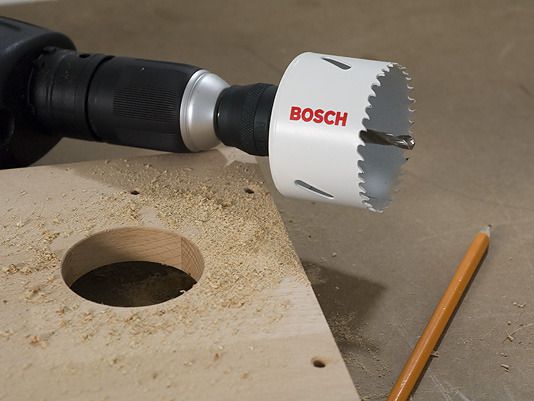
hole drill bit
Nozzles come in different diameters, which allows you to cut a hole of the required diameter. If you have already prepared a hole, we can advise you to try yourself in options trading.
Drill
You can also cut a large hole with a drill. To do this, it is necessary to pre-mark the contour of the drilled hole. Next, with a small drill, drill through holes along the contour prepared in advance. Next, with a jigsaw or a very sharp knife, we cut off the holes, thereby connecting the holes. After that, you can smooth the circle with the help of skins of various grain sizes.
Chisel
You can also cut the required hole with a chisel. It is enough to remove the wood along the contour layer by layer. This option is the least suitable for interior design. The hole must be even, which cannot be achieved using improvised and unsuitable materials. The best option would be to use a crown on a drill. The hole is smooth and has smooth edges.
Thus, summing up, it becomes clear that you need to choose a tool for cutting a hole based on your goals. If you need a high-quality cut, then you can not do without a special tool.


