How to make a solar battery at home: 3 elements
Solar panels allow you to process the energy of the sun to generate electricity. The system is quite popular, but expensive. You can reduce the cost of the design by doing the manufacture at home. To work, you will need to study the principle of operation, the process of soldering and assembly.
Components for making a solar battery with your own hands
To get electricity for free, solar panels are used, which are gaining more and more popularity every year. But the process of obtaining solar energy can be even more cheapened by self-assembly of the module.
Scheme of a homemade solar battery:
- Collector installation;
- Voltage accumulator;
- inverter.
The collector is a compact design of small elements. The system converts solar energy into a stream of positive and negative electrons. The collector cannot create high voltage.
One part is capable of producing 0.5 watts. The collector generates a voltage of 18 watts. This energy is enough to charge a small battery. For large volumes, an increase in the area of \u200b\u200bthe solar battery will be required.
Batteries provide the required amount of energy. The work of one battery will not be enough. But here the role is played by electrical appliances that are powered by a solar module. The number of batteries will have to be constantly added. Along with this, do not forget to update the collectors. One battery may require 10 batteries.
Batteries and collectors are purchased in specialized stores. Materials for the battery will serve as improvised means.
The inverter converts the received solar energy into current. When buying a part, you should study its characteristics. The power of the device must be at least 4 kW.
Do-it-yourself calculation of electricity from solar panels: preparation
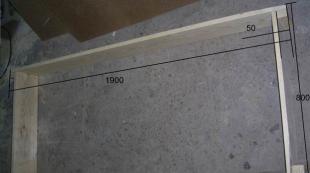
You can make an assembly of the structure from improvised materials. So the frame is made of duralumin. You can take other material, but be sure to perform protective painting. This will help save on the installation of the structure. But if you wish, you can purchase a finished frame in a specialized store.

In self-manufacturing, for starters, a calculation is carried out. The required battery charge is taken as the basis. This indicator is considered the main one, and is divided by 0.5 watts. As a result, it receives the required number of elements.
A charge current of 3.6 A requires the connection of three series circuits. So the number of elements is multiplied by 3. By multiplying the obtained data by the cost of the element, you can get the price of the solar battery.
The elements of the solar module must be connected in a parallel-series circuit. In each chain, there must be an equal number of elements.
The calculation of electricity in practice will be less. This is due to the uneven flow of solar energy throughout the day. For efficient operation, you will need to use several batteries at once.
Required tools for self-assembly:
- soldering iron;
- Rosin;
- Installation wire;
- Silicone sealant;
- Double sided tape.
Tools may vary and their number may change. To place all the elements on the frame, a structure with dimensions of 90x50 cm will be required. For other dimensions of the finished structures, other calculations are carried out.
Tips on how to make solar panels yourself: the soldering stage
The optimum temperature for panel operation is 70-90 degrees. But it is difficult to control the indicator. To simplify this work, ventilation holes are made in the frame. The diameter of the holes is 1 cm. You need to solder the parts yourself.

A set of parts for plates should be purchased from the store. This is not a cheap purchase, but more profitable than buying a ready-made solar panel from the manufacturer. You need a silicon wafer that converts solar energy into electricity. They are made from polycrystalline silicon.
The sequence of soldering elements:
- According to the blanks, we cut the conductors;
- We fix the details in the right places;
- We apply acid and solder to the contacts;
- Then install the conductors;
- We start soldering the elements.
Flipping a soldered system can be difficult. Therefore, the elements are fastened first, and then the rows. On the extreme details, a bus should be made for a positive and negative charge. The output wiring is equipped with insulation. A terminal is installed on the outside of the frame.
In case of soldering problems, it is required to file the contacts with sandpaper.
The panels are then attached to the frame. When attaching, use a silicone-based sealant. It acts as a binding agent of the panel with the frame. When the whole structure is assembled, you need to check its serviceability. A special tester is used here. The readings of the device should be 17-19 watts. The procedure should be carried out for several days and only then sealed.
There should be a layer of sealant between the frame and the plexiglass. It is required to wait until the substance completely hardens. Fixing plexiglass is carried out using self-tapping screws. Joints are also treated with silicone.
How to assemble a solar battery with your own hands: finishing work
After soldering the structure, it is necessary to complete the assembly of all elements into one system. First, pay attention to inverters. They work for the processing of electricity.
Varieties of inverters:
- Systemic ones act as an additional source of energy. When processing current together with a central source, batteries can not be used.
- Hybrid - can become the main source of energy. But it is better not to abandon the main source. Such systems can not only process, but also store energy.
- Autonomous designs are used as the main power source. Batteries are required for operation.
The required amount of battery is based on the required power. In this case, attention should be paid to the batteries and the height of their installation. The higher the structure is, the more efficient the module will work.
For a private house, a battery power of 4 kW is required.
The battery is attached to the battery with a diode. This is to prevent the panel from discharging at night. The charge controller will also provide protection. Less powerful batteries can be built using a copper sheet and a plastic bottle. Salt and warm water are required for the structure to work. From the tools you should take sandpaper, an electric stove and a tester. Often, tin cans are used as a material for the manufacture of a solar battery. They are usually made from aluminium.
DIY solar panels (video)
To assemble the structure with your own hands, you need to connect all the elements in series. The basis for a solar battery is three elements: a battery, a convector, an inverter. The frame can be made from improvised materials.


