Making a solar battery for your home with your own hands
The energy generated by one module is not enough to meet the energy needs. The photovoltaic converters are interconnected by one series circuit.
Parts that make up a solar battery:
- solar modules combined into frames. In one frame, from units to several tens of photovoltaic cells are combined. To provide electricity to the whole house, you will need several panels with elements.
- . It serves to accumulate the energy received, which can then be used at night.
- Controller. It monitors the charging and discharging of the battery.
- . Converts direct current received from solar modules to alternating current.
Solar module (or photovoltaic cell) It is based on the principle of p-n junction, and in its structure is very similar to a transistor. If you cut off the hat of the transistor and direct the sun's rays to the surface, then a meager electric current can be determined by the device connected to it. The solar module works on the same principle, only the transition surface of the solar cell is much larger.
Like many types of transistors, solar cells are made from crystalline silicon.
According to manufacturing technology and materials, there are three types of modules:
- Monocrystalline. Made in the form of cylindrical silicon ingots. The advantages of the elements are high performance, compactness and the longest service life.
- Thin film. The layers of the photoelectric converter are deposited on a thin substrate. The efficiency of thin-film modules is relatively low (7-13%).
- Polycrystalline. Molten silicon is poured into a square mold, then the cooled material is cut into square plates. Outwardly, they differ from single-crystal modules in that the edges of the corners of polycrystalline plates are not cut off.
Battery. Lead-acid batteries are most widely used in solar panels. A standard battery has a voltage of 12 volts; battery packs are assembled to obtain a higher voltage. So you can assemble a block with a voltage of 24 and 48 volts.
Solar charge controller. The charge controller acts like a voltage regulator in a car. Basically, 12 volts give out a voltage of 15 to 20 volts, and without a controller they can be damaged by overload. When the battery is 100% charged, the controller turns off the modules and protects the battery from boiling.
inverter. Solar modules generate direct current, while household appliances and appliances require alternating current and a voltage of 220 volts. Inverters are designed to convert direct current into alternating current.
Selection of components for manufacturing
To reduce the cost of a solar station, you need to try to assemble it yourself. To do this, you will need to purchase the necessary components, some elements can be made by yourself.
It will be possible to independently collect:
- frames with photoelectric converters;
- charge controller;
- voltage inverter;
The largest costs will be associated with the acquisition of the solar cells themselves. Parts can be ordered from China or on eBay, this option will cost less.
It is prudent to purchase serviceable converters with damage and defects - they are simply rejected by the manufacturer, but they are quite serviceable. You cannot buy elements of different sizes and power - the maximum current of the solar battery will be limited by the current of the smallest element.
To make a frame with solar cells you will need:
- aluminum profile;
- solar cells (usually 36 pieces for one frame);
- solder and flux;
- drill;
- fasteners did;
- silicone sealant;
- copper bus;
- a sheet of transparent material (plexiglass, polycarbonate, plexiglass);
- a sheet of plywood or textolite (plexiglass);
- Schottky diodes;
It makes sense to assemble the inverter yourself only with low power consumption. A simple charge controller is not so expensive, so there is not much point in wasting time on making the device.
DIY manufacturing technology
To assemble solar panels you will need:
- Design a frame (case).
- Solder all the solar cells in a parallel circuit.
- Fix the solar cells to the frame.
- Make the housing airtight - direct contact with atmospheric precipitation on photovoltaic cells is unacceptable.
- Locate the battery in an area with the highest amount of sunlight.
To meet the energy needs of a private house, one solar panel (frame) will not be enough. Based on practice, 120 W of power can be obtained from one square meter of a solar panel. For the normal energy supply of a residential building, it will take about 20 square meters. m. area of solar cells.
Most often, batteries are placed on the roof of the house on the sunny side.
Case assembly

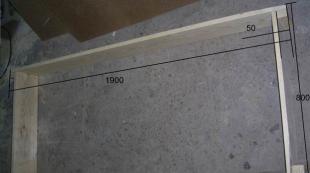
The body can be assembled from plywood sheet and slats, or from aluminum corners and sheet and plexiglass (textolite). It is necessary to decide how many elements will be placed in the frame. It should be borne in mind that a gap of 3-5 mm is required between the elements, and the size of the frame is calculated taking into account these distances. The distance is necessary so that during thermal expansion the plates do not touch each other.
Assembling the structure from aluminum profile and plexiglass:
- a rectangular frame is made from an aluminum corner;
- Holes for fasteners are drilled in the corners in the aluminum case;
- silicone sealant is applied to the inside of the body profile around the entire perimeter;
- a sheet of plexiglass (textolite) is installed in the frame and tightly pressed against the frame;
- at the corners of the case, with the help of screws, fixing corners are placed, which securely fix the sheet of transparent material in the case;
- the sealant is allowed to dry thoroughly;
Everything, the body is ready. Before placing the solar cells in the housing, it is necessary to thoroughly wipe the surface from dirt and dust.
Photocell connection

When handling photoelectronic elements, it should be remembered that they are very fragile and require careful handling. Before connecting the plates in a serial chain, they are first carefully but gently wiped - the plates must be perfectly clean.
If the photocells were purchased already with soldered conductors, this simplifies the process of connecting the modules. But before assembly, in this case, it is necessary to check the quality of the finished soldering, and if there are irregularities, eliminate them.
On the photovoltaic plates, there are contacts on both sides - these are contacts of different polarity. If the conductors (buses) have not yet been soldered, you must first solder them to the contacts of the plates, and then connect the photovoltaic cells to each other.
To solder busbars to photovoltaic modules, you need:
- Measure the desired length of the tire and cut into pieces the desired number of strips.
- Wipe the contacts of the plates with alcohol.
- Apply a thin layer of flux to the contact along the entire length of the contact on one side.
- Attach the tire exactly along the length of the contact and slowly draw a heated soldering iron over the entire soldering surface.
- Turn the plate over and repeat all soldering operations on the other side.
You can not strongly press the soldering iron to the plate, the element may burst. It is also necessary to check the quality of the soldering - there should be no irregularities on the front side of the photocells. If the bumps and roughness remain, you need to carefully walk the soldering iron along the contact seam again. It is necessary to use a low-power soldering iron.
What needs to be done in order to correctly and accurately connect photovoltaic cells:
- If there is no experience in assembling elements, it is recommended to use a marking surface on which elements should be placed (plywood sheet).
- Arrange solar panels strictly according to the markup. When marking, do not forget to leave a distance of 5 mm between the elements.
- When soldering the contacts of the plates, be sure to monitor the polarity. The photocells must be properly connected in series, otherwise the battery will not work properly.
Mechanical installation of panels:
- In the case, make markings for the plates.
- Place the solar cells in the housing, placing them on the plexiglass. In the frame, fix with silicone glue in the marked places. Do not apply much glue, just a tiny drop in the center of the plate. Press carefully so as not to damage the plates. It is better to move the plates together into the case, it will be inconvenient for one.
- Connect all wires at the edges of the plates with common busbars.

Before sealing the panel, you need to test the quality of the soldering. The structure is carefully taken out closer to the sunlight and the voltage on the common tires is measured. It should be within the expected values.
Alternatively, sealing can be done as follows:
- Apply droplets of silicone sealant between the plates and along the edges of the case, gently press the edges of the photocells against the plexiglass with your fingers. It is necessary that the elements lie as close as possible to the transparent base.
- Put a small weight on all edges of the elements, say, heads from an automotive tool kit.
- Let the sealant dry well., the plates will be securely fixed during this time.
- Then carefully grease all the joints between the plates and the edges of the frame. That is, you need to lubricate everything in the case, except for the plates themselves. Sealant getting on the edges of the back side of the plates is acceptable.
Final assembly of the solar panel

- Install the connector on the side of the case, connector connect with Schottky.
- Close the outer side of the plate with a protective screen from transparent material. In this case, Plexiglas. The design must be airtight and prevent the penetration of moisture into it.
- The front side (plexiglass) is desirable to process, for example, varnish (lacquer PLASTIK-71).
What is a Schottky diode for? If the light falls only on part of the solar panel, and the other part is darkened, the elements may fail.
Diodes help to avoid structural failure in such cases. In this case, power is lost by 25%, but diodes cannot be dispensed with - they shunt the current, the current bypasses the photocells. To minimize the voltage drop, it is necessary to use low-resistance semiconductors, such as Schottky diodes.
Advantages and disadvantages of a solar battery
 Solar panels have both advantages and disadvantages. If there were only one pluses from the use of photoelectric converters, the whole world would have switched to this type of electricity generation long ago.
Advantages:
- Autonomy of the power supply, there is no dependence on power outages in the centralized power grid.
- No subscription fee for the use of electricity.
Flaws:
- High cost equipment and elements.
- Dependence on sunlight.
- Possibility of damage to elements solar battery due to adverse weather conditions (hail, storm, hurricane).
In what cases it is advisable to use the installation on photovoltaic cells:
- If the object (house or cottage) is located at a great distance from the power line. It may be a country cottage in the countryside.
- When the object is located in the south sunny area.
- When combining different types of energy. For example, heating a private house using stove heating and solar energy. The cost of a low-power solar station will not be so high, and can be economically justified in this case.
Installation
 It is necessary to mount the battery in the place of maximum illumination by sunlight. The panels can be mounted on the roof of the house, on a rigid or swivel bracket.
The front of the solar panel should face south or southwest at an angle of 40 to 60 degrees. During installation, external factors must be taken into account. Panels should not be obstructed by trees and other objects, dirt should not get on them.
- It is better to buy photocells with small defects. They also work, only they do not have such a beautiful appearance. New elements are very expensive, the assembly of a solar battery will not be economically justified. If there is no particular hurry, it is better to order plates on eBay, it will cost even less. With shipment and China, you need to be more careful - there is a high probability of receiving defective parts.
- Photocells need to be bought with a small margin, there is a high probability of their breakdown during installation, especially if there is no experience in assembling such structures.
- If the elements are not yet used, you should hide them in a safe place to avoid breakage of fragile parts. You can not stack the plates in large stacks - they can burst.
- At the first assembly, a template should be made, which will mark the location of the plates before assembly. This makes it easier to measure the distance between elements before soldering.
- Soldering is necessary with a low-power soldering iron, and in no case apply force when soldering.
- It is more convenient to use aluminum corners to assemble the case, wooden construction is less reliable. As a sheet on the back of the elements, it is better to use plexiglass or other similar material and is more reliable than painted plywood and looks aesthetically pleasing.
- Photovoltaic panels should be located in places where sunlight will be maximum. throughout the daylight hours.
House power supply scheme

The series power supply chain of a private solar-powered house is as follows:
- Multi-panel solar array, which are located on the slope of the roof of the house, or on the bracket. Depending on the energy consumption, there can be up to 20 panels or more. The battery generates a direct current of 12 volts.
- Charge controller. The device protects batteries from premature discharge, and also limits the voltage in the DC circuit. Thus, the controller protects the batteries from overload.
- voltage inverter. Converts direct current to alternating current, thereby enabling the consumption of electricity by household appliances.
- Batteries. For private houses and cottages, several batteries are installed, connecting them in series. They serve to store energy. The energy of the batteries is used at night, when the solar cells do not produce current.
- electricity meter.
Quite often, in private homes, the power supply system is supplemented by a backup generator.
In general, it is not so difficult to assemble a solar battery with your own hands. Only certain means, patience and accuracy are needed.


