How to build a house from a bar: everything about this process
For hundreds of years, our ancestors built houses from wood, during this time a lot of new, modern building materials have appeared, but people invariably return to natural materials and wood is rightfully considered the best of them.
Wooden houses:
- warm,
- reliable,
- beautiful,
- durable.
But they have another important advantage, a wooden house is quite easy to build. Having 3 people who know how to use carpentry, locksmith tools as assistants, in one season you can build a good wooden house, from profiled or glued beams, and with your own hands.
Important: You can lay the foundation in advance while it is warm, and build the house itself when the cold comes.
What is a bar
The most popular are two types. Profiled timber is a wooden product, square or rectangular section.
The beam can be even, geometrically regular shape. Or profiled, having a certain profile, which allows the product to be joined more tightly at the junction points.
Glued laminated timber appeared relatively recently, it can be called a product of new, advanced technologies.
Visually, it looks like a profiled one. But the production technology is more complex. Glued laminated timber consists of several layers of wood, fastened using a special technology. It is stronger, more durable and easier to work with.
Important: Profiled timber can shrink up to 50 mm per 1m, depending on the dryness of the timber. Glued laminated timber shrinks, on average, by 10-15 mm.
The thickness of the timber ranges from 90 mm to 275 mm.
The most popular are the profile section:
- 100 mm by 150 mm.
- 100 mm by 200 mm.
- 150 mm by 200 mm.
- 180 mm by 200 mm.
With a maximum, standard length up to 12m.

Wall length
m
Wall width
m
Wall height
m
Bar section
150x150 mm. 180x180 mm. 200x200 mm.
Beam length
5 m. 6 m. 7 m. 8 m. 9 m. 10 m. 11 m. 12 m.
We are preparing a project
You will not be able to build from a bar without a project.
It is no secret that in the CIS, there are many countries, and the level of bureaucracy is practically the same. We provide a list of the main documents that you will need to prepare.
- A foundation drawing is required, with a detailed description with a full layout by material, composition, depth, etc. As well as detailed data on the soil, composition, quality, groundwater, etc.
- The next number, building plan. You prepare it based on the drawing of the foundation, but also with a detailed description.
- After you need a floor, detailed plan. In it, indicate in detail partitions, stoves, fireplaces, windows, doors, etc.
- Another, really important document, scatter. Simply put, this is a detailed sectional drawing of the walls of a house. By unloading, you will be able to place an order for the manufacture of timber, it will be made for you and marked as a designer. Then just look at the numbers and collect.
- Specification of every detail of the house.
- Detailed drawing of the roof, with a detailed description of all layers.
- Final view of the house.

Please note: take seriously the description of the timber itself, what kind of wood, what kind of profile, the level of dryness of the timber, etc. This will eliminate misunderstandings when ordering.
The package of documents is solid, of course, you can rest, although the work is painstaking, but you yourself are quite capable. But my advice is don't waste your time. The collection of papers may take longer than the construction itself. Trust the professionals, they will be happy to help you on our website and it will cost you much less than amateur performance.
Foundation laying
To build houses from a bar, a capital, expensive foundation is not required. These structures are relatively light in weight.
For construction
- Shallow strip foundation. This type of foundation is laid in a trench and has a maximum depth of up to 50 cm.
- Mixed or strip-column foundation. This type is similar to tape. But in all important nodes, it has reinforcement in the form of concrete pillars.
- Columnar. This foundation is based on pillars connected by a concrete or metal grillage.
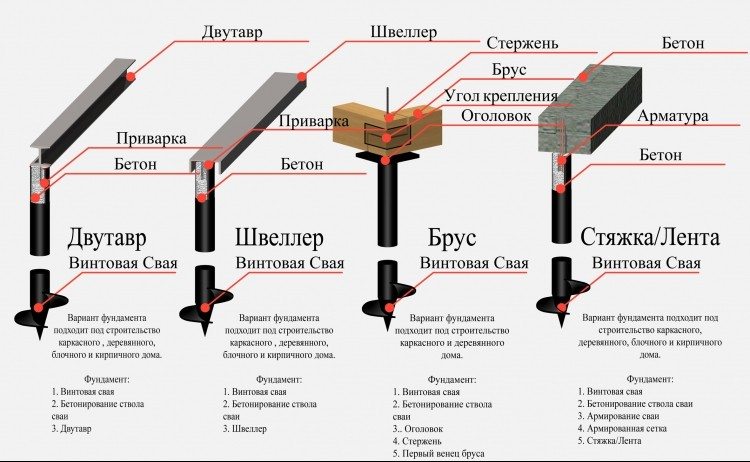
- On screw metal piles or piles with screws. A product of modern technology. Metal, corrosion-resistant piles are screwed into the ground and connected with a grillage. The foundation is convenient, also because it is easily repaired.
- On wooden piles, at the present time it is rarely used, since the tree, no matter how you process it, still deteriorates in the ground.
- On concrete piles. The foundation is excellent, but expensive. To drive a concrete pile, you will need special construction equipment.

In order to build from a bar, the first 4 options are enough. The instructions below, with minor amendments, are suitable for the first 3 types of foundation.
Tape
- Any foundation starts with markings. For marking, we use ordinary wooden pegs and fishing line. At a distance of 30-40 cm from the projected wall, we drive in the pegs and pull the fishing line.
- The body of the foundation will be indicated not by driven pegs, but by a fishing line.

Important: after stretching the fishing line, you should measure the diagonals. The distance along the diagonals must be strictly the same. Even the slightest discrepancy speaks of wrong angles, and you will get an asymmetrical foundation.
- We take out the soil to a depth of 50 cm. Consider the thickness of the formwork. Control the bottom of the trench by level.
- Next, we make 2 pillows up to 10 cm each. Sand, plus gravel.
- We proceed to the installation of formwork.
- We invest in waterproofing, the most budget option, this is roofing material or thick, technical polyethylene.
- We weld or knit a reinforcing, metal frame.
- We fill it with concrete, it is better to fill it all at once, in a complex way. Order a mixer, pour the foundation in one go and wait for it to harden.
- Remove the formwork, and in its place pour a cushion of rubble.
mixed foundation

It differs from the previous tape one by the presence of reinforcing pillars at the corners of the structure and at the most stressed nodes. Therefore, to the above, instructions for pouring the pillars with your own hands are added.
- We drill a hole under each post, to a depth of 1m.
- We make a similar mastering of sand and gravel.
- We turn the pipe from the roofing material into 2-3 layers and fix it with adhesive tape.
- We insert the pipe into the pit, mount the reinforcing cage, 200 mm high above the general level of the foundation.
- Before the main pour, make the sole of the pillar. To do this, pour the solution into the pipe and raise the pipe, allowing the solution to spread. When the solution hardens a little, start pouring the entire foundation.

Column type foundation
The pillars in this foundation can be made, as in the previous version, from concrete. So lay out from a brick, in the form of a curbstone.
Just lay out the cabinet with a well, and insert the reinforcing cage inside and fill it with concrete.
Himself, the cabinets are set according to the level and a grillage is mounted on them.
The grillage can be concrete, then formwork is made on the pillars in the form of a bath, waterproofed, reinforcement is installed and concrete is poured. Or welded from metal, which is attached to the reinforcing cage of the pillars.

Making crowns

Crowns, this is the first row of timber. To build a good house from a bar, carefully consider the installation of the crowns.
The video in this article clearly shows the installation of dowels.
Making the floor
At this stage, you should lay the foundation of the floor, a draft version. The final finish will be done along with the interior decoration.
If you are building a relatively small building, sauna or garden house. It will be quite enough for you to lay an additional belt of timber along the perimeter, fasten it with a crown and mount logs on this belt.
But if the house occupies a large area, the approach will be somewhat different.
With a large quadrature, separate pedestals should be laid out to support the floor, something similar to a separate foundation for the floor.
- Depending on the composition of the soil, we lay the columns to a depth of half a meter.
- We make them square 40x40 or 50x50. Bookmark step from 50 to 90 cm.
- In layers up to about 10 cm, we lay and compact sand and gravel.
- We make a small reinforcing cage, up to 10 cm high, install it and fill it with concrete.
- Next, we waterproof this base and lay out a cabinet of bricks, to the level of the beams.
- We lay down the waterproofing again and mount the beams.
- We grab the logs to the beams with self-tapping screws.
- Between the lag, with the help of a corner, we mount waterproof plywood.
- We waterproof and glue all joints with adhesive tape.
- We lay the insulation on top and cover it with a subfloor.

Building walls
If you did everything right before that, then building walls from a beam with your own hands will not be difficult for you.
- The profiled beam already has special grooves, they will facilitate the connection.
- Corner connection do as you like, there are 3 types of corner connection:
- Back to back.
- Half a tree.
- By means of a root spike.

- Be sure to lay insulation between the timber.
- Control each laid beam by level and fix it with a dowel.
- In the window area, leave technological gaps for shrinkage.
Important: when you put a load-bearing wall or supporting columns under the roof in the house, you should not rigidly fasten them to the roof at first. Take self-tapping screws and that's enough. When the house begins to sit down and walk, you will have to adjust the height of the support. When you sit down, fix it completely.
This video will tell you about the intricacies of building walls.

Starting roof installation
The roof is a rather important stage of construction, but you can mount it yourself.

- First, knock down a template from light boards. On it you will install the rafters.
- Next, set the beginning and end of the construction according to the template.
- Between the installed rafters, at control points, according to the level, we stretch the strings from the fishing line.
- Focusing on the strings, controlling the level and template, we mount the rest of the rafters.
- We fill the crate on top and fasten it with a stapler under the bottom, overlapping the vapor barrier.
- Under the vapor barrier, between the rafters, we lay the insulation, close it with another layer of vapor barrier.
- Next, we finally fix the bottom layer of the crate, it is already possible to attach the lining to it according to your taste and wallet.
- From above, the most budget option is to cover the roofing material on the upper crate and slate sheets on top of it.

The video presented in this article will help you understand the types of roofs.
As you can see, the project is needed and important!
Conclusion
As you can see, there is nothing particularly difficult in building a house from profiled or glued beams. Moreover, such houses are much safer than concrete boxes, and the price for them will be much lower.
And then, if you are short on funds, it is better to build a beautiful, warm, reliable house from a bar in a season and already move in, rather than dreaming or collecting for a long time on a stone one.
Easy construction!


