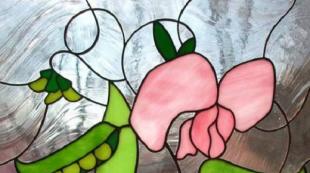
Charming satin stitch embroidery: types of seams and highlights. How to embroider flowers and leaves? Embroider leaves
We continue to master the basics of embroidery with ribbons. In this lesson, we will learn how to perform a ribbon stitch, with which flower petals and their leaves are embroidered.


2. We press the tape to the fabric with your thumb at the distance of the finished stitch.

3. We start the needle under the tape at the base of the stitch (the tape is directed upwards from the needle). Slightly tighten the tape, straightening it with a needle.

4. With the tip of the needle, mark the center of the tape at the highest point of the stitch (point B).

5. We stretch the needle to the wrong side of the work and begin to slowly tighten the tape.

6. We continue to gently tighten until the edges of the helen are wrapped.


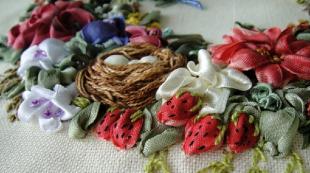
Green leaves are embroidered with a straight ribbon stitch (author - Tatyana Akchurina)
This ribbon stitch is done in much the same way as the main stitch, but here the ribbon is laid at an angle.
1. Pull the tape to the front side at the base of the stitch.

2. We put the needle under the tape at the base of the stitch (the tape is directed upwards). By moving the needle back, slightly tighten the tape, straightening it.

3. At the very edge of the tape (on the left), we stretch the needle to the wrong side, holding the stitch with your finger at the base. Then we pull the tape to the wrong side so that a curl forms.


4. We fix the ribbon on the wrong side of the work.
In the same way, but already turning the tape to the right side, the right side stitch is performed.


Sunflower petals are made with a side ribbon stitch (author - Dasha Svetlaya)

Leaves embroidered with side ribbon stitch
1. Pull the tape to the front side at the base of the stitch.

2. We stretch the tape and start the needle under the base of the stitch. The tape is directed from the needle up. We tighten the tape well, straightening it with a needle.

3. Supporting the tape with your finger, bend it to the desired angle. In the center at the distance you need, we stretch the tape to the wrong side.

4. Without releasing the fold of the tape, we pull it out until at the top of the stitch the edges of the tape begin to bend inward.

5. With a simple needle we fix the fold of the tape:

6. Finished folded stitch.


The left tulip leaf is made with rolled ribbon stitch.
Air ribbon stitch
You will need a thick wooden pencil for this stitch.
1. Pull the tape to the front side at the base of the stitch.

2. Hold the tape at the base with your finger, insert the needle under the base of the stitch and pull the tape (as usual, it is directed upwards from the needle). We tighten the tape, straightening it with a needle.

3. We put a pencil under the tape. At point B in the center of the tape (choose the distance yourself), we bring the needle with the tape to the wrong side of the work at the top of the stitch.
Delicate daisies, made with three-dimensional embroidery, will surprise you with the simplicity and ease of execution. Chamomile flower can be captured in many ways. For example, with the help of three-dimensional embroidery, which will make the flower more realistic.
Maiden flower - chamomile
You can capture the image of chamomile in many ways. This time I offer volumetric embroidery.
We will need the following:
- Fabric - the basis for embroidery
- hoop
- Embroidery threads in white, yellow and green
- Embroidery needle
- Scissors
- Pencil
Note.
Where does any embroidery begin?
Of course, from the diagram.
Therefore, for starters, look at a few patterns by which you can embroider flowers. Or take any of yours. Transfer the selected scheme to the fabric.

Then we stretch the fabric on the hoop and proceed to embroidery.
Chamomile petals will be elongated loops. Each of them must be secured with an additional stitch so that it does not “run away”. The middle of the flower is made with an interesting seam, which is called the "French knot". Such small nodules need to fill the entire center.


Petal loops can be cut with scissors or left as is.

Then we make the second, and then the third flower. We will embroider the leaves with a stitch, and we will make the stems with a chain stitch.


You will not notice how quickly a clearing of delicate daisies will bloom under your light hands.
This method can be used for embroidery of different colors. For example, if you take the blue color, you get cornflowers, and if you take orange, then you get marigolds.
Have a good mood! And may there always be a place for flowers in your house!

Stitch embroidery is a rather complicated and time-consuming process that requires special care and precision. To embroider means to make even seams and stitches that will fit snugly together. Using the embroidery technique, you can work with different fabrics. Below are diagrams for beginners that will help you understand the basics of this technique.
Stitch embroidery of flowers and trees
In order to embroider flowers or trees with satin stitch, you need to prepare a fabric that needs to be stretched on the hoop. To create a large fragment of the picture, you need to lay the stitches across the desired area. After that, the needle must be brought to the front side, and always in the lower part of the site, and then injected into the starting point.
After a few stitches have been completed, you can see a mirror image of the embroidered fragment. The stitches should be slightly larger than the work area. For this purpose, the needle is injected beyond the contour line of the site. This is a special technique that allows you to hide all lines transferred from the template, they will also not be highlighted at the edges of the stitches.
Not only large images can be embroidered with a stitch, but also small fragments, for example, flowers, or rather, flower stems, for embroidery of which you will first need to lay the “forward needle” stitches along the contour of the entire stem. After they are completed, it is necessary to make short stitches, and so that they are perpendicular to the contour line.
Stitch embroidery: patterns for beginners
In order to rationally use the thread when embroidering with satin stitch, it is necessary to use a method for laying a new stitch, in which the needle is brought to the front side so that it is closer to the end point of the stitch. By embroidering in this way, you can get small rows of stitches along the outlines.
To prevent the fabric from wrinkling when embroidering, pull it tightly over the hoop. And in order to get good stitches, you should perform them in 2 steps, namely: first, bring the needle to the front side of the embroidery, stretch the thread, and then pull the needle inside out and stretch the thread completely to get an even stitch on the front side.
Separate fragments of flowers and trees can be embroidered according to the stitch pattern on clothes:

Patterns for embroidery with satin stitch leaves are varied. For example:

You can download patterns for embroidering trees and flowers below, they are easy to complete if you follow all the embroidery rules:


It is also worth noting a variety of satin stitch embroidery, namely Chinese embroidery, which allows you to create many extraordinary patterns. This type of embroidery differs from others in its execution technique, as well as in its semantic load, which implies both the use of certain colors and the use of special lines.
Each person has his own hobby. That activity that can relax, distract from everyday affairs, from various thoughts and just give yourself a break. Today I would like to draw your attention to a beautiful type of needlework, like satin stitch embroidery for a beginner needlewoman. Stitch embroidery is creativity and one of the wonderful things to do when you feel joy and see the result of the creation of your hands, when after the completion of the next project a butterfly sitting on a flower “flutters”, or maybe a beautiful bird (as in the first photo). And finally, feel proud of yourself and your creations!
Stitch embroidery at all times helped to bring a touch of sophistication to the house - extraordinary home textiles, original interior items, toys for small children, clothes, linen and many other things that will decorate any room. Stitch embroidery when finishing clothes will be a unique individual highlight in the wardrobe of any woman.

There are many types of satin stitch embroidery, but we will consider the most necessary types of stitches for a beginner needlewoman to try her hand at this, no doubt, interesting satin stitch embroidery technique.

In order to start this exciting process of creating another masterpiece, you will need the following items: a hoop, canvas, a drawn drawing of the future project on canvas, floss, scissors, and so on.

satin stitch embroidery this is the earliest technique. It was used in ancient times in the east. Therefore, another name for this technique is damask embroidery - a series of flat stitches that completely fill the free contour of the pattern, which is applied to the canvas, fabric and fixed on the hoop for further satin stitch embroidery.

Sketches of drawings for colored artistic smoothness, as a rule, are black and white. This is done so that the embroiderer can choose the color palette according to her own taste. In this technique, various types of seams and techniques are used.
Consider the basic stitch embroidery techniques.
Types of seams:
1. Stem seam - consists of stitches, partially overlapping each other, and looks like a lace. In plant patterns, they are most often embroidered with stems or individual lines, and they are also sheathed with the contours of patterns. The seam is conveniently performed from the bottom up or from left to right. The needle with the working thread is directed back, as when sewing the “back of the needle” seam, but goes to the right side of the fabric approximately in the middle of the last stitch, while the thread always lies on one side of the already embroidered stitches, either to the left or to the right. The seamy side of the stalk seam coincides with the seam “back to the needle”.

2. Buttonhole stitch- performed in the direction from left to right by moving the needle from above. The thread is brought to the front side at the bottom of the seam, then a stitch is made with a needle in the direction from top to bottom, while the thread remains under the needle and the working thread is tightened until a loop is formed. The seam stitches can be placed very tightly or spaced apart. When sheathing the edge, in order to achieve its greater relief and strength, a flooring is preliminarily laid under it. Seam stitches can be of various lengths. Buttonhole stitch can be used to embroider individual small elements, such as leaves or flowers.

3. Seam "narrow satin roll" is performed in 2 steps: the first stage - with a “forward needle” seam from right to left, a line of a satin roller (straight or curvilinear) is outlined, the second stage - small and frequent vertical or oblique stitches of the same length are laid in the direction from left to right. Such a stitch is used to embroider thin lines of a pattern, as well as to finish the edges of an outline product, as well as to add volume.
4. Seam "chain" - chain stitch. This is a deaf one-sided seam, it consists of a series of loops coming out of one another, and on the front side it resembles a crocheted chain. It is embroidered from top to bottom, from right to left and along the contour of the pattern. The sequence of the seam: the thread is brought to the front side at the first point and taken down, holding it with the thumb of the left hand. Then, from the second point to the third point, a stitch is made by moving the needle from top to bottom and the thread is tightened, forming the first loop. Subsequent loops are performed in the same way, thus forming a “chain” seam. They can embroider both straight contours and curvilinear ones.

5. Smooth stitch - used to fill large areas of the pattern. Consists of long stitches and one or more short cross-stitches that attach long stitches to the fabric. A long stitch is best done only on the front side. You can also first fill the entire area of \u200b\u200bthe pattern with long stitches, and then lay short transverse or oblique attachment stitches over them.

6. Surface with flooring - is carried out on a pre-laid flooring, made with thicker threads, due to which the embroidery is more convex, embossed. The sequence of execution of the convex surface is as follows: the contours of the pattern are sheathed with a “needle forward” seam, then the flooring is laid in one or two (for greater convexity) layers, and then embroidery is performed in the direction opposite to the flooring. Patterns with a wavy line of contours are embroidered with an oblique stitch. In this case, it is imperative to ensure that the stitches of the smooth surface fit exactly along the contour and fit snugly against each other. In the relief surface, the so-called donut balls are often used as elements. The thread is brought to the front side, 2-3 turns of the thread are made with the left hand, and the needle is brought to the wrong side next to the first puncture on the needle. In this case, the thread on the needle must be held with the finger of the left hand until a tightened knot forms on the fabric.

7. Flat surface - is double-sided used in floral ornaments for embroidering wide and narrow patterns. The needle from the wrong side runs along the entire width of the pattern, the stitches fit tightly to each other fig. The direction of the stitches can be straight or oblique. Performed without flooring. In large details, the stitches of the smooth surface are arranged according to the shape of the pattern: in leaves - from the edge to the middle, in the direction of the veins, in flower petals - from the edge to the center.

8. Shadow surface - e that smooth surface is performed along a free contour with threads of different colors. At the same time, there is no clear boundary between the colors, and the transition from one thread tone to another is achieved using stitches of different lengths that enter one another. This technique achieves the so-called shadow effect. The sequence of execution of the shadow surface. The pattern is transferred to the fabric and a conditional division is applied according to the tones of the threads. To do this, draw curved lines with a pencil, which serve as the border of the transition of one color to another. Moreover, you need to stick the needle not exactly along these lines, but above and below. Stitches should be applied tightly one to the other, and placed in a direction that depends on the pattern. So, if this is a flower petal, then in the direction of the center of the flower, if it is a leaf, then in the direction of the central vein, and so on. Therefore, to simplify the work, you can draw dashed lines on the fabric with a pencil, which indicate the direction of the stitches.

Flower petal sequence
The petal is divided into 3-4 parts and embroidery begins from the middle of the upper part. Having finished the right half, the needle and thread are passed along the petal from the front side to the left edge of the petal and the left half is embroidered. When the embroidery of the upper part of the petal is completed, the thread is cut and in the same way, from the middle, the second part of the petal is embroidered with a thread of a different color. In order for the second tone of threads to enter the first one gradually, it is performed, either by lengthening or shortening the stitches (the stitches of the second part are laid between the stitches of the first part). After completing the right half, the needle is transferred to the beginning of the left half and it is performed in the same way. Do the rest of the parts in the same way. The transition of colors in the petal - from lighter (topmost) to darker (lowest).

The sequence of execution of a leaf having a vein in the middle
The leaf is embroidered with an oblique stitch, laying the stitches towards the vein. Perform first the right, then the left half of the leaf. Previously, each half of the leaf must be divided into 2-4 parts (according to the number of colors). Embroidery begins from the extreme (lightest) part in the direction from top to bottom. The stitches are shorter at the edges, longer towards the center of the leaf. The second and third parts are also embroidered from top to bottom, only the color of the threads is taken darker. The second (left) half of the leaf is embroidered in the same way, only in the direction from the bottom up and from the central (darker) part to the outer (lighter).

Knowing these basics of satin stitch embroidery technique, you can safely start a project to start a small satin stitch embroidery pattern.


There are also other stitch embroidery techniques: back stitch, twisted knot, French knot, Vladimir seam edge stitch, welt stitch, satin stitch, and so on.
To embroider flower petals, loop and half-loop stitches, various knotted stitches, looped stitches, buttonhole stitch, goat stitch, various star stitches and numerous varieties of these stitches and their combinations are suitable.
Sew the desired number of stitches, directed from the central circle or oval of the flower.
A buttonhole stitch consists of a series of individual loops arranged in a pattern. To make a loop, the thread is fixed on the wrong side, brought to the front side at point 1 and taken down, holding it with the thumb of the left hand.
Then, from point 2 to point 3, a stitch is made equal to the length of the loop (a). The resulting loop is fixed with a small stitch at point 4 (b).
The figure shows the sequence of making a flower with a loop-attached stitch
This seam of the needlewoman is also called the seam "daisy":
The body of the butterfly is embroidered with simple elongated stitches. In this way, it is good to embroider with a melange thread (with a color transition).

Irises in a basket

We will need:
base fabric (it is recommended to choose a fabric of uniform weave), scissors, floss in five colors (multicolor Anchor 1325, light brown, yellow and two shades of green)
1. We embroider a basket. First, we embroider vertical stitches in an odd number (for example, 9 stitches) with a height of 12 threads through 2 warp threads. We step aside 2 more threads and begin to fill the basket in a woven way. We perform horizontal stitches as close as possible to each other, for example, through 1 warp thread. Most of the seams are done with a thread folded in half (1 thread folded in half, or 2 threads of a skein).


Let's make buds, for which we sew three short stitches of different lengths from the end of the stem or one loop attached with one or two straight stitches.


Simple and beautiful!

Delicate daisies, made with three-dimensional embroidery, will surprise you with the simplicity and ease of execution. Chamomile flower can be captured in many ways. For example, with the help of three-dimensional embroidery, which will make the flower more realistic.
Maiden flower - chamomile
You can capture the image of chamomile in many ways. This time I offer volumetric embroidery.
We will need the following:
- Fabric - basis for embroidery
- hoop
- Embroidery threads in white, yellow and green
- Embroidery needle
- Scissors
- Pencil
Note.
Where does any embroidery begin?
Of course, from the diagram.
Therefore, for starters, look at a few patterns by which you can embroider flowers. Or take any of yours. Transfer the selected scheme to the fabric.


Then we stretch the fabric on the hoop and proceed to embroidery.
Chamomile petals will be elongated loops. Each of them must be secured with an additional stitch so that it does not “run away”. The middle of the flower is made with an interesting seam, which is called the "French knot". Such small nodules need to fill the entire center.


Petal loops can be cut with scissors or left as is.

Then we make the second, and then the third flower. We will embroider the leaves with a stitch, and we will make the stems with a chain stitch.


You will not notice how quickly a clearing of delicate daisies will bloom under your light hands.
This method can be used for embroidery of different colors. For example, if you take the blue color, you get cornflowers, and if you take orange, then you get marigolds.
Have a good mood! And may there always be a place for flowers in your house!