How to build a chicken coop in the country with your own hands for the summer period from improvised materials? Do-it-yourself chicken coop: we make a winter chicken coop, step by step instructions with a photo A small chicken coop for a summer residence
Many owners of country houses, after arranging the main building, laying out a vegetable garden and a garden, are thinking about breeding feathered living creatures. In this case, knowledgeable people are advised to have chickens - and fresh eggs will appear on your table every day.
The general arrangement of the chicken coop and its types
For breeding birds in the courtyard, it is necessary to build a special structure - a chicken coop. The place to place the chicken coop should be dry and on a hill. Drainage is arranged around it - a small pit or groove for rainwater to drain. If there is no hill on the territory, it is created artificially (from clay and sand).
The dimensions of the building should allow the birds to move normally. The area of \u200b\u200bthe house with perches is calculated based on sanitary standards: 2–3 chickens per 1 m 2 of free space, but the minimum area value is 3 m 2.
The entrance to the chicken coop and the paddock are built on the south side, which is protected from the winds. The aviary is hidden under a roof or covered with a canopy: from the hot sun and rain.
The poultry house can be of two types: summer or winter, depending on the temperature conditions of residence and the size of the free space on the site. A summer building in a warm climate is made light and mobile - it can be moved from one place to another, if there is such an opportunity in an open area. And in the middle latitudes, a solid structure is immediately installed: on the foundation. The winter poultry house is built with additional insulation so that during the cold period the temperature inside does not fall below zero.
The chicken coop includes:
- house for spending the night chickens;
- paddock-aviary;
- perches;
- nests;
- litter collection tray under the house.
During the movement, the chickens develop better and rush more, so the device of the bird house implies the presence of a paddock - an aviary, closed on all sides with a net.
A paddock is attached to the chicken coop so that the chickens can walk on fresh grass and breathe air without scattering all over the suburban area
Perches are always placed in the chicken coop: birds use them as a place to sleep. The perches are made smooth and rounded so that the chickens are comfortable to hold on, and the paws are not injured by splinters.
A perch is a long perch attached to the walls of a chicken coop or set on the floor on stable props.
Additionally, nests are built in the bird house: chickens will begin to lay eggs in them.
The nests are lined with a layer of soft straw or grass: the hens choose their favorite place, and sometimes it happens that everyone rushes in the same nest - in turn
Drawing of a chicken coop, arrangement of perches and nests
For 6-8 hens, the dimensions of the house on the foundation will be 2x2 m, and the aviary for walking about 2x7 m. The minimum height of the room is 1.8 m, so that the owner can freely enter it.
To build comfortable housing for chickens, you will need to perform the correct calculations of the chicken coop and draw up a drawing
The perch can be made from timber, even knots, thick branches, or other improvised means. But it is important to follow the rules:
- Comfort: for an adult bird - 25 cm perch.
- Strength: perches should not sag under the weight of birds.
- Safety: sharp corners are smoothed with a planer.
Perches are made with a thickness of no more than 4-6 cm in diameter, and the pole in the cut should not be round, but closer to an oval shape
Perches are installed in the darkest and warmest place in the room: away from windows and doors. It is recommended to roost on:
- 50–80 cm from the floor;
- 25–40 cm from the nearest wall.
Nests are knocked down from wooden boards or made up of plastic boxes with a slatted bottom.
- size of one nest: 30x30x40 cm;
- install nests at a distance of 30–40 cm from the floor;
- put them against the far wall, in the dark;
- lay soft and dry straw;
- 10 chickens will need about 4 nests.
A separate area is prepared for raising chickens. Adult birds and young birds are recommended to be separated.
On the drawing, you need to indicate the location of all the necessary elements of the chicken coop, so that it is convenient to build a structure using this markup
After drawing up a detailed drawing, we proceed to the selection of materials.
Selection of materials and tools
- For pouring the base - concrete mortar. Materials should be selected based on the type of foundation.
- For the frame - bars. For wall cladding - boards.
- For inner lining and nests - plywood sheets.
- For roofing - roofing felt, slate or tin. 2 layers of roofing material are also laid on the foundation (protection from decay).
- For an open-air cage - a grid and iron clamps.
- Screws and nails.
To make a chicken coop, you do not need to prepare any special tools - you only need standard fixtures that are often used in the country
The set of tools may vary based on the dimensions of the structure being manufactured, but the basic set is required:
- Master OK;
- plane;
- roulette;
- building level;
- axe;
- mallet.
After complete preparation, we proceed to construction.
Step-by-step instructions for making a summer chicken coop
Foundation manufacturing
An ideal option for a chicken coop 2 × 2 m and a height of 1.8 m is a columnar base, which can be made from old bricks or stones. First of all, you need to perform marking work:

After the marking work is completed, you can proceed to the manufacture of the foundation:
- We remove a layer of fertile soil with a thickness of 17–20 cm.
- In the corners and perimeter we dig 8 holes 50 cm wide and 60 cm deep (there will be pillars in them).
- We cover the bottom of each pit with sand and gravel (by 10 cm).
- Then we put 2 bricks and cover them on top with a cement mixture.
- Next - 2 more bricks. The curbstone is laid out to the level of the rope. The cement mixture will level the height of the cabinet.
- Treat finished poles with bitumen or protective mastic. And fill the cavity between the pillars with soil, leveling it with the surface of the earth.
- The building mixture sets for about a week, then a grillage from a bar is mounted.
For a chicken coop, the foundation is built smaller: with three pillars on each side; install a grillage from a bar on top
The finished foundation is left for a month. Then you can start building the walls of the chicken coop.
Installation of walls and roof
It is recommended to use the frame structure of the walls. A shield frame is constructed and clogged with a mixture of clay and straw in layers. Before installing the walls, you need to waterproof the floor. An excellent basis for frame walls and floors is a support frame made of beams.
For walls and floors, you need to make a support frame from bars
It will be necessary to prepare material for racks, jumpers and struts, which will increase the rigidity of the structure. Support bars of great length can be used not only as support pieces for the walls of the poultry house, but also the bottom of the paddock. The frame structure of the site can be made from an iron corner. All that remains is to fix the chain-link mesh on it and cover the structure with polycarbonate.
The frame, sheathed with boards, is insulated with ecowool or mineral wool.
Chicken coop wall installation guide:
- You can build walls right on the wooden floor of the chicken coop. But you can separately assemble each wall, and then mount them ready-made.
Each wall must be assembled separately using a wooden beam.
- Openings are made in the walls for windows, a door and a box from which eggs can be taken.
You need to make openings in the walls: fold the blanks, align them according to the markup
- After that, all the walls must be knocked together, excluding distortions.
After preparation, they need to be knocked down into a single structure, taking into account the verticality of the racks level to the floor
- After the frame is assembled, you can proceed to the manufacture of the roof.
In order for the structure to retain heat better, it is recommended to make a roof with two slopes. The frame consists of rafter legs and lathing.
You can cover the roof with slate, metal tiles and other materials
Gaps between wall elements should be insulated. A vapor barrier film is laid on top of the insulation material. After that, the building is sheathed with plywood sheets.
From the outside, the structure is sheathed with OSB-boards and plywood
From the outer part of the OSB-slab, you will need to cover it with glassine, and then sheathe it with clapboard.
Outside, the structure must be covered with glassine and sheathed with clapboard
To prevent rotting of wooden parts, they should be treated with an antiseptic. It is important to periodically cover the walls of a wooden structure with lime to protect against pests.
floor base
For the floor, boards with a thickness of 50 mm are taken, they are laid in 2 layers, laying insulation. The bars take 10x10 cm, the bottom bar should have a thickness of 26 mm. The surface is made even and cleaned with a planer.
A rectangular recess is cut in the floor base, through which chickens will enter and exit along an inclined ramp. The floor is covered with a protective mixture for wood or lime and a dense bedding is laid. Layer thickness 5 cm (mixture of crushed peat, straw, sawdust).
Ventilation and lighting of the chicken coop
Natural light and ventilation come through the windows and door. But they are not always kept open (draughts are dangerous), so you will need to equip automatic ventilation.
Ventilation through draft
High above the perches is a chimney extending beyond the roof. The supply pipe is placed in another corner of the chicken coop 20-30 cm from the floor. The draft passes naturally, reducing the humidity inside the coop.
Chickens do not tolerate drafts, so be sure to make a supply and exhaust ventilation
The hole for birds is recommended to be located on the south side of the bird house. The minimum width is 30 cm and the height is 40 cm. The manhole can be combined with the entrance door. In this case, you will need to cut through the element at the bottom of the canvas.
Lighting
Egg production is affected by the length of daylight hours. In order for chickens to lay eggs in winter, they should be well fed and create the effect of a 14-hour daylight hours. During mass molting, the optimal day length is 9 hours.
- Install lamps with a power of 50-60 watts. Place them above the feeders. Sockets are removed in a closed shield.
- It is recommended to use red and fluorescent bulbs. For every m 2 - 5 W of lighting.
Red light bulbs will not dry the air around and will only be able to heat those places where the rays fall
Installation of feeders and drinkers
Devices for feeding birds can be made independently or purchased ready-made.
Bunker feeder: it is made from a pipe, having made holes along the entire length
They use a bunker version of feeders or homemade food serving devices fixed at a height of 15–20 cm from the floor: chickens will not dig into the grain and scatter it. If the feeder is placed on the floor, then the place under it may begin to dampen.
Feed supply structures can be built from wooden planks or plastic containers. Summer residents recommend using tanks with sides of at least 2 cm. You can also build a tank for sand or shell rock (chickens peck the mixture for better digestion of feed).
How to make a small chicken coop
A mini chicken coop can look like a cage. The dimensions of the cage for several chickens are 1x2 m. The foundation is not needed for it, it is placed on the grass.
Mini chicken coop for 5 chickens can be made in the form of a cage
Tools and materials for manufacturing:
- timber 50x50 mm;
- nails and screws;
- Rabitz;
- wooden slats 20x30 mm;
- iron pipes;
- door hinges;
- plywood sheets;
- tiles or slate;
- insulating material;
- hammer;
- saw;
- electric drill or screwdriver.
First you need to make a drawing. It is important to determine which side the windows and entrance will be located on. This will allow you to choose a place for perching and nests (in the far corner).
On the drawing, you need to indicate the location of all fixtures, as well as the dimensions of the house
Work sequence:

Photo gallery: ideas for decorating a chicken coop
 With a flower bed on the roof: make high-quality waterproofing and breed cacti
  Chicken coop without paddock: you can build a chicken coop with a detachable paddock
  Walking in the form of a greenhouse, with a rounded arch: the design looks unusual
  Made in the form of a teremka, where the gable roof is stretched for the entire paddock
  Chicken coop with a square high paddock in the form of a summer gazebo
  Two-story poultry house: the chicken house is located on the roof of the paddock
  Teremok, in which one roof slope covers a square paddock
  Made with a flat roof, minimalist style
Features of the winter design
The winter chicken coop is made more insulated, with south-facing windows and good ventilation. If the design is designed for more than 20 chickens, then additional electric fans are built into the walls.
The temperature inside the bird house should be above +12°C. Windows should be glazed and tightly closed. In cool weather, chickens cluster together, warming each other.
The walls of the all-season chicken coop should be built of wood. The room with perches is separated from the entrance by constructing a vestibule.
The walls of the winter chicken coop are best made of wood and build a vestibule
Use of oil and infrared heaters is allowed. You can also use panels in the form of plates coated with a film. They will radiate heat using infrared radiation. Structures are attached to the ceiling.
It is advisable to use such devices if the walls are made of concrete or brick. When the temperature reaches the required level, the design will automatically turn off.
Large chicken coops can cause significant problems. It is quite difficult to heat a vast building, and the cost of thermal insulation will also be considerable. If you plan to keep birds all year round, then it is important to consider some features:
- The roof is made of two layers.
- Sheathe the walls with thermal insulation material.
- If you plan to build a chicken coop from logs, then it must be carefully caulked. The floor is covered with a deep bedding.
- In cold weather, additional frames should be installed on the windows.
- If the house has an attic, then the floor must be covered with sawdust or straw.
- For heating, high power lamps or a heater are often used.
Video: do-it-yourself chicken coop making
Making a chicken coop with your own hands is not a difficult process. The design can be made even from improvised means, it is only important to correctly draw up a drawing.
Increasingly, people are choosing country houses for permanent or at least seasonal residence. Therefore, the desire to provide oneself not only with a harvest from the beds, but also with fresh chicken eggs is not only understandable, but also quite feasible. And if not everyone has the opportunity to build a monumental structure for a chicken coop, then almost everyone can arrange comfortable maintenance for several laying hens.
Moreover, there are many interesting options for country chicken coops, which will allow not only a functional outbuilding, but also turn it into a decor element that sets the style of the entire backyard.
To provide the family with environmentally friendly products and to keep chickens in the country hassle-free, it is enough to have a chicken coop for birds. However, no matter the number of layers, building a comfortable chicken coop is a real science, because this house should not only be durable and beautiful, the chickens should be comfortable and safe in it.
The location of the chicken coop in the country
For a beginner poultry farmer, for quality supervision of pets, it is better to build a chicken coop in the country near the house, while not forgetting the need to provide chickens with proper living conditions:
- The soil under the chicken coop must be dry, and even better if it is sandy.
- If the soil is clayey, swampy, or often too wet, then measures should be taken to drain it by removing moisture, arranging channels, pits, or backfilling the site with sand. Moreover, the collected moisture can be redirected to a place reserved for bathing chickens.
- It is good if the area under the chicken coop will have a slope to the southeast, which contributes to the best illumination.
- The chicken coop in the country should be protected from drafts and piercing wind, for which you can use green hedges or building structures.
- It is necessary to provide comfortable lawns for walking birds with mandatory shelters from the sun or bad weather.
- A shallow pool for swimming is also desirable.
If you do not follow these recommendations for keeping chickens in the country, the bird may become lethargic, laying hens will produce fewer eggs, and diseases of chickens are not excluded. Moreover, overheating without sufficient shading from the sun, and increased humidity, crowding and cold affect the bird equally negatively.
Building a chicken coop with your own hands
 If you are going to build a chicken coop in the country, you should take into account all these features and try to provide future residents with all the conditions for comfort.
The floor in the chicken coop should be warm and durable, but also breathable, so that there is no excessive moisture, leading to the development of mold and mildew.
Therefore, brick, asphalt or stone flooring is unsuitable for a poultry house. On a cold floor, chickens will suffer from rheumatism and other leg ailments.
So for the conditions of the middle lane, the best option is a two-layer wooden floor.
Arrangement of a chicken coop in the country
 Comfort for laying hens living in a chicken coop is:
- In plenty of space, it is recommended to provide at least 50 square meters per bird. see area.
- In the presence of affordable feeders and drinkers;
- In nests located at different heights.
- In equipped nests where laying hens will be located in the country.
- Good lighting and ventilation.
Straw bedding is made in feeding places and nests, which must be cleaned and updated regularly.
bird walking
 The more birds accumulate in a limited area, the greater the risk of infections and other diseases in chickens. Therefore, it is important to provide chickens with sufficient space for walking, which will increase the egg production of laying hens and the fatness of meat breeds.
For this purpose, chickens, especially in spring, are divided into 10-12 birds, allocating them separate areas for walking.
Perches for laying hens in the country
Having made a chicken coop in the country with his own hands, the summer resident should pay attention to arranging nests where it will be convenient for chickens to lay eggs.
At least two or three nests are arranged for a dozen chickens, and in the summer it is recommended to arrange perches in the air, where the bird walks.
The distance between perches should be at least half a meter, while nests located at least half a meter from the floor should not sag. To keep the nests clean, the arrangement of visors above them allows. And to fill the nests, they use regularly cleaned and changed straw.
It is not worth using hay, because it quickly begins to rot and becomes the cause of the development of infection and pests.
Nests need to be slightly darkened, because laying hens in the country do not like to rush in bright light. Well, if the perches are removable, then they can be removed and cleaned twice a year.
The modest size of many household plots made a variety of chicken coop designs in demand, including unusual, but very practical buildings.

This also applies to portable mini-designs. You can make a chicken coop in the country with your own hands in such a way that it will make it easy to move the structure, while the chickens will always be in sight and will never spoil cultural plantings, which often happens with free range.
In the design of such a miniature chicken coop, like any other, three main areas should be provided:
- space for nests;
- a place for walking a bird;
- nests for laying hens in the country
What is better to build a chicken coop in the country?
Most often, the following materials are used to build a country chicken coop:
- A wooden block is used for the frame of the chicken coop;
- Wall cladding is often made of wooden lining;
- Be sure to provide a retractable tray under the perch so that cleaning can be carried out faster and more efficiently. For this pallet take a galvanized sheet;
- For fencing walking take a metal mesh with a small mesh.
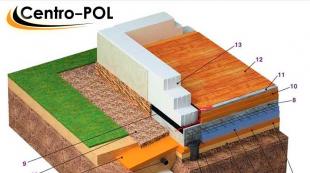
- If a chicken coop with a green roof is conceived, where decorative or green crops will be planted, then roof waterproofing is mandatory. For such insulation, any waterproofing material in rolls is ideal.
The green roof not only creates an original appearance of the chicken coop, but also reliably protects the bird from overheating inside the house on hot days.
Well, if there are not enough building materials, then you can make a chicken coop in the country with your own hands from improvised means, for example, you can find arched chicken coops made on the basis of plastic pipes, pallets or completely original solutions.

Having built a chicken coop in the country, it is important to cover all the wooden elements of the structure, regardless of its size and design, with a special compound that protects the wood from damage by pests and from atmospheric influences.
Design options for country chicken coops
Stationary houses for chickens of different capacities, designed for summer or all-season poultry living.

A beginner poultry farmer can recommend a simple chicken coop design, which can be moved to a new place if desired using two boards that act as portable handles. At the same time, the chicken coop is similar to a one-story cottage with an attic.

The one-story portable chicken coop in the country is even more compact than the previous one.

Portable chicken coop arch design.

Many summer residents today pay attention to mobile structures, and they make such a mobile chicken coop with their own hands.
Mobile chicken coop in the form of a wheelbarrow.
Such devices are mounted on a single-axle frame with wheels. This scheme is good for completely chicken coops, which makes it easy to move the bird around the lawn of the site or fenced pasture.

Mobile chicken coop trailer.
This is a two-axle trailer for a chicken coop of considerable size and capacity, which has a large weight, which allows you to take the bird to remote pastures.

Mobile country chicken coops on rollers.
Mini chicken coops on small casters can be set up on a level base and can be moved within small areas.
If you dream of raising chickens in the country, but the lack of a specialized room stops you, do not despair, building a comfortable and functional chicken coop with your own hands is not at all difficult.
First of all, it is necessary to determine the number of chickens that will live in the future building.

Given this information, you can plan the size of the chicken coop, and allocate space for the building.

You can make a simple chicken coop from any materials at hand, of course, having at least the most minimal building skills.

Building requirements
Any specialized building must meet the requirements for its functionality. At the design stage, some points should be taken into account:
- Ensuring the safety of the building from the penetration of predators. Otherwise, you can not count the number of birds or the number of eggs.
- Provide ventilation or permanent ventilation of the house.
- The absence of drafts is an important requirement that will prevent all kinds of bird diseases and help maintain a comfortable temperature.
- Thermal insulation is also necessary, especially if chickens are planned to be kept all year round.
- For good egg production of chickens, lighting is needed indoors, which must be turned on at some time of the day.
chicken coop project
Choose a place for a chicken coop on a hill, in the lowland the house will be constantly wet, not having time to dry out from morning fogs and precipitation.

When calculating the area of \u200b\u200bthe building, do not forget about walking the birds, the more laying hens walk, the better they rush. When accurately calculating the area of \u200b\u200bthe chicken coop, take into account the fact that 4 sq.m. is enough for a comfortable existence of five hens, and about 7 sq.m. for walking.

A clearing for walking chickens will be correctly located to the south. Enclose with a chain-link mesh and be sure to make a roof. It will protect not only from rain, but also from the sun.

If your site is flat, then before construction, make an artificial elevation of sand and gravel. To protect the chicken coop from small rodents, mix clay and broken glass and place on top of the mound.

Natural lighting of the house can be provided by making a door with glass. To provide space, the ceiling is raised to 2 m. If the bird nests are attached outside the poultry house, you do not have to go inside to pick up the egg. You can see a drawing of this version of the chicken coop in the photo.

Foundation
If you are building a summer frame chicken coop, you don’t need a concrete base under it, a slight elevation is enough.
When building a capital structure of brick, a foundation is required. A monolithic or tape base is suitable here. In such a room it is ideal to place a winter chicken coop.

Poultry floor
Earthen and clay floors can be made with a low strip foundation. If desired, the floors can be assembled from boards or concreted.

When using the premises in winter, the floor must be insulated with mineral wool, which is laid between the joists, and then covered with plywood. Such floors are covered with sheets of roofing material for reliable coverage and protection of the floor from the waste products of birds.


Sand is also good for sprinkling the floor.

Note!

Wall construction
Most often, the walls of the chicken coop are built of wood, as a rule, this is a frame building sheathed with clapboard. They are insulated with mineral wool or foam, from the outside, before sheathing, the structure is covered with a vapor barrier material.
A brick structure requires good heating in the winter, which will lead to costs, and the construction of such a chicken coop will be more difficult and expensive.

Walls made of any materials must be disinfected before use, this can be done with ordinary lime.

Chicken coop roof
When building a chicken coop in the country, it is better to make a gable roof. This technique will help to allocate space for roof insulation.

If the chicken coop is modest in size, you can do without an attic and lay the insulation directly under the roofing material. Chicken coops are covered with slate, metal tiles, professional flooring.
Room ventilation
Good ventilation is important for bird health, especially during the summer. The ventilation system in the chicken coop can be several holes on opposite walls with valves.

Note!

Valves will help control and regulate the flow of cold air, which is especially important in winter.

The interior of the chicken coop
The most important and basic interior item of the chicken coop are the perches, they are wooden rounded poles, the length from the wall to the wall of the chicken coop. It is on perches that chickens spend most of their lives.

You need to fix them at a distance of 50 cm from the floor and 25 cm from the wall and 35 cm between each other. Each resident of the poultry house is entitled to 25 cm of poles. So we expect in a chicken coop for 10 chickens, we will have to place perches at 2.5 m.

If laying hens live in a chicken coop, then nests will be the second important piece of furniture. You need to build at the rate of 5 layers per nest. Having built a chicken coop for 20 chickens, you will have to place about 4 nests.

It is best to place them in the dark corners of the chicken coop, after warming them well with sawdust.

The dimensions of the hen box are 30cmx30cm wide and 40cm high. The nest is raised 50 cm from the floor.
Note!


Lighting
An important condition for the normal life of a chicken is lighting. In dark rooms, the bird becomes inactive, its egg production decreases.

The chicken coop must have an opening window, which will provide not only sunlight, but also additional ventilation.

Laying hens must be provided with light up to 18 hours a day. In winter, artificial lighting is indispensable.

Chicken coop heating
In winter, the chicken coop needs to be warmed up to a temperature of at least 10 degrees during the day and 15 at night. It is important to control the level of humidity in winter, high humidity will lead to illness and further death of birds.


In our selection of photos of chicken coops, you can choose the best option for yourself.

DIY chicken coop photo


Are you planning to breed chickens in the country, but do not know how to build a chicken coop with your own hands? You can make it from scrap materials and without using any fancy tools. In our article you will find many tips, as well as detailed photos, videos and drawings that will help you build a poultry house correctly.
Preparatory work
Before you get started, you will need to choose the most suitable chicken coop design. Think about its size, location and seasonality in advance, because these characteristics will not be able to change after construction is completed. In addition, if you try hard, then the chicken coop will become not only a reliable haven for chickens, but also a real decoration in your country house.
Location selection
Building a chicken coop with your own hands should begin with choosing a good location. Try to place the room on a hill. So you can protect it from flooding during heavy rains. Think in advance how much space you need. If you plan to expand your farm over time, then immediately pick up a large area.
Also try to correctly position the house relative to the cardinal points. There must be windows on the south side, so you will extend the daylight hours for the birds, which will increase egg production. Doors are best placed on the west or east side, so you will save the room from the cold north wind.
Most breeds of laying hens are quite restless birds, and the presence of sources of noise near the poultry house can significantly impair their productivity. Try to find a place in the country where they will not be disturbed by various harsh sounds. It will also be a good solution if we build a chicken coop with our own hands surrounded by a hedge that will protect the birds from stress.
Materials and tools
To build a chicken coop in the country, you will need to stock up on a sufficient number of boards and beams. They will form the basis for the floor, walls and roof. When building a foundation, you will need bricks and cement. In addition, when you build a chicken coop, stock up on a lot of insulating materials, such as roofing felt, mineral wool, or sawdust. To build an aviary, you will need several meters of metal mesh.
You will also need a basic set of tools. Before you start building your chicken coop, make sure you have everything from this list:
- hammer;
- saw;
- nails and screws;
- ruler with a level;
- shovel.
Building a chicken coop
Building a comfortable chicken coop with your own hands is not difficult if you follow the entire sequence of actions correctly. Before that, you can watch photos and videos to better understand the construction process. Having decided on the place and the list of materials, you can start building a building in the country.
Foundation
First, decide if your chicken coop needs a foundation. If you are going to build a small poultry house, then you can do without it. But at the same time, do not forget to deepen metal plates around the perimeter to protect birds from predators.
If your poultry house is quite large, then the construction of the foundation will be mandatory. The best choice when building a chicken coop will be a columnar foundation. It is fairly easy to build and can be made from the cheapest materials. In addition, by properly building such a foundation, you will be able to avoid the penetration of predators and provide good ventilation for the floor.
- To begin with, study the drawing and, according to it, hammer metal rods into the corners of the future building.
- Connect them with a rope and, just in case, take verification measurements.
- Remove the top layer of soil by about 20 cm. If this is fertile soil, you can use it to good use in the country by transferring the land to the garden.
- Further along the perimeter, it is necessary to build pedestals that will become supports for the future building. The distance between them must be at least 1 m. A hole about 60 cm deep is dug under each cabinet.
- Pedestals should rise above the ground by about 20-30 cm. Using a level, make sure that they are even and located at the same height.
On this, the construction of the foundation will be completed. It is necessary to give him time to compact, so it is necessary to continue building the chicken coop no earlier than after 5 days.
Floor
If you are trying to build a chicken coop in the country, which can be used both in summer and in winter, then the floor should retain heat well. The best solution in this case would be to make a double floor. To do this, immediately above the foundation, a “rough” floor is spread, which can be made of any materials. Next, beams are laid on it, a layer of insulation is laid and the main floor is laid. It should consist of even boards and not contain cracks and openings.
Frame and walls
Walls also need to retain heat. Therefore, it is recommended to build a chicken coop using a frame of bars. Do not forget to leave openings for windows, they must be made to ensure good ventilation. After fixing the bars, it is necessary to upholster them with boards on both sides. Place insulating material between them. For these purposes, mineral wool, sawdust or other insulation is well suited.
The height of the walls should be at least 1.8 m. Otherwise, the chickens will be very limited in space, which can also adversely affect egg production. You can also paint the walls in your favorite color. This will not only improve the aesthetic appearance of the house, but also prevent damage to wooden structures by insects. Also, do not forget to install windows that can be removed or opened during a hot period.
Roof
If we decide that we are building a chicken coop in the country, then in the same room we place everything necessary for caring for the bird. It is enough to make a gable roof, and under it you can place tools and feed for your layers. In addition, this design will avoid the accumulation of snow and rain, which can lead to dampness.
It is not difficult to make such a roof. First lay the flooring, then fasten the ceiling beams at an angle. The floor must be well insulated. Insulation can be made from improvised materials, for example, from coal slag or expanded clay. Further, roofing material is attached to the beams, which is covered with slate or other roofing material.
Aviary
If you decide to build a chicken coop with a paddock, then you will need to attach an aviary. Its size should be 1.5-2 times the area of the house. Try to build it on green grass to provide birds with access to healthy food while walking. To build an aviary, you can make several sections of the bars, tightening them with a net. One of the sections can be attached with hinges, making a gate out of it. You can see examples of interesting enclosures in the photo and video in our article.
Inner space
When building a chicken coop, it is very important to pay attention to its interior decoration. It is necessary to properly place perches and nests and make sure that the layers are calm and comfortable inside. You can see various options for interior arrangement in the video.
First of all, take care of the number of perches. Calculating it is very simple: each chicken needs at least 30 cm perch. It is best to make them from a 40x60 mm timber, which is recommended to be rounded. Perches should be placed at a height of 70-80 cm, while they cannot be fixed on top of each other. To make cleaning easier, you can place trays under the perches.
If you are building a chicken coop for laying hens, then you will need to take care of comfortable nests. Wooden boxes filled with sawdust are suitable for this purpose. Place them in the corners of the house at a height of about 30-40 cm from the floor. Be sure to also lay sawdust, straw, or other dry material on the floor. It will make the birds feel more comfortable and also make it easier to clean the house.
Photo gallery
Have you decided to build a chicken coop in the country, but have not yet decided on the design? Maybe one of these photos will inspire you!
Drawings and diagrams
Video "We build a chicken coop in the country with our own hands"
In this video, you can learn even more about how you can build a chicken coop with your own hands. Here you will find detailed instructions, as well as many useful tips that will greatly simplify the manufacture of a summer house.
Many summer residents and people living in private homes are engaged in keeping chickens. Like other living creatures, chickens need a special place where they will walk and spend most of their time. If in summer you can equip an old barn and an aviary next to it for this, then in winter you will need to build a full-fledged chicken coop to keep the bird.
Do I need to build a warm chicken coop
The health and egg production of poultry is directly dependent on their comfort, good nutrition and general physical activity. Not the last role is played by the temperature regime and the duration of daylight hours.
Old barn converted into a chicken coop with paddock
The period from November to March is the most difficult for both poultry and poultry farmers who keep laying hens all year round. If in spring and summer the bird leads an active lifestyle, freely walks around the aviary or alley, bathes in sand and specially designed water containers, then in winter, for obvious reasons, its activity is very limited.
If the temperature is too low and there is no light, the egg production of laying hens is greatly reduced, and in some cases completely stops. Based on this, for the period of cold weather for chickens, a chicken coop should be built that provides conditions such as:
- temperature above 10–12 o C and low air humidity;
- artificial lighting, which increases the length of daylight hours;
- natural or artificial ventilation for constant air exchange;
- a place for nests and a free perch at a low altitude;
- free space at the rate of 1 m 2 per chicken.
Compliance with the conditions described above ensures that laying hens not only remain completely healthy and endure the winter well, but also maintain egg production and overall body weight.
Types of insulated chicken coops
An ordinary chicken coop is a barn, near which there is a platform for walking birds in the fresh air. The walking area is fenced with a fine-mesh net, which will reliably protect the bird's habitat from unwanted penetration of predators.
Winter chicken coop made of timber and boards for 30–35 chickens
In fact, this option can be taken as the basis for the construction of a warm chicken coop. Especially if you need a room for keeping no more than 10-15 chickens. If desired, you can consider a more comfortable chicken coop with both external and internal walking areas. But in this case, its size will be noticeably larger, which is not suitable for suburban areas of a small area.
Depending on the number of birds, the following types of chicken coops can be used:

In many ways, all three types of chicken coops are similar and differ only in size, but with enough materials and free space on the site, an insulated chicken coop can have a completely different look.
For example, you can build a completely enclosed structure, which will already have a place for walking. This will avoid hypothermia of chickens during walks, and will also enable the bird to walk freely, even when it is -15–20 ° C outside.
The choice of material for DIY construction
A variety of building materials can be used to build a chicken coop - from edged boards to masonry bricks. Any material has both positive and negative qualities, which should also be considered when choosing.
base material
The construction of a chicken coop, like any structure, begins with the laying of a supporting foundation. The foundation is necessary for reliable protection of load-bearing walls and roofs. In the absence of a base, the walls of the chicken coop will be under the constant influence of moisture, which will come from damp earth. As a result, this will lead to decay and damage to the structurally important components of the structure.
For the manufacture of foundation supports, concrete, brick or foam blocks are used.
For the construction of an insulated chicken coop, you can use such types of foundations as:
- columnar - suitable for building chicken coops using frame technology, when the walls are made of thick boards and OSB. For the manufacture of the foundation, foam blocks or concrete mix are \u200b\u200bused. Supports are erected along the perimeter of the future structure;
- pile - used for the construction of buildings on heaving and moving types of soil. The base in the form of metal piles sunk into the ground along the perimeter of the building is suitable for building wooden chicken coops. If a pile-grillage foundation acts as a foundation, then its bearing capacity is sufficient to build a chicken coop from foam blocks;
- tape - the most reliable type of foundation. It can be used to build a chicken coop of any size and design. For the manufacture of the strip foundation, a concrete mixture of the M500 brand, steel reinforcement Ø18 mm and an edged board are used.
For the manufacture of the grillage, you can use both a wooden beam 20 × 20 cm, and a concrete mix of the M500 brand. The first option is cheaper and easier to implement. The use of a concrete mixture requires the ability to set up formwork and knit a reinforcing cage, but in general, the use of these materials allows you to build a more reliable and durable foundation.
The choice of materials for making the floor in the chicken coop depends on what type of foundation is used. For pile and column foundations, it is more rational to use a wooden beam, edged board and DSP sheets. In the case of a strip foundation - concrete and reinforcing materials.
Wall materials
The choice of material for the construction of the walls of the chicken coop depends on the size of the structure and the technology by which it will be built. The simplest and most quickly implemented option is a chicken coop made of wooden beams and OSB. A beam or a thick board (from 22 mm) is used to build a frame, which is later sheathed with OSB sheets inside and out.
The foam block is perfect for building the main walls of a winter chicken coop.
For the construction of the main walls of the chicken coop, you can use the following materials:
- shell rock is a natural material with low thermal conductivity. Perfect for building chicken coops for 25-30 chickens. The shell rock is a rectangular block 180x180x380 mm. The technology of work is in many ways reminiscent of the process of laying foam or cinder blocks;
- foam concrete is a popular environmentally friendly building material. Suitable for building chicken coops of any size. For the construction of walls, it is better to use foam blocks of the D400 brand with a size of 200x300x600 mm. The thickness of the walls being built depends on the temperature regime in the region;
- brick - a traditional material for the construction of load-bearing walls. It has low thermal conductivity and long service life. It is best used for the construction of capital chicken coops for 50 or more chickens. For the construction of chicken coops, both solid and hollow bricks are suitable.
When choosing the material for the walls, you should also consider how long the structure will be built. If you are just trying yourself as a poultry farmer, then wooden beams and OSB will be the best choice for wall material. In the future, such a chicken coop can be disassembled or expanded due to a small extension.
If you already breed chickens in large numbers and plan to build a permanent chicken coop, then it is better to build a capital structure from foam blocks or bricks. Such a chicken coop will cost more, but its service life is much longer.
material for insulation
To insulate the floor, walls and ceilings of the chicken coop, you can use various heat-insulating materials. The cheapest option is the use of sawdust, expanded clay and dry hay. Expanded clay is used to insulate the floor or ceiling, and sawdust and hay are used to insulate walls.
Styrofoam has a low coefficient of thermal conductivity, which makes it one of the best materials for wall insulation.
The only disadvantage of this method compared to modern heat insulators is that the materials have a high thermal conductivity. In turn, this requires the arrangement of a large layer of insulation, which is not always possible when building a chicken coop.
Modern insulation materials that can be used to insulate walls and floors in a chicken coop include:

When choosing a heat-insulating material, one should take into account its cost and the surface area that is planned to be insulated. For small chicken coops, Stizol and other polyethylene foam materials can be used. Steizol has a low coefficient of thermal conductivity (0.3 W / m * K) - this ensures that the material reliably retains heat indoors.
For coops with 50 hens or more, a combined approach is recommended. For example, insulate the floor with expanded clay, and the walls with extruded polystyrene foam. If you want to save money, then it is better to use polystyrene or mineral wool in conjunction with stizol.
Preparatory work
In order to build a chicken coop quickly and without problems, you should carefully prepare for the construction work. To do this, you need to decide on the location of the chicken coop, draw up a drawing of the future structure, calculate the material and prepare a construction tool.
The diagram should show the location of nests, perches and feeding places.
When choosing a site on the site, it is advisable to adhere to the following:
- it is not recommended to build a chicken coop in a lowland or on a slope. It is optimal if it is a free platform located on a hill;
- chickens and other poultry are afraid of noise. Therefore, it is better to build a chicken coop away from the road and other sources of noise;
- The health of chickens is directly dependent on the amount of sunlight. To ensure the free flow of light, the structure should be located on the south side.
If the soil on the site is represented by clay, loamy, swampy and other soil that does not absorb moisture well, then it is recommended to drain the site before building a chicken coop. If this is not done, then the supporting base of the structure will quickly become unusable, and this will reduce the life of the chicken coop as a whole.
After you managed to find a suitable place for the construction of a chicken coop, you can proceed to drawing up a drawing. This can be done using plain paper and pencil, as well as using special computer programs for design.
Opposite each structural element, you need to indicate the size - this will help to avoid mistakes during construction
The drawing should depict the structure on a reduced scale. This takes into account that the size of the structure depends on the number of chickens that are planned to be kept.
In front of each structural element, its size should be applied. This will help you quickly navigate the project without wasting time on miscalculating one or another part of the structure. Additionally, you should depict the chicken coop in the projection from above. On this part of the scheme, you need to place the entrance to the room, perches, nests, a feeding place, etc.
As an example, consider the two diagrams above. Both options are designed to keep 10-12 chickens. The first diagram shows a chicken coop on a columnar foundation 200 × 400 cm with a pitched roof. For the manufacture of the chicken coop, a cut board with a thickness of 10 to 20 mm is used. If desired, this scheme can be taken as a model, on the basis of which the chicken coop you need will be built.
The second diagram shows a chicken coop with an aviary for walking. The dimensions of the structure, taking into account the vestibule, are 425 × 525 cm. For the construction of the chicken coop, as in the previous version, a wooden board and timber are used.
Materials for building a chicken coop
The materials for building an insulated chicken coop are selected based on personal preferences and the funds that you are willing to spend on the construction of the structure. For example, to build the chicken coop from the first example above, you need the following material:

As fasteners, it is desirable to use galvanized wood screws or galvanized nails. To ensure the reinforcement of the frame, you can use a steel corner of a suitable size.
Work tool
To build a chicken coop, you need the following tools:

Manufacturing technology of a chicken coop with perches
The technology for manufacturing chicken coops of various sizes is similar in many respects. The main thing is to follow the sequence of actions and adhere to the drawing that was drawn up earlier. The construction of an insulated chicken coop begins with marking, preparing the site and pouring the supporting base.
Making the foundation and floor
The size of the chicken coop directly affects the total weight of the structure, so when choosing the type of foundation, consider the size of the structure being built. For a chicken coop for 15–20 chickens, it is recommended to build a pile or column foundation. The second option is the most popular, since the supports can be poured on their own using a concrete mixture.
To fill the foundation and build the floor of the chicken coop, you will need to do the following:
- According to the drawing, it is necessary to mark the place where the chicken coop is planned to be built. To do this, you need to level a piece of land with a shovel. After that, wooden pegs are driven into the ground, between which a rope is pulled.
Marking the foundation with pegs and rope is the easiest and fastest option.
- At the corners of the marked area, it is necessary to dig wells for concrete supports 50–60 cm deep. For this, a hand drill and a shovel are used. Well sizes - 30 × 30 cm. Wells similar in size and depth are equipped along the perimeter of the future structure with a step of 2 m.
- For chicken coops longer than 6 m, the construction of a concrete grillage is desirable. To do this, you will need to dig a trench 20 cm deep around the perimeter of the marked area. At the bottom of the trench, it is necessary to fill up 10 cm of sand and 10 cm of gravel with a fraction of 20–40. Each layer is carefully leveled and compacted.
To assemble the formwork box for support, it is best to use plywood or flat slate.
- Formwork for supports and grillage is made and installed from edged boards. To do this, the boards are knocked together into shields up to 70 cm high. For installation, supports made of bars and bricks are used. For reinforcement, reinforcement is used, which is knitted into a frame consisting of two lower and two upper rods.
- For pouring the foundation, a concrete mix based on M500 cement and fine-grained sand, taken in a ratio of 1: 3, is used, respectively. For mixing, a concrete mixer or an electric drill with a mixer attachment is used. Pouring supports and grillage starts from any convenient angle.
- After pouring the foundation, you will need to wait for a set of minimum strength. To do this, the foundation is covered with plastic wrap and left to dry for 7-10 days.
The binding of the columnar foundation is made of a bar 20 × 20 cm
- After 10 days, the surface of the foundation is covered with roofing felt, on which a wooden strapping made of a 20 × 20 cm beam is laid. The strapping is a box of 4 blanks that are connected at the corners with self-tapping screws and a steel corner. Before laying, the strapping is treated with a wood preservative. The harness is attached directly to the grillage with anchor bolts.
- Logs from a board 20 × 200 mm are mounted to the laid strapping. To do this, you need to prepare several blanks from the board. The number of lags depends on the length of the chicken coop. The installation step is 1 m. After that, the board is placed on the edge and attached to the harness using self-tapping screws and a corner.
The logs are attached directly to the strapping of the timber in 1 m increments.
- The resulting floor structure is hemmed with a draft board, which is fixed to the logs and strapping. After sheathing, the entire floor structure is treated with a wood preservative.
Floor insulation is best done after the assembly of the load-bearing walls (see below). To do this, the floor is covered with a vapor barrier membrane, which is fixed with a construction stapler. Then the space between the lags is filled with expanded clay fraction 20–40. At the end, floorboards from edged boards are laid on the logs.
The construction of the walls of the chicken coop and the insulation of the structure
The walls of wooden chicken coops are best built using frame technology. This will allow laying the insulation in the space between the outer and inner skin, which will prevent its damage during the operation of the house.
The technology of insulation and wall construction consists of the following:
- An edged board is mounted at the corners of the strapping, which is fixed using a 50x50x35 mm mounting bracket and 50 mm self-tapping screws. The front pillars should be 30-50 cm higher than the rear ones. This will provide the necessary slope of the roof. After that, all corner posts are connected by means of an upper strapping from a board of the same section.
To fasten the racks to the harness, galvanized nails or self-tapping screws are used.
- Next, you need to specify the width of the insulation that will be used for thermal insulation of the walls. Taking into account its width, intermediate supports of the crate are installed. They are also attached to the harness using mounting brackets and self-tapping screws.
- To strengthen the structure in places where the front door, the window for the exit of the bird to the outside and the windows will be located, horizontal guides are mounted according to a similar principle. To frame the window opening, guides are installed at the top and bottom.
Intermediate racks of the frame are mounted in increments equal to the width of the insulation used
- Having finished with the installation of the frame, you can immediately proceed to the roof. To do this, you need to measure the distance from the front drain to the back. To the value obtained, add 25–30 cm, which will go to the roof overhang. After that, according to the calculated size, the rafters are prepared from the edged board.
- Prepared blanks are treated with a wood preservative. After drying, the rafters are placed on the edge and attached to the upper trim of the frame. The step between the rafters should be equal to the width of the insulation. After that, a polyethylene film 200 microns thick is laid on the rafters, a crate made of a 10X10 mm board with a gap and roofing material.
Sheathing the walls of the chicken coop with OSB sheets from the outside
- The frame of the chicken coop is treated with an antiseptic for 2 times. Further, 20 × 20 mm bars are mounted from the outside, onto which OSB sheets are attached using self-tapping screws 50 mm long. Step between screws - 20 cm.
- A vapor barrier membrane is laid in the space between the frame posts without tension. A stapler is used for fastening. After that, mineral wool is laid between the racks in slabs or a roll. It is important that the material lies tightly and does not fall off.
Insulation in slabs or rolls is laid in the space between the racks of the frame
- When insulating walls with polystyrene foam, polystyrene foam or styzol, it is not necessary to lay a vapor barrier. After laying the insulation, the walls are sheathed on the inside of the chicken coop. The place where the ventilation will be located is not sheathed.
The roofing process is similar. For this, heat-insulating material is laid in the space between the rafters. If desired, roof insulation can be performed in two layers of insulation. In the process of sheathing the frame, it should be remembered that there should be a small ventilation gap between the OSB sheets and the insulation.
When insulating the roof from the outside, insulation in the form of a polyethylene film should be laid. Roof sheathing is performed using a similar technology. When installing windows, the gaps between the frame and the window frame are filled with mounting foam.
Installation of ventilation and lighting
Ventilation in the chicken coop can be represented as a conventional exhaust vent with a damper, or a full-fledged ventilation duct, which will be located under the roof.
The best option for a chicken coop built using frame technology is two ventilation holes located on opposite walls of the building. In order to install ventilation, you will need to cut a square hole in the wall of the chicken coop. This can be done with an electric jigsaw by first drilling a small hole in the casing to insert the cutting blade.
The second hole is cut in a similar pattern 40 cm below the first. Supply ventilation fans of any convenient size are mounted in the openings. The average cost for such products without additional functions does not exceed 800-1000 rubles.
Lighting in the chicken coop can be done using LED strips of various brightness
As lighting, it is better to use 1-2 fluorescent lamps or an LED strip with a white luminous flux. For laying electrical wiring, a plastic corrugation and a copper cable of the appropriate section are used.
If you plan to install heating equipment, it is recommended to use fan heaters with automatic temperature control. They can be turned on when the temperature inside the coop at night falls below 12 ° C.
Making perches and nests
For the manufacture of perches, you can use a wooden block 20 × 20 cm or a round profile 28 × 2200 mm, which can be purchased at various hardware stores.
When making nests, remember that one chicken requires 30–35 cm of free space.
To install perches, you will need to do the following:
- Perches are installed at a height of 50-70 cm from the floor level. The installation location is selected based on the free area in the room. It is best to use a place near the window for this.
- To make perches, you will need to measure the width of the chicken coop. According to this value, it is necessary to prepare 4–6 blanks from a round wooden profile or bar.
- As supports, boards 50 cm long will be used, which are mounted on opposite walls. Preliminarily, 3 × 3 cm recesses are sawn in the boards for installing poles.
- For more reliable fixation, the pole is attached to the support using self-tapping screws or nails. The step between adjacent perches is 25–30 cm. The distance in height is at least 20 cm.
To make it more convenient for chickens to climb onto the perch, you will need to make a small ladder from the board. To do this, measure the distance from the floor to the lower perch. Next, the workpiece is sawn off, to which short bars of 20 × 20 mm are attached. After that, the ladder is attached to the lower perch with self-tapping screws.
As nests, it is better to use a semi-open box made of a wooden block and sheathed with OSB. Dimensions and manufacturing scheme can be seen in the photo above. First of all, a frame is assembled from a 20 × 20 mm bar. To fasten the workpieces, self-tapping screws 30 mm long and mounting angles are used. After that, the frame is sheathed with OSB or edged board. If it is required to install nests at a height, then legs are attached to the bottom of the box.
Features of chicken coops in the cellar
When converting the basement into a chicken coop, the foundation walls should be insulated with mineral wool or foam
- litter - a layer of dry sawdust 4–5 cm thick. The litter is changed as it gets dirty, but at least once a week. Sometimes you can use hay, but it will have to be changed more often;
- lighting - LED lamp power from 5 watts. With the help of artificial lighting, the length of daylight hours should be regulated. This will help increase the egg production of laying hens;
- insulation - mineral wool, stizol or other rolled heat insulator. To protect the insulation, it is better to use a vapor barrier membrane or dense polyethylene. The thickness of the insulation layer - from 5 cm;
- ventilation - vents in which you can install a supply and exhaust valve. Periodically, the cellar or basement should be well ventilated. For example, at the time of cleaning the litter.
Nests, as in the case of a full-fledged chicken coop, can be put together from edged boards on the basis that 30–40 cm of space is required per chicken. The perch is set at 50–70 cm from the floor level. If desired, the perch can be connected to the nests using boards.
Chicken coop care after winter
Disinfection of the chicken coop is carried out for preventive purposes at least once a year. This avoids the outbreak of infection and the spread of harmful microorganisms. It is best to disinfect in the spring or summer, when the chickens can safely walk in the fresh air, and you clean the chicken coop.
Complex of means for disinfection of chicken coops and other objects where animals and birds can be kept
To disinfect the chicken coop, you will need to do the following:
- cleaning - the floor, walls, ceiling, perches and nests must be completely cleaned of dirt and dust. To do this, use a convenient broom and brushes with a hard bristle. After that, the surfaces are washed with hot water with the addition of soda ash;
- processing - special means are used to disinfect the internal space in the chicken coop. For example, sodium hydroxide in the form of a 2% solution or a 4% xylonaft emulsion. The solution is prepared strictly according to the recipe without exceeding the norm. When processing, personal protective equipment is used: glasses, gown, respirator.
After processing, you should wait until the product has completely evaporated. The minimum exposure time is 2 hours, but it is advisable to wait at least 5–6 hours and only then release the birds. And they also disinfect feeders, drinkers and other accessories that were in the house.
Video: review of a winter chicken coop with a range
The construction of a chicken coop is not particularly difficult - you can do the work yourself, without resorting to the help of auxiliary workers and specialists. To do this, carefully study our instructions and read the advice of other chicken breeders, which can always be found on the Internet.