Let's build our own plane! How to build a model airplane yourself. How to design a wooden plane Do-it-yourself airplanes made of wood
Modern toy stores are simply bursting with a large assortment of all kinds of cars, bears, construction sets and much more. But remember the old days, when there was no such abundance. Then, in clubs and craft classes, we were taught to make toys ourselves, and the main material for creativity was plywood for modeling. It is precisely these crafts that we will tell you about today.

Preparation of material and tools
Like any business, and making a toy for a child is a very important step, you must first prepare both the material and the tools that will be needed in constructing the model.
If you are missing something from the list above, buy these missing items urgently.
- Hand jigsaw for wood, an electric tool in our case is not our help; we do everything manually.
- Model plywood, usually the thickness of the material is three and seven millimeters, otherwise it is also called three-layer and seven-layer, respectively.
- Pencil, ruler.
- Sandpaper and square file for processing aircraft spare parts.
- PVA glue or any other, which is designed for gluing wood.
- Great patience and desire to bring joy to the child.
We need to start our design, of course, by marking out all the parts of the future airplane, namely: the fuselage, wings and stabilizer. You can first draw a drawing on paper, and then transfer it to the plywood itself, or you can immediately draw the details on the plywood, whichever is more convenient for you. 
Since our model of an airplane made of plywood was invented on the fly, there are no exact dimensions and, accordingly, a template or drawing. But as an example, we will take a certain size of the wingspan, and we will build on it when assembling our aircraft.
Let's make the wingspan thirty centimeters long, this is perhaps the most optimal option; for those who find such an airplane small, they can increase the size of the wings and thereby make the airplane a little larger.
Cutting out blanks with a jigsaw
As you can see in the photo, all the components can be easily drawn by hand, there is nothing complicated here. Let's start with the fuselage, the length of which can be made ten millimeters larger than the wings. Just draw the body itself by hand as shown in the picture.
Immediately on the fuselage body, make tenon joints for attaching the wings. Due to such connections, prefabricated plywood models are quite strong and can be easily connected with glue, so be sure to use them.
Let's move on to the wings, as we have already decided, the wings will be thirty centimeters long, respectively eight to ten centimeters wide. Remember the main thing, the lower wing should be no more than ten millimeters shorter than the upper one. 
All that remains is to draw the struts to support the wings, the rear flap, and the stabilizer. When everything is ready, you can start cutting out the parts with a jigsaw. Carefully cut out all the parts for the plane based on the outlines you drew. Don’t be discouraged if there are some unevenness somewhere, in any case, you try, and you will succeed.
Advice!
The cut parts must be sanded with sandpaper immediately before assembling the model.
Once you assemble the plane, it will be inconvenient to polish it, as the model can be damaged.
Assembling our plane
As a rule, modeling from plywood is an interesting and meticulous task, and if you have already prepared tenon joints on the fuselage, now you need to make grooves on the wings for fastening to the body and for the struts supporting the wings.
Feel free to use a file while working and adjust the connections as accurately as possible. Start assembly by installing the stabilizer, which you will glue to the tail of the toy. 
At the next stage, our instructions recommend installing the wings in their place. To do this, apply glue to the joint and install the upper wing. Having turned the model over, we install racks to support the wings, and also pre-apply glue to the attachment points.
There is very little left and our homemade plane will be ready, we install the lower wing and our assembled structure. Also carefully coat all the butt joints on the assembled model with glue and place the plane on the shelf, allowing the glue to dry completely. 
It’s not at all difficult to make such an airplane, of course it’s not an ideal option, and if you want, you can look for other drawings of prefabricated plywood models, because the flight of fancy and creative ideas don’t end there. Let's take a look at what other crafts can be made from wood.
We continue to make homemade products
Well, let's not stop halfway, but let's try to please the child some more, with some kind of plywood craft. If you focus on a boy, then it is possible that you want to know how to make a tank out of plywood? Quite a logical question, let's try to answer it. 
As an example, we invite you to consider our small model of a plywood tank, which is easy to manufacture and, when assembled, looks no worse than tanks made from plastic construction sets.
Let's look at all the design stages in order, and start with the materials that are needed for modeling.
- Plywood is, of course, the basis of our model; in this case, the thickness of the plywood should be two to three millimeters. With such plywood it will be very convenient to cut out parts and then assemble them.
- Copy paper, with its help we will transfer the drawing to the workpiece.
- A set of needle files will help in processing tenon joints when assembling the model.
- A hand jigsaw and files for it, as for the files, prepare several of them, usually when cutting a model from plywood with your own hands, the files tend to break.
- Glue, preferably using PVA, it interacts well with wood and becomes discolored after drying.
- Sandpaper and clear varnish.
Advice!
It is recommended that before starting to outline the details of the tank, the prepared material, plywood, should be cleaned with emery cloth and the surface made smooth.
This approach will ensure more accurate copying of the drawing onto the plywood surface.
Copy the drawing and cut out the elements of the tank
The next step in constructing a tank model will be to transfer all the component parts of the model from paper to plywood. In the modeling process, namely answering the question of how to make a tank from plywood, model drawings play a very important role. 
Tank model drawing. Part 1 
Now that you have a ready-made template of parts in your hands, you need to transfer it to plywood using carbon paper. Outlining the details is best done with a simple pencil or using an empty ballpoint pen.
Do not forget about the numbering of parts; when copying, also transfer them to the material. In the future, when assembling, it will be easier for you to navigate the details. The rules of assembly are the joining of parts in sequence according to numbers: number one is connected to number one, number two is connected to number two, respectively.
When everything is ready and the drawing has been transferred to plywood, you can start cutting out the parts. We won’t teach you how to use a jigsaw, but we will give you a recommendation. After you cut out all the parts, be sure to sand them down, so you will smooth out all the corners left by the jigsaw and ultimately get a neat model.
Now, in order of numerical designation, we begin to assemble our model of the tank; after joining, we coat all connections with glue and let them dry a little. After assembling all the components, you should have a tank model that is almost ready.
As in any other matter, it remains to put an end to it, and our point is to treat the assembled model with colorless varnish. Believe me, the price of such a homemade toy is not comparable to the joy of your baby who will play with it, you can be sure that you did not waste your time making such a model.
What else can be made from plywood

In fact, modeling has enormous potential for creativity; plywood as a material is ideal for these purposes. Various plywood car models are very popular; as a rule, they are easy to manufacture and are in demand among children.
Here, for example, is a simple model of a truck; its manufacture will require very little material, and it will not take much time to assemble. If you take into account that you already have all the necessary tools, you can make such a craft without much effort.
In order to make such a truck, it is enough to transfer the template and all the spare parts of the car onto the material. Then collect all the parts and connect them together. These drawings of plywood car models have a common base and on this base you can assemble various versions of trucks.

If you get creative, you can make a closed van instead of a body, or cut out a fire escape, fantasize and bring your ideas to life together with your child.
Making a boomerang yourself
Another very interesting toy is the boomerang. In fact, this toy was considered a throwing weapon in the old days, but today both adults and children really enjoy the flight of this unique invention and return it to the place from which it was launched.
Let's figure out how to make a boomerang from plywood, while respecting all its aerodynamic properties. As a rule, first of all we need a material, in our case it will be plywood ten millimeters thick, and a template.
For the template, you will need a sheet of paper measuring fifty by sixty centimeters, and apply a grid with a mesh size of fifty millimeters on this sheet of paper. Then we draw the boomerang itself on the template, try to do this as shown in the figure below. 
After the boomerang template is ready, we cut it along the contour and transfer it to our plywood blank and follow a simple procedure:
- We trace the contours of the template with a pencil on the workpiece.
- Using a hand jigsaw, cut out the boomerang according to the contours.
- The resulting boomerang must be further processed and given aerodynamic properties.
- We clamp the boomerang blank with a clamp and use a small plane from the center to the edges to remove the excess wooden covering.
- As a result of processing, we should get a uniform transition from the edge to the center. The central part should be ten millimeters thick, the edges of the boomerang six millimeters. Try to make the transition smooth and not jagged.
- The next step is to be thorough. The boomerang must be perfectly smooth, this directly affects the aerodynamics.
- Now the toy needs to be opened with varnish and, after drying, painted in a bright color. Typically, bright colors will make the toy easy to spot in flight or when searching after it lands.
Information!
The boomerang by its nature belongs to the category of dangerous toys, so be careful when launching it so as not to harm yourself and the people around you.
It is advisable to launch in the field, in places where there are not crowded people and no residential buildings.
Finally
Very often, lovers of fakes are interested in: how to make a balalaika from plywood and is it possible to do this in practice at home? We hasten to please you, although such a product is considered a complex musical instrument, it can still be made at home. But we will talk about this complex process another time.
In the video presented in this article you will find additional information on this topic.
Erect airplane from tree Even a schoolchild who never misses classes in the school aircraft modeling club is absolutely capable of doing it. Ultimately, such a glider model is unlikely to be able to take passengers on board, but will reward the creator with good flight properties and high structural strength. By launching a wooden glider, you will acquire the skill of adjusting free-flying models and get an unforgettable sensation from a flight made with your own hands. airplane A.
You will need
- Pine slats, knife, jigsaw, plane, PVA glue, aluminum wire, polystyrene foam, balsa, mylar film, iron with thermostat
Instructions
1. Working on a wooden model airplane start by assembling the frame. Glue it together from pine slats with a cross section of 5x5 mm using PVA glue. After the glue has dried, reinforce the frame with inner corners made of foam. Also cut the upper end of the keel from a piece of foam or balsa with a knife. Round the front and back edges of the frame. Cover the keel on both sides with colored lavsan film. Glue the steering wheel to the rear edge (it can be cut from cardboard 0.5 mm thick).
2. Also assemble a stabilizer from pine slats with a cross section of 5x5 mm. Reinforce it with foam corners, rounding the edges of the frame. Bend the end parts of the stabilizer from wire (an aluminum knitting needle or a piece of electrical wire will do). Attach the ending to the frame with threads and PVA glue or epoxy resin. Cover the finished stabilizer with a thin lavsan film, just like the keel.
3. The wing will be made entirely of pine wood. The leading and trailing edges of the wing must have a section of 3.5x9 mm, the spar - 3.5x7 mm. Also make the ribs from pine blanks or linden. After the frame is assembled, plan the edges according to the wing profile and round them.
4. Make the fuselage from pine slats with a section of 10x15 mm. The rail should thin evenly along each length towards the tail. Plan the nose from linden or pine. You will also need a balancing weight made from a piece of lead. Insert the weight into the hole in the spout and rivet it.
5. After gluing and processing the fuselage, glue the fin and stabilizer to it with PVA glue. In this case, maintain the mutual perpendicularity of the tail elements and the even position of the stabilizer in relation to the fuselage beam. Varnish the fuselage and cover it with shiny nitro paint.
6. Adjust the wooden glider model. Tie the pylon at the rear and front ends to the fuselage using a rubber band and move the wing along the beam until you find the required location of the center of gravity relative to the wing.
7. Carry out the first test runs in the gym or outside in a light wind. Launch the model with a gentle throw along the horizon. By using adjusting wooden wedges placed between the pylon and the fuselage, achieve the lowest descent speed when gliding the model. After mastering the technique of such “piloting”, bravely use the model to demonstrate your design knowledge - for the fun of the public.
Modeling aircraft has fascinated both adults and children for decades. Aircraft made from plastic, wood, metal, composite materials. The final version today is probably the most famous, tea composites are strong and durable, they are created by an unnatural method by connecting heterogeneous solid materials, which consist of several components that differ in their chemical and physical properties.

Instructions
1. Design your plane on paper. Remember, it depends on your plan what the aircraft will be like in appearance and functionality. There can be a lot of options, it all depends on your imagination and imagination. However, here we should also consider those factors that will influence the lifting of the unit, its flight and landing, that is, all parts of the aircraft must be proportional and accurate in measurements and calculations.
2. Calculate all the details of your aircraft. In this case, you should calculate not only the weight and geometric dimensions of the unit, but also consider the number of seats, engine power, the one you will use, stall speed, operational overload, aerodynamics, etc. All calculations should be made strictly according to the appropriate formulas.
3. Determine and mark on your paper plan where there will be butting connections, and where there will be supporting connections, where there will be adhesive connections, and where there will be welding, threaded or composite connections. It should be taken into account that the joints are usually subject to higher loads, and they should be made of metal elements.
4. Prepare all materials and tools for work. Make composites in those places materials where holes, threads and sockets for connections are required. Remember that the holes do not have to be located near glued seams and adhesive joints.
5. Clean the surfaces around the made threads and holes. Determine the locations of the rivets and make these types of connections.
6. Begin assembling your aircraft in accordance with calculations and a paper drawing (sketch), observing and connecting all the parts of the aircraft step by step. When assembling an aircraft from composite materials remember that first the wings and tail are assembled, and then the body, into which all the elements (parts) of the aircraft are inserted. Test the finished unit.
Construct airplane allowed using available means, spending a minimum of time and effort. Moreover, such an aircraft model, if properly adjusted, will be able to fly quite far away. Having erected several of these airplane ov, you will be able to compete with your friends in the flight range of your models.

You will need
- – a sheet of squared notebook paper;
- - match;
- - a triangular object.
Instructions
1. Take a sheet of notebook paper and draw on it drawings of the wing and tail of the aircraft in accordance with the diagram presented in the figure. Carefully cut out the parts and bend the keels on the tail along the dotted lines.
2. Take a match that will be used as the fuselage of a future airplane. The match must be of good quality, that is, straight-layered and even. Cut off part of it with a blade as shown in the picture. Clean the cut area with sandpaper. Now glue the tail unit (see picture). Use PVA glue or similar.
3. Find a triangular object on which you can balance the fuselage with the tail unit. For example, you can cut a triangular prism from wood yourself or use a triangular ruler. If the fuselage is not balanced in any way and the tail of the plane outweighs, glue a small piece of plasticine to the nose (to the sulfur head of a match). When the balance point is located, sweep it - this will be the center of gravity of your aircraft.
4. Glue the wing to the fuselage, making an indent towards the nose 2.5 mm from the center of gravity. After the wing is glued, you need to bend it approximately 8°, as shown in the figure.
5. Your plane is ready, but in order for it to fly perfectly, it needs to be tuned. Take it with two fingers and smoothly roll it horizontally. Follow his flight. If it immediately dives down, bend the horizontal part of the tail upward. If it quickly falls flat, on the contrary, you need to bend the tail unit slightly down. If the plane is turning to the right, you need to bend the bends on the tail to the left. If he turns left, you need to bend them to the right. By bending the left or right side of the wing, you will get rid of the tilt of the plane. If set up perfectly, your plane will fly straight and descend smoothly and will fly at least 8 meters.
Video on the topic
Polycarbonate is a current material often used for the manufacture awnings. It has a number of advantages: attractive appearance, light weight, and the possibility of choosing a color. Despite the fact that many companies offer to install a canopy from polycarbonate For a certain fee, this work can be carried out independently.

You will need
- – polycarbonate sheet;
- – metal pipes;
- – wooden slats;
- - dye;
- – self-tapping screws;
- – fasteners for polycarbonate;
- – drill;
- – hacksaw.
Instructions
1. Before making a canopy, take measurements and purchase the necessary components: polycarbonate itself, pipes, wooden slats, fasteners.
2. To attach the canopy you will need a frame, the size of which depends on the available free space. The shape of the canopy depends only on personal preference, because polycarbonate is quite elastic in order to take the shape of a semicircle.
3. Take 4 pipes and dig them into the ground to a depth of 30-40 cm, forming a square or rectangle. There should be a distance of about 1-1.5 meters between the pipes if the canopy is made of polycarbonate will be larger, the number of supports increases. They will be the basis of the frame for the canopy. If you want to achieve increased structural safety, cement the base of the pipes.
4. Make a frame from wood that in appearance resembles a window frame, the sides of which will be equal in size to the distance between the pipes. Inside the frame there should be several transverse slats located at a distance of 50 cm from each other. It is to them that the polycarbonate will be attached. Treat the wood with stain or paint it so that the frame retains its shape longer.
5. Using corners with existing technical holes, attach the wooden frame to the pipes. The corners are attached to the pipes using metal screws. All kinds of screws can be used on the wooden part.
6. Cut a piece with a hacksaw or circular saw polycarbonate, the size of which should be 5-7 cm wider than the frame made.
7. Place the sheet on the frame and drill holes in it for fastening. They can be placed at a distance of 50 cm from each other. It is advisable to carry out drilling initially at high drill cycles; opposite to the edge of the hole, the holes turn out to be torn.
8. Using self-tapping screws and special washers with wide heads, attach the sheet to the wooden frame. Leaks at fastening points can be avoided using rubber gaskets. To make the edges of the canopy look more carefully, it is worth putting on them special finishing profiles, which are sold in the same stores as polycarbonate.
Video on the topic
In Minecraft you can make trolleys, cars and even planes. Probably every Minecrafter dreams of moving through the air at unimaginable speed. And if you don’t yet know how to make a plane in Minecraft, then it’s time to learn.

Instructions
1. Unfortunately, it is impossible to make a plane without mods in Minecraft. In order to build a working winged transport, you need to download and drop the Flan’s Mod files into the minecraft.jar folder. In order for the mod to work correctly, you must also install the MinecraftForge utility on your computer. With the help of this software add-on you can make four-wing and six-wing aircraft.
2. You should start crafting an aircraft by making the tail. It is made of leather and metal. To make the body you need wood, and to make the wings you need sticks. All items must be placed on the workbench as shown in the picture below. A plane in Minecraft will not fly without a propeller. It requires steel and sticks to make.
3. In fact, making a plane in Minecraft turned out to be not that difficult. For its construction, no hard-to-find materials were needed. You can float in the air, surveying the area from a bird's eye view. But the plane can still bomb its enemies!
4. In order to make a combat aircraft in the game Minecraft, you need to make a machine gun and bombs. You will also need a place to store charges - coklit. All these things are easy to craft if you look at the picture. This is how you can arm an airplane made in Minecraft.

Video on the topic
A children's playground on the territory of a summer cottage or country house will allow your child to energetically spend time in the fresh air under your supervision. Choose a well-lit and wind-protected place for the play area and build a playground with your own hands.

Sandbox on the playground
For children, there must be a sandbox on the playground. It can be made using several methods from inexpensive materials. Build a sandbox from a tire from a tractor or other large machine. Cover the bottom with non-woven material, one that will allow moisture to pass into the soil, but will not allow the soil to mix with sand. Place a tire on top and fill the structure with sifted river sand. A wonderful sandbox can be made from stumps. Select the required number of stumps and treat them with an antiseptic so that the tree does not rot. Lay out the rope in a sandbox shape in the place where you plan to place it. You can get creative and give the sandbox the appearance of a boat, a flower with petals, an airplane, or make lightly curved silhouettes. Dig the stumps along the silhouette, the one marked with a rope. By using thick stumps located on one tier, children will also have paths along which they can run or sit. Build a sandbox supported by boards. First, dig a hole about 50 cm deep in the place where it will be located and fill it with crushed stone. In this case, after a rainstorm, the sand will quickly dry out. Screw a box out of four boards and four bars. Take the bars more reliably, so that their lower ends also serve as legs. Paint the wooden edge of the sandbox with shiny oil paint. On the sides you can draw cartoon characters or large berries and fruits. Dig the legs into the ground along the silhouette of the hole and fill it with sand for play.
Baby swing
When building a swing, it is very important to follow safety precautions. The supports must be strong and the fasteners must be secure. Also consider the presence of free space in front of and behind the swing. For supports, take two thick beams about 3 meters long. Treat it with antiseptic impregnation. Dig two holes, approximately 50 cm deep. Install the timber and fill it with concrete or cement. After the solution has dried, attach a metal water pipe on top of the supports. Tie a rope with a seat to the crossbar. If the seat is wooden, try to give its corners a rounded shape. It is comfortable to use a child's car seat for swings.
Playground houses
Kids love to hide in secluded places. Make a house on the playground. This could be a hut built from branches, or a tent that you can buy in a store. You can also make a fabric house independently. Make a frame from timber or bend it from metal-plastic pipes. Pull old sheets or curtains over it. Cut a window.
Elements for outdoor games
Mount a basketball hoop on a beam or tree. Determine its height based on the child’s height. You can make a labyrinth out of old tires. Cut them in half and dig them into the ground in a certain order. Install the horizontal bar. Make a flat badminton court.
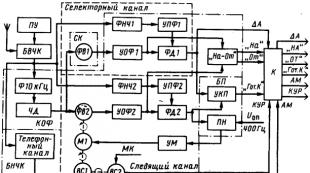
Homemade aircraft, drawings of machines and their brief descriptions built by amateur designers
PHOENIX M-5

A model that is equipped with two Vikhr-25 engines modified for air cooling. The design of the handle and the control circuit of the machine have no analogues in the world. Famous test pilots did not hide their delight, and even recommended its use on military fighters.
The take-off weight of the vehicle is two hundred and fifty-five kilograms, and the wing surface area is five point six square meters.
VOLKSPLAN

The model was designed by an American amateur designer, with a pulling screw, which consists of the following components:
Shaft (1), made of duralumin pipe
fuselage spar (2), the material from which is made – pine
casing (3), made of plywood three millimeters thick
wing spars (4)
arc (5)
tank (6), which holds thirty liters of fuel
frame (7), made of plywood thirty millimeters thick
automobile engine (8), the power of which is sixty horsepower
hood (9), made of fiberglass
spring (10)
technological holes for installing wings (11)
fender braces (12)
its racks (13)
his braces (14)
bolt for installing the strut (15)
Specifications:
Take-off weight is three hundred and forty kilograms
wing area is nine point twenty nine square meters
speed - one hundred seventy kilometers per hour
This model passed certification tests and was found fit for use; moreover, it was possible to perform aerobatic maneuvers and even a “corkscrew” on it.
AGRO-02

Created by Tver designers. The main material used in its manufacture is plywood, canvas, pine and the domestic RMZ-640 engine. The take-off weight of which was two hundred thirty-five kilograms and the wing area was six point three square meters.
KhAI-40

Designed by students of the Kharkov Aviation Institute. The model has a beam fuselage.
SINGLE SEAT AIRCRAFT BIPLANES


SINGLE BEAM PLANES
Every boy in childhood dreamed of being at the controls of an airplane. The sky, clouds, and travel have always attracted adventurers and brave men. But to feel closer to aviation, you don’t have to buy a plane ticket or enroll in a flight school. After reading this article, you will learn how to make an airplane out of wood with your own hands.
Required tools and materials
Before you search for a suitable aircraft model and its drawing, you need to provide yourself with the necessary materials. The best option would be. In its manufacture, three layers of birch veneer are glued together using phenolic glue.
In this case, the thickness of the material is important; it should be about 1 mm, but thicker sheets of plywood may be needed. If you don’t know how to make a flying airplane out of wood, then pay attention to this parameter. Moreover, this material is very light, flexible and durable.
When choosing plywood suitable for the job, you should pay attention to its appearance. Its thickness should be the same over the entire area. There must be no defects of any kind, delamination, chips or cracks. The material should be dry, so it is easier to process.
made of wood

Now that you have mastered the information on how to make an airplane out of wood in various ways, you can choose any of the options and modify it as you wish.
You can construct the structure yourself, but to do this you will need to study publications on the design of modern aircraft. Various virtual design programs may be useful.
If you are unable to find dry material, you can prepare plywood sheets yourself by keeping them in a room with low humidity and constant temperature for two to three weeks.
If you have never made and do not know exactly how to make an airplane out of wood, then take on the job only if you know what the future model will be like, or when its aerodynamic properties are not important (making a children's toy).
When making a decorative model or toy, you should get rid of sharp corners by chamfering.

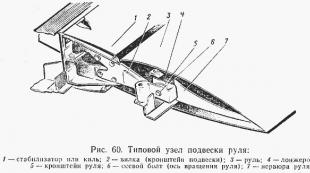
If you are working on a model intended for flight, then special attention should be paid to the precise positioning of the tail and wings. After all, the aerodynamic properties depend on them.
Conclusion
Airplane models of varying levels of complexity are made by craftsmen all over the world. At the same time, the most complex controlled models can perform aerobatic maneuvers.
Having selected a suitable drawing, you can easily figure out how to make an airplane out of wood. However, such work will be uncomplicated only when making the simplest models. Novice builders will not be able to undertake more labor-intensive tasks; they should master the simplest technologies and schemes, as well as understand the process in more detail.
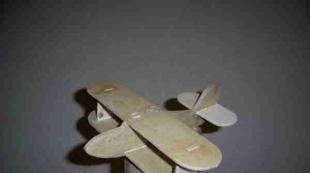
The plane can become a toy or a blank for further painting or decoupage. The wings and propeller are made from thin planks from vegetable crates, and the fuselage is made from 6 mm plywood. It would be better if everything was made of wood, but I was afraid that the openwork cabin would be too fragile
In profile. The wings and wheel struts are inserted into tight slots in the fuselage and could be held in place by a tight fit. But for strength, PVA wood glue was also used. Small smudges of glue are cut off after drying with a sharp knife. If they are serious, it is better to wash them immediately with a damp cloth, then the varnish in this case may be stained with glue residues.
-780.JPG)
All parts are carefully sanded before assembly. The collected ones are more difficult to skin.
-780.JPG)
The axles of the propeller and wheels are studs, although this is not the best choice. It was worth rounding the cap a little and sanding it. The screw and wheels are drilled to ensure free rotation. In the fuselage and landing gear there are holes for the axles of a smaller diameter so that the nails would hold tightly, but would not split the plywood into layers.
-780.JPG)
The propeller blades are cut at an angle, like fan blades. This can be seen in the last photo, a top view of the plane. So if you blow on it, the propeller will start to rotate and it seems that the airplane is about to take off!
Here I give my drawing for cutting out an airplane. 1 cell = 10mm
The screw is made from a plank 8mm thick, the rest can be made from plywood 4-6mm