Weaving from rods with your own hands. Weaving materials. Choosing the right material
Do-it-yourself baskets from a vine began to weave a very long time ago. This material was also used in the manufacture of fences and cradles for babies. They even made dishes from the vine. Now wicker baskets owe their popularity to mushroom pickers. It is they who use such products more than other people. A good solution is to weave and a separate option for picnics or household use. There are many design ideas - from the simplest to the stylish and fashionable. At the same time, it is easy to make this item yourself.
Choosing the right material
The first thing to do is to choose the material. It must be of high quality. The service life of the product depends on this indicator. Usually the vine is cut at the very beginning of spring or autumn. It is believed that at this time it has great strength.
A quality branch of a vine is determined as follows: in the thickest place, it is bent to the stop. It should not burst or crack. Material that meets these parameters is suitable for weaving. An important nuance - each branch must ripen.

The vine needs to be processed, because freshly cut wood will not be able to keep the shape of the basket. There are two schemes for preparing branches: soaking and leveling. In the first case, the rods are treated under running water or placed in a container and the liquid is changed every day. The water should completely cover the wood. So that it does not float, it should be pressed down with a load. This procedure should be carried out within two weeks.

The second method is faster and will take three hours. The rods must be folded into a large container and pour boiling water. The mixture is boiled for about two hours. You should cool the vine and begin to separate the bark from the rods. The peculiarity of the second method is that the branches of the vine will acquire brightness and brilliance. They are also easy to clean and wash.
Making a list of tools
Before weaving a basket from a vine with your own hands, you need to prepare the following tools:
- awl;
- side cutters;
- weight - it will hold the vine in a certain position;
- pliers - with their help bend the rods.
Devices should be prepared in advance. This approach will speed up the creation of the basket.
Work algorithm
How to weave baskets from a vine? First you need to divide the work into several stages, they will help you quickly understand the algorithm of actions and master the technique:
1. Weaving the bottom begins with the fact that you need to take 8 twigs. In half of them they make a hole. Each of them is 3 centimeters. The second half of the branches are threaded into these slots. As a result, a cross is formed.
 Making a cross for the bottom
2. The next step is braiding the base. It is necessary to take two branches and circle them around four rods. So you should weave two circles. Upon completion of this action, they begin to braid each of the rods. Two more rows are created. The elements must be evenly distributed. As a result of weaving, a circle is obtained.
3. Another rod is added. It is placed in the extreme row, bent. It is worth noting that the previous base is cut off (due to lack of length). In the same way, all the rods are replaced and two rows are woven. The vine should bend around the rod from the inside and outside. This principle is maintained until the completion of the creation of the bottom. There are 16 main rods. At the end of weaving, you need to add another one. It is placed between the other branches in the last circle.
 Making the foundation
4. Weaving the base of the intended size, you need to start creating the walls. You should choose medium-sized rods. They are attached to the bottom of the basket - in the weaving itself. The bases of the walls are bent to a right angle, and the tops are tied. The bent ends are inserted into the bottom of the basket and begin to braid them. You should take three twigs. With their thin side, they are inserted into the holes next to the main rods - one per rack.
5. You should weave a "braid" and repeat the pattern of the base. It should resemble a rhombus in shape, and it goes around each vertical rod. In this technique, 2-3 rows are performed. Such actions allow you to create the basis of the form.
 We make a frame for the walls
6. It's time to start weaving a common "canvas". In this case, the method used is the introduction of the vine for one rack and the removal in front of the other. When the desired height of the basket is reached, the vertical branches are cut off and their ends are hidden in weaving.
 Weaving the walls
The vine basket is ready. It remains only to make a pen. First, you should measure the length for the handle and choose a thick branch. It is bent and given the shape that will fit the basket. The ends of the rod are sharpened and inserted into the walls of the product. Next to the handle should be placed 6 thinner rods. They go around the main branch, which allows you to firmly fix it in weaving. To prevent small branches from moving, they are fixed with adhesive tape. The "tails" of the rods should be hidden in the walls of the basket.
 Making a pen
 To start using the basket to the fullest, you need to let it dry. This will take several days. This simple method is used by most beginner masters. In the future, it is recommended to develop your weaving skill and create more complex designs. Not only baskets are in demand, but also furniture, wicker decor elements.
Weaving instructions (2 videos)
Options for ready-made baskets (38 photos)


Products woven from a wicker can serve their owners for many years, performing not only a practical, but also a decorative function. As an interior item, they are successfully used both in the village and in the metropolis.
Do-it-yourself willow is a science mastered by our ancestors several millennia BC. In historical documents from around the world there are references to various wicker boxes, fences, baskets and much more. The products that can be made by learning how to weave are beautiful and varied. Now weaving from willow is not connected with the everyday needs of a person, rather, it is a fashionable hobby and a way to bring beauty and style to the interior.
General information about weaving
Modern willow baskets are not only accessories for summer cottages, they are full-fledged inhabitants of apartments. They not only carry practical benefits, but are also a highlight, a kind of accent in the design of the apartment.

It is important to note that the collection of vines for weaving does not bring any harm to nature, but, on the contrary, rejuvenates the thickets.
Willow weaving is popular today both in rural areas and in large cities. Another advantage of such a hobby is that there is no need to purchase materials for work. You can easily prepare them yourself. Willow is a very common plant and grows in almost all regions of Russia. If you love walking in the fresh air, then going for willow vines will be a pleasant and interesting adventure for you. In some large cities, shops that provide goods for various hobbies are beginning to sell vines for weaving. There are not many such stores yet, but this is a great option for those who do not know where to find willow thickets in a large city.
Blank for weaving
Not only willow vine is suitable for weaving, but also walnut vine, other flexible species of shrubs and trees. It is better to choose thin long shoots. Take those twigs that do not branch.

For this type of hobby, both the unbarked vine and the peeled vine are suitable. Large items are woven from the unpeeled: fences, large baskets for fruits and vegetables. Vases, trays, linen boxes, bread bins and much more are made from the cleaned vine. An unpeeled vine is called unbarked, a peeled vine is called debarked.
Harvesting of materials for weaving is carried out in autumn or spring. In summer, willow shoots are very brittle due to active growth, and are not suitable for weaving.
The shoots harvested in the spring are cleaned from the bark immediately, without additional preparation. The shoots harvested in autumn are boiled before cleaning. Harvesting and preparing vines for weaving is a simple matter, but it takes time and effort.
But when willow weaving for beginners step by step will captivate and tighten you, and the finished wicker thing will become your pride, the time and effort spent will fully pay off with a charge of positive energy that you will receive.
Required Tools
What do we need in the process of work? Willow weaving for beginners, described step by step in the article, requires at least a good supply of patience. Making a basket from a vine is more difficult than weaving it from newspaper tubes. Natural material is less malleable and may break.
You need some tools to get the job done.
Prepare:
- Awl.
- Secateurs.
- Side cutters.
- A spray bottle filled with water to spray the vines.
Technology
Baskets are traditionally woven starting from the bottom. Then weave the walls, bend. The handles are last.

It is advisable to start from willow for beginners step by step with round-shaped product models. To make it, you will need to learn just a few tricks:
- Technology for the manufacture of a round bottom.
- Rope weaving.
- Layered weaving technique.
- Fold.
Work in the process of weaving must be tamped and crushed so that the basket does not turn out to be too flimsy. The rods should be laid tightly and evenly, without closing each other.
After the technique of making a round basket is mastered, you can move on to more complex openwork products from a vine. Experienced craftsmen decorate their baskets with braids, weave birch bark, straw and wooden beads into them. The design and shape of such baskets are limited only by the imagination of the master.
Weaving from the vine can be almost anything. Often, landscape designers order wicker figures from a vine to decorate the garden. They decorate the backyard with wattle, and on the open veranda it is quite possible to place a rocking chair made of vines. You can also weave stools, a small table made of willow vines for outdoor gatherings.

Even decorations and New Year's gifts are made from this affordable eco-friendly material. For a child's room, a cradle made of raw rods is suitable. Children like to sleep in such natural, environmentally friendly cradles.
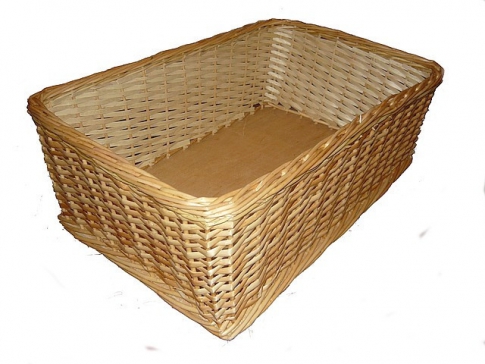
Rectangular wicker baskets, arranged on shelves and racks, are suitable for storing clothes, magazines and newspapers, and all sorts of household trifles.
Any housewife will be able to find a use for wicker products in her home. The ability to weave from a vine will definitely come in handy in your life, at least for arranging your own life, and maybe it will become a source of additional income for you.
Now that you have learned about willow weaving, the tutorial below will teach you how to weave round baskets from willow. With such a basket, it will be possible to go on picnics with friends or to the country house with children.
Weaving willow baskets for beginners (master class)
Let's start making the basket by preparing the willow vine. The vine is best cut in May, before the willow blooms. You can cut the vines in August, when new long shoots grow on the willow.

Preparation of vines from willow branches
We immediately remove the bark from the cut branches and leave our vine for five days in the shade in the open air.
After the vine is prepared and rested, we begin weaving willow baskets. The technology is as follows: we weave the bottom and edges of the product with round whole twigs, the walls - with a vine split into several parts.
How to split a vine
To split the vine into pieces, you will need a special hardwood cleaver. An incision is made at the end of the vine with a knife, a cleaver is inserted into it, and the vine is split into 2, 3 or 4 parts.
The split branches are soaked in water for several hours, and then the brown center is removed. For processing split vines, it is recommended to use a planer.
Before weaving from the vine, it must be moistened. This can be done with a spray gun or by lowering the branches for a few minutes in water.
Having prepared a sufficient amount of vines, we begin weaving willow baskets.
Carefully consider the process of creating a basket in the figure. First, the bottom of the basket is woven, then the ribs are added and the sides are woven along them. At the very end, a pen is made.
If you know the technology for making baskets from paper tubes, then you should know that willow weaving for beginners step by step is almost the same.
We perform the work in this order:
- To make the bottom of the basket, split five rods in the middle with a knife and insert five other rods into the holes. We insert the tips of the first two into the same holes.
- We make a braid of the bottom. The first rod must cover the split twigs from above, and the second to cover those that are threaded into the split twigs from below.
- Do the same for the third and fourth turns.
- We move apart the rods of the cross in the form of a fan and braid with two branches of willow.
- We press the twigs to each other with an awl.
- When the bottom reaches the size we need, we install the ribs of the basket in our willow weaving. For beginners, we will explain this process step by step. For the ribs we use round twigs. We cut their ends obliquely at a distance of about 5 cm. Insert the sharp ends into the bottom braid. We cut off the excess ends of the vine. The edges of the bottom are woven from four round twigs, which are inserted 4 cm near the side edges of the basket. To give the basket the necessary shape, we make a blank, as in Fig. 9. We nail the bottom of the basket to it with the help of small carnations.
- We finish braiding the bottom, cut off the extra twigs.
- We turn to weaving the sides. We cut the ends of the new twigs. We take twigs of medium thickness. We insert new branches along each twig of the base.
- We bend the new rods under the two adjacent ones to the left, down, and then up.
- We also bend the rest of the branches of the vine. The last two branches cannot be bent. We just wrap them around the first ones. Weave the sides of the basket until they reach the height we need.
- We begin to weave a pen. We take thick shoots of the vine, bend them and determine the length of the handle. We cut off the excess vine.
- We sharpen the ends of the vine and insert them into the walls of the basket. We insert five branches next to the handle, and wrap the handle with them. We hide the extra ends of the vine between the walls of the basket.
- We take a thin twig and wrap the edges of the handle with it. We hide the tips of the twig and cut off the excess.
- Weaving a willow basket with your own hands is completed. A simple round willow basket is ready.

Follow the steps shown in the pictures. A little practice and you'll be fine.
Conclusion
Having mastered the technique of weaving round wicker baskets, you can then learn how to weave square and oval baskets and boxes, learn weaving a willow fence for beginners step by step, then move on to making wicker furniture and more complex products. The growth of your skills and craftsmanship depends only on the amount of your free time and the desire to engage in basket weaving. Willow weaving is an interesting and accessible activity for everyone.
Bast weaving has been known since very ancient times, even when our ancestors made bast shoes. Over time, people began to weave containers and household items of various kinds and purposes (boxes, baskets, cradles, etc.). Now basket weaving allows you to create unique and unusual decorative elements, and household items simply diversified their arsenal and style.
Christmas wreath

Necessary materials:
- vine (you can use any grape plant, both wild and cultivated), you will need about 10 vine sticks, 0.5 cm in diameter and about 2 meters in length (the number of vine sticks depends on the desired thickness of the future wreath);
- glue gun;
- natural materials for decor (cones, Christmas tree branches, acorns, berries);
- decorative materials (burlap, balls, bows, beads, money, boxes).
Weaving is best done from freshly cut vines. If the vine is dry, you can moisten it and it will regain the necessary moisture and elasticity.
The order of weaving a Christmas wreath:
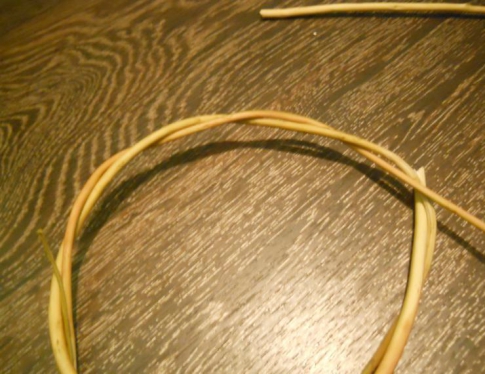
We take one stick of grapevine and turn it into a ring, as shown in the picture.

With the second stick, you need to braid around the previously obtained ring.
At the beginning and at the end of the action, the edges of the working vine must be fixed between the rods of the first row of weaving.

In the process of weaving, the vine tends to break; in this case, at the point of breaking, you need to cut off the twig, and fill the end between the previously woven rows.


For the accuracy of the finished product, you need to ensure that all the rods in the weaving process lie in the same direction.
The finished ring from the vine can be left without decor, as a talisman, or you can decorate it.

Using a glue gun, you need to glue all the previously prepared decor elements to the vine ring.
You can fill the wreath with twigs and cones using your own imagination.

You can add various kinds of bows and even artificial snow to the wreath.
Weaving a decorative braid

This example will follow the contour of a plywood board with rounded corners.
Necessary materials:
- plywood board with rounded corners;
- nail;
- hammer;
- pencil;
- drill and drill, depending on the thickness of the rods of the vine;
- wire cutters or secateurs;
- vine.
First you need to take a plywood board and on the sides you need to mark with a pencil the future holes for inserting the rods of the vine, about 3 centimeters should be left between the marks.

Use a nail and hammer to make small indentations on the marks. With a drill, drill holes about 2 centimeters.

The rods are best used wet, as they are more flexible, so insert the rods into the holes as needed during the weaving process.
Insert rods about 30 centimeters long into the holes.

Weaving a braid must begin from left to right from the place where three paired holes are drilled one after the other. From three places we will have four rods of the vine.
For convenience, we will call these structures of rods “strands”.
Take a separate stick and bend the middle strand through it, using the tips from the picture.
Take the first strand of rods and wind it behind the third, over the second.

We bend the third strand over the first strand wound behind it


We take the second strand of four rods and wind it up behind a strand of two rods over the third strand, which still consists of four.
We bend a pair of strands of rods.

We attach four rods from the first to the already bent pair strand. We have formed six rods in one plane. Further, the upper waves of the braid will consist of four rods, and the lower waves of six.

Start the third strand of four rods behind the next paired strand.

Bend a pair of strands of rods.

Attach four rods from the second strand to the already bent pair strand.

In the fourth strand, we have already formed six rods. We take only four of them and start the next pair of strands for four rods.

We bend a pair of rods by attaching four rods to it. So a wave of six rods is formed.
Repeat the step in which you need to take four rods out of six.
Continue weaving in a circle until the end and the beginning of weaving converge.

Take four of the six rods in the top wave and wind them behind the first strand.

The last time you need to start the next four rods out of six, for the strand from which the weaving of the pigtail began (the strand, which was first bent through an auxiliary stick).
Weave the lower wave with the rods that are left and add four rods in order to each woven section, two more. And cut off the two unused rods at the end of the entire weaving.

Also, at the end, you need to cut off all the protruding rods only carefully so as not to spoil the leading ones.
basket weaving

For weaving, you will need a willow vine, however, not all vines are equally good for this business, some types may break when working with it. To check if the vine is suitable for the job, bend it 90 degrees, if it does not break, then it will do. The vine must be dried before you start working with it.
However, before the process, the dry vine needs to be moistened to make it easier to work with. The duration of the soaking of the vine depends on its length, the longer the vine, the longer it needs to be soaked.
In addition to the vine itself, you will need:
- scissors;
- secateurs;
- long nail or sharp stick.
The initial stage is the creation of a base for the basket. Make eight sections from a fairly thick vine. For a basket of this size, as in the master class, lengths of about 30 centimeters are enough.
Take four pieces and in the center of each of them make a cut about 5 centimeters long.

Insert the uncut pieces into the cut ones in the middle to form a cross.


Now examine the lengths of the rods and select the thinnest of them, as well as the longest. Of these, it is best to start weaving. Take two pieces and insert the thin ends into the cuts, as shown in the picture.


To start making the basket, we will use the "Twist" weave. It's actually quite a simple technique, but it might not work for you the first time if you've never tried it before. It consists in the following: you need to hold two twigs, and then twist them one above the other so that they change places. Each twist is always done in the same direction. To better understand the technique, look at the pictures.

Wrap four pieces each time, make two rows. This will help secure the base of the basket. Try to pull the twigs as tight as possible and place them as close to each other as possible.

After you finish two rows using the same twisting technique, you need to wrap each piece with rods separately.

Separate the segments from each other by tilting them. Make the distance between the segments as uniform as possible. After you complete this row, your twigs should be distributed like the spokes of a bicycle wheel. Make a few more rows.

Soon your weaving sections will become too short, and you will need to lengthen them in order to continue working. It is best not to add two vines at the same time, as this can make the weave weak. See the picture for how to do this.

The end of the new segment must be inserted between the last two rows, and then bent. After that, cut off the old vine and continue to weave the basket. When adding new twigs, connect the thick end to the thick one, and the thin end to the thin end.

Once you've made the base for the basket, insert another vine in addition to the 16 you have in the base (simply sharpen the end of the vine and insert it into the last two rows). You will have to apply some effort, if necessary, you can expand the distance between the braided rows so that the segment is easier to insert.

Cut off those twigs with which you wove earlier, and continue to weave with only one inserted (above the twig, under the twig, and so on). You can add new twigs by simply tying the new one to the old one. Continue weaving until the base reaches the diameter you need. In this case, the base is 20 centimeters.

Now take sections of the vine of medium thickness. You need to create the sides of the basket. Sharpen the thick end of each of them. Insert these segments next to each of the "knitting needles". Cut off the ends of the old knitting needles at warp level.


One of the new twigs, bend it to the left under the two adjacent ones, and then bend it up, as shown in the picture. Repeat in the same way with the rest of the twigs. After that, take all the twigs in a bundle and tie.

Now insert three twigs to the left of the three twigs at the base of the sides. Take the leftmost one, bend it to the right behind the two adjacent ones and in front of the third, then turning it outward. Continue in the same way and make two rows, then untie the twigs.
Count the number of twigs, take the same amount. Insert a twig to the right of each knitting needle at the base, tilting it to the left and winding it behind the adjacent knitting needle and in front of the third, and then bring the twig out again.


When you insert the required amount, you can start weaving. Weave until the segments are short.


It remains to make a bezel. To create it, take one of the twigs and bend it to the right.

Get it behind two adjacent twigs, in front of the third and fourth, then behind the fifth and bring it out.

Repeat in the same way with each of the twigs. At the end, cut off the excess length of the segments.

Weaving from a vine is probably the oldest of the crafts. It appeared even before pottery and related, to a greater extent, to the everyday needs of a person. Houses, outbuildings, fences, cradles and toys for children, cart and sleigh bodies, boxes and kitchen utensils were built from tree branches. But the ideal material from which to weave a basket was willow twigs. They are very flexible and great for this kind of creativity.
History of the craft
Willow weaving in Rus' was commonplace. There was no peasant who could weave baskets. There were also masters - basket makers who were professionally engaged in weaving. They wove a wide variety of products: round and oval, rectangular and conical, with complex - simple weaving, large and small. In those days, baskets were simply indispensable. Women in them wore linen to rinse on the river, took food on the road, harvested, went for mushrooms and berries.

In the modern world, wicker baskets are also popular. It is difficult to imagine a mushroom picker without a basket. Weeping willow branches contain tannins, thanks to which the mushrooms do not deteriorate longer, and the gaps between the rods help to ventilate the air.
If you have even the slightest idea and a little skill, then easy to learn to weave from willow. For beginners, step-by-step study and independent repetition of all stages of weaving products will bring a lot of positive emotions.
The choice of materials for weaving
The main advantage of basket weaving is the availability of consumables. Willow is a common unpretentious tree found in many regions of Russia. Usually craftsmen prepare raw materials on their own. Some grow willow in their backyard. And in single stores you can even buy materials ready for weaving.
Willow twigs growing on sandy and loamy soil are best suited for weaving. Shoots are cut with a pruner or a sharp knife, choosing the longest ones without branches. Cut at a slight angle, while leaving a few buds so as not to harm the plant.
Shoots with a wide and loose core are not suitable for weaving, it should be small in size. Usually young shoots are used.
To check if the plant is suitable for work, it is necessary to cut the branch and bend it 180 degrees in the butt - if it cracked, it does not fit (it means it will break during weaving), if not, then you can safely proceed to further processing.
Season for harvesting and processing rods
Willow weaving rods are harvested all year round, but preferably in early spring and late autumn. The bark of spring shoots is removed very easily without additional processing. Rods harvested in another season need to be soaked or evaporated.
For soaking, the shoots are lowered into running waters - a river or stream, having previously secured it to the shore with a rope so that it does not carry away with the current. It is possible in a trough or a barrel, but in this case a daily change of water is required. Tied bundles with shoots are immersed to the bottom, and a load is placed on top (stone or any other heavy object, except iron) and leave for 1-2 weeks.
To reduce processing times from weeks to hours instead of soaking rods are evaporated in any of two ways:
- The shoots are placed in a tank, rolled around the perimeter, filled with water and put on fire. After boiling, cook for 1-2 hours. Then they are taken out, allowed to cool and proceed to the removal of the bark.
- The vine is no longer poured with cold water, but with boiling water, brought to a boil and boiled for 20-30 minutes. Take out, cool and remove the bark.
It is better to clean the rods raw, starting from the butt (root part). During cleaning, so that the material does not dry out, it is better to leave it in water and take it out in small bunches. After the willow is debarked, in order to finish the job, it must be laid out in the sun until it dries completely. For ease of use, the rods are sorted out and folded into bundles of the same size.
Barked rods are divided into two types - harvested in the spring and obtained by digestion. Boiled during operation, they acquire a bright glossy appearance, are easy to clean, getting better each time. Not boiled, on the contrary, darken over time, acquiring a nondescript look.
Weaving tools
Making a basket from willow is more difficult than from newspaper tubes, but the principle of operation is the same. Natural material is more brittle and less malleable. It is not so difficult to weave willow for beginners. By repeating all the steps step by step and assembling a set of tools, you can achieve good results. The work will need:
- secateurs;
- sharp knife;
- large scissors;
- dishes for soaking or boiling rods;
- pliers;
- clothespins;
- tweezers;
- Ruler and pencil;
- drill;
- jigsaw;
- stain and water-based varnish;
- brushes.
These tools are useful not only in the manufacture of baskets, but also more massive products - such as a rocking chair, table, flowerpot, hedge, and so on.
Basket making method
To understand how to weave a willow basket for beginners, you first need to delve into and study the lessons, patterns and techniques for making them. After the preparation of tools and materials, when the rods are soaked or evaporated, debarked and dried, the most interesting stage begins - weaving. First of all, weave the bottom, then the sides, and lastly, the handle.
bottom formation
For the correct weaving of the bottom with your own hands, it is necessary to prepare 8 twigs (knitting needles) of medium thickness (Fig. 1). They are divided in half - four are left untouched, and in the other four a gap is made in the middle of each (Fig. 2). Then rods are inserted into the slots in the form of a cross (Fig. 3). Further, two more thin rods are inserted into the same slots and the base is wrapped around in two rows (Fig. 4 and 5). Then the knitting needles are spread apart and wrapped around each individually (Fig. 6).

Each time the rod comes to an end, it must be increased by others. It is not necessary to increase both rods at once, it is better to do it one at a time. To do this, the end of the rod is sharpened and inserted into the hole between the last two rows, it is bent and weaving continues, and the end of the old rod is cut off.
Weaving continues with two more rows (Fig. 7). This is where the twisted weaving method ends and continues with the usual one - bypassing the knitting needle inside and out (Fig. 8). In this case, an odd number of knitting needles is needed; for this, an additional rod must be inserted into the weaving.

Wall manufacturing
Having reached the desired diameter of the bottom, you finish the first stage, the next one comes - the transition to the walls. To do this, you will need willow shoots of medium diameter, which are called racks. Each of them must be pointed at the end and inserted between the knitting needles (Fig. 9). Old rods are cut with a knife at the base. Now they take one rack and wind it up behind the other two, after which they bend it up (Fig. 10). Do the same with all the other racks (Fig. 11). Racks are braided in several rows with a twist, then in the usual way (Fig. 12 and 13).

When the height of the basket has reached the desired size, you need to take one rack and bend it down, placing it behind the other two (Fig. 14). The same must be done with the following racks, removing the ends inward and sticking outward (Fig. 15). Then the protruding ends are cut with scissors at the base (Fig. 16).
Handle weaving
The last step remains - to make a pen. This will require thick shoot of willow which is cut to size. The ends are pointed and stuck into opposite sides of the product (Fig. 17 and 18). Next, they take 4–5 rods and stick them into the weave at the end of the handle (Fig. 19). They are braided several times and threaded into weaving from the other end. Then they take a few more shoots and do the same (Fig. 20 and 21). Another rod is stuck nearby and braided around the handle at the base, tightening it with a knot (Fig. 22 and 23). The end is cut with a knife (Fig. 24). The basket is ready!

Over time, you can learn to braid pigtails and ropes in two or three rows with more complex weaving, for example, openwork. Sometimes, for the convenience of making wickerwork, wooden templates are made in a round or square shape, which greatly facilitate the work.
Vine is the oldest material for weaving various devices: dishes, furniture and decorations. Recently, weaving from a vine as a type of creativity has regained its popularity - environmentally friendly materials and natural motifs in decorating home interiors are back in fashion.
Product types
The vine is a flexible pliable material from which it is convenient to weave a variety of household items. Most often, craftsmen use willow twigs and vines - they are the most flexible and strong enough not to break during the work process.
Among the wicker products you can find the following:
- furniture - armchairs, tables, racks, large baskets for things;
- dishes - baskets, trays, bread boxes, vases;

- decorating elements - floor vases, figurines, caskets, Christmas-tree decorations.
Baskets, tables and chairs made of wicker are made more often than other items due to the simplicity of their design. In some cases, their creation is similar to macrame weaving: the same technique of alternating knots and free parts of the threads.
Toys from a vine began to be created in antiquity. But now this creativity has been revived thanks to the growing love for environmental materials.
Types of creativity
This concept, many novice craftsmen can confuse with the techniques of weaving products from the vine. Weaving differs not only in the way it is created, but also in appearance and tightness of the rods. In addition, weaving from a vine of the same type can combine different techniques.
solid weave
The classic view of the creation of products from the rod. With continuous weaving, there are no decorations in the form of openwork holes and patterns on objects.

This type is used to create baskets, chairs and tables - due to the tight fit of the rod, the product can withstand a lot of weight well.
openwork weaving
This type is characterized by many openwork and twisted elements in the product. It can be slots, waves and loops.

Most often weave souvenir baskets, biscuits and vases of this type.
Twisted weave
This type of weaving was forgotten for some time. And only in recent years has received a second wind. With its help, they create miniature products like Christmas toys and figurines, armrests for furniture.

The peculiarity of this type of weaving from a vine is that the rods are not intertwined, but twisted together. In this case, the product is given a certain shape.
spiral weaving
High demands are placed on products from this type of weaving, therefore, mainly professionals are accepted for its implementation. Rings of rods are taken as the basis, which are braided through one with a special tape.
The vine in this case should be especially flexible and not leave creases. Therefore, instead of willow vine, spruce or pine roots are often used to start the spiral weaving. In addition, the diameter of the beginning and end of the rod must be almost the same so that the ring is uniform.

Braiding tape is cut from the top glossy layer of willow vine. It should be thin and elastic, but very strong.
There is also a figured type of weaving from a vine, which is based on combining several types of this creativity in 1 work at once. As a result, the work of the master is not correct geometrically, but with corrugated edges in the form of waves.
Weaving techniques
Weaving from a vine is carried out according to 1 simple principle - initially the master builds the frame of the product with long strong rods in the form of a fence. After that, thinner flexible twigs are taken, which braid the base in a certain order, forming a pattern.
Currently, there are many different techniques for weaving wicker products. In addition, for each part of the product - whether it be the bottom, walls or edge - a different method is used.
But the techniques presented below are considered basic and easiest to perform. Therefore, beginners are advised to initially engage in their development, and then move on to more complex ones.
simple weaving
The easiest weaving technique. In addition, it is universal - with its help you can weave any kind of products.
To perform a simple method, start braiding the frame rods with one vine through one: 1 rod in front, 1 in the back. For the next row, change the order of braiding - now the first cheat is braided from behind, and the second - from the front, so that the rows form an interesting diagonal sequence.

To speed up the process and diversify the pattern, you can weave 2, 3 or more rows in the first order, and also 2 or 3 in the second order to increase the width of the resulting pattern.
Weaving in oblique rows
This technique is also called the layered method of creating products from the vine. In this case, the same number of braiding vines is taken as there are rods in the frame.
The first twig goes around the first vine in the frame in front, the second - behind, and is brought out of the product. Repeat this with each vine, gradually weaving the layers of your work.

This method is best suited for circular weaving - creating baskets, baskets, large round household baskets.
For a variety of patterns on the product, you can also take 2 and 3 rods to perform one action.
Rope weaving
An interesting way of weaving from a vine, which is often used to separate one layer of patterns from another. It is possible to weave a rope from 2 or 3 rods. The pattern looks like a small twisted rope.

For weaving from a vine into two rods, go around 1 vine of the frame behind with 1 working rod and bring it out. Repeat the action each time with the upper rod that was just used, pressing the lower one.

Weaving in 3 vines is based on a slightly different method - you need to go around not one, but two pegs of the frame, and not from behind, but from the outside. After that, the vine goes around the third riser from the inside and is brought out. Weaving in 3 vines can also be used for circular braiding products.
Willow wreath: master class
If you have never tried your hand at creating complex twisted wicker products, but really want to learn this type of needlework, start with the simplest - weaving willow wreaths for interior decoration.
This master class does not require special knowledge in the field of weaving. At the same time, it will help you learn how to properly handle wicker in your work.
Collect willow twigs 30-60 centimeters long and clean them from the top glossy layer. Forty elements will be enough for you to create 2-3 wreaths. After that, soak the vine in water for about 4 hours to make it more flexible. At this preparatory stage is over - you can get to work.
- Weave a ring from the first twig. To do this, start wrapping the thin end of the rod around its thick part.

- Take the second element and braid it around the first.
- Hide and fix the thin tip between the gaps of the wreath.

- Using the same technology, start wrapping the rods around the already formed base.
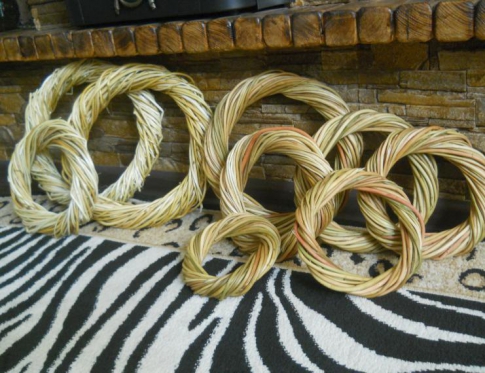
Leave the finished wreaths to dry in a warm, dry place for about 3-5 days. After that, they can be used as a finished decor element or a base in a more complex master class. Such blanks are often used to create wreaths for Halloween or New Year.