Artistic metal etching. Metal Etching Knife Engraving Patterns
One of the methods for obtaining a convex or depressed pattern on metal products, which has appeared relatively recently, is called etching. The operating principle of this method is based on the use of electrochemical processes in a liquid electrolyte. If you have artistic abilities, even at home, you can get a high quality pattern with a minimum of required materials and equipment.

When performing etching on your own at home, you will need the following consumables and devices:
- a product intended for decoration - various cutlery, hunting or camping knives or simple soap dishes on which simple patterns can be made;
- a container of sufficient volume and convenient shape made of non-metallic materials, suitable for placing the entire workpiece or part of it to be decorated. It is most convenient to use glass containers for this purpose, allowing you to visually control the processing process.
- a sufficient amount of ordinary table salt;
- nail polish of any color;
- nail polish remover designed to clean the treated product;
- low voltage direct current source. In this capacity, a charger can be used to charge car or telephone batteries.
drawing
We start with the preparation of the workpiece. It must be qualitatively cleaned of grease and dirt, rinsed with hot water and dried. After that, using a brush, apply varnish to the surface of the object to be treated (in our case, these are tablespoons).

Without allowing the coating to dry completely, apply a pattern or inscription.
Depending on the variant of the pattern, the desired decorative effect, when etching metals, a pattern can be obtained both pressed into the material of the product and protruding on its surface. This can be achieved by removing the protective varnish layer. It is pure metal without a beautiful film that will be subject to chemical etching.
In the event that you want to get a convex image, leave the varnish on it, and remove it from the background.

Otherwise, remove the lacquer film exactly in the form of the desired pattern - it will be “pressed” into the material of the product. To obtain a subtle pattern, remove varnish from the surface with a conveniently sharpened wooden stick or toothpick. Try to get as smooth lines as possible without smudges, which can significantly spoil all the work of etching the pattern on the product.

Electrolyte preparation
After making sure that all the necessary varnish is removed, we proceed to prepare the working solution. During this time, the protective layer will have time to dry completely. As a substance in which pickling of steel products is carried out, most often at home a solution of common salt is used. To prepare it, it is necessary to dissolve the crystals in pure water in a ratio of 0.5 liters of liquid to two tablespoons of salt.

Instead of sodium chloride, you can use another quite accessible chemical substance called copper sulfate. It's easy to find at any hardware or garden store.

Etching of metal products
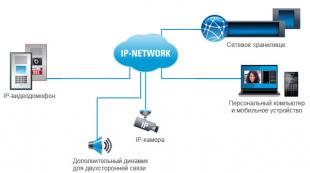
To activate the process, it is necessary to place any steel object in the electrolyte solution and connect a negative wire from the current source to it. The positive wire in this case is connected to the workpiece. Schematically, the etching process looks like this:

In the absence of a high-quality converter (rectifier), you can use a phone charger by cutting off the contact for the corresponding socket from it.
The process of etching under the influence of electric current occurs quite rapidly.

This must be taken into account when choosing a glass container. The level of electrolyte in it must prevent its possible splashing during the pickling process.
The control of the deepening of the pattern during electrochemical processing can be carried out visually, periodically removing the workpiece from the solution. Subject to all the necessary parameters, the process can last up to several minutes, depending on the desired depth of pattern etching on the metal part.
When you get the desired result, turn off the electric current. After that, carefully remove the varnish film from the extracted sample. To do this, it is convenient to use a nail polish remover and a thick cloth. Wash the finished drawing with warm soapy water.

Getting a color drawing
To give the resulting pattern, drawing or inscription an additional decorative effect, we suggest using a simple method that is accessible to everyone. To do this, apply a small amount of any nitro enamel to the treated area, achieving complete filling of the recess. This paint and varnish material dries quickly enough, so you can return to further work after an hour. After making sure that the enamel is completely dry, remove excess material that has fallen on the surface of the etched product with fine sandpaper. The use of a thinner in this case can spoil the whole work, as it smears the paint over the surface without completely removing it, and can give the pattern an ugly haze.
The mechanical polishing of the finished product on a felt wheel with GOI paste will finally give expressiveness to the painted etched pattern.
Dear readers, comment on the article, ask questions, subscribe to new publications - we are interested in your opinion :)
Hi all! I will show you a method of electrochemical engraving, with which you can transfer a drawing printed on a laser printer to a knife, cleaver, or any other metal surface. I will transfer the drawing from the computer to the spatula for clarity of the process.
Search for a picture
To work, we need an image that we will transfer. It is easy to find it on the World Wide Web. But there are certain requirements here - it should be monochrome, black and white, without smooth transitions, only clear edges. If you did not find such a picture on the Internet, then you can bring it to this form using a photo editor.Printing a pattern
For printing, we need special paper. Ideally, a backing from an adhesive film, which is usually thrown away, is suitable. It has a coating, such as wax, on which the adhesive film itself does not stick. At worst, you can use the pages of glossy magazines. Anyone who has ever poisoned the boards himself should understand without problems.In general, we cut out a format for an A4 or A5 printer from such a substrate and insert it into the printer. The printer must be laser, with powder paint.
We print the drawing at maximum quality, with the ink saving function turned off. After printing, cut off the excess edges of the paper.
Translation of the picture into metal
For translation, you need an ordinary iron. It is good because it accurately maintains the set temperature, which is very important. We turn it over and set it to 130-150 degrees Celsius.While the iron is heating up, degrease the metal surface where the picture will be applied. This can be done with a cotton swab moistened with acetone, alcohol or gasoline.

After that, put the spatula on the iron, wait a bit until it heats up.

After a few minutes, we apply the image to the place. This must be done very carefully, without smearing the drawing.


Under heat, the ink melts and sticks to the metal.
Gently smooth the picture, through a cotton swab. You do not need to press hard - there is a danger that the paper will move out and smear everything. We iron everything for about 1-2 minutes. Be careful - don't get burned.


Then remove the spatula to the side and wait until it cools. After cooling, carefully peel off the paper. If you used a glossy magazine, soak in water for a while and then peel off gently.
You should get a clear picture on the metal. If there are melts or thickenings, then you can wipe off the ink with acetone and repeat the operation again.


Electrochemical etching of the pattern

In order not to pickle the excess, I will make a kind of barrier for the solution out of plasticine. I also glued the surface around the drawing with adhesive tape so as not to poison too much.

Prepare saline solution.
The composition of the solution:
- - water 50 ml.
- - salt, ordinary kitchen - half a teaspoon.
Pour in saline solution.

And with a negative electrode (I use a regular self-tapping screw), we poison by immersing the electrode in the solution. Etching time is short: 20-30 seconds. According to my observations, increasing the etching time is not very good for the picture.

Then, remove the plasticine barrier and see that everything has turned black.


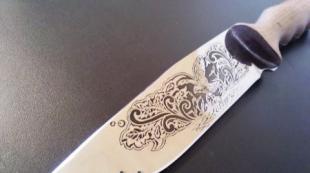
With a cotton pad soaked in acetone, remove the printer ink. And we see that we got an excellent engraving. Very clear, as I already have quite a lot of experience in this. You can even see the animal's whiskers!


I also made a drawing, but flipped the black and white in the editor.

The result of transferring the pattern to metal
Satisfied with the result, the quality is excellent. Now it will not be difficult to make a gift knife, for example.
Afterword
Etching can also be carried out without electricity, using a different chemical solution.Also, etching can be carried out without any plasticine barriers, simply by soaking a cotton swab with saline and applying an electrode to it, directly affect the metal. But I do not like this method, since the contact is made directly, which can erase fine details of the ink.
Watch the video of the process -
If you didn't get it right the first time, don't worry. Try again, it's not hard.
Local method of etching a pattern on metal
Hello! Today I want to talk about another method on metal. This is an etching method. Let's say you already have a wonderful shape, and now you need to decorate it with some "cool" pattern. You can draw a drawing yourself, or download ready-made ones on the Internet by printing them on a printer. We will also need ordinary adhesive tape in order to make a sticker. Scotch tape is important to take good quality. The higher the quality of the tape, the easier it will be for you to work with it. Cut off a strip of adhesive tape, and stick the prepared pattern on its sticky surface, image down. Now rinse off the paper with hot water. The drawing will be printed on tape.
By the way, applying an image for etching with is applicable only with a pattern printed on a laser printer. An inkjet print will wash out along with the paper. Rinse off the paper as thoroughly as possible. You can use a toothbrush for this. Now we just have to wait until it all dries and continue to work.
Let's take our pride and degrease its surface. We will degrease with alcohol. If you do not want to spend such a “useful product” on some kind of degreasing, use acetone, or any other liquid that can degrease the metal surface. Now carefully stick the tape to the place of the blade where you want to see the pattern. Stick the adhesive tape very tightly, without air bubbles, smoothing it over the surface of the blade with a cloth.
The next step is cutting the pattern. To cut neatly through the contour, without scuffing the tape, use the following method. Take an awl and heat it on a gas burner. Carefully burn the outlines of the pattern. Well, you probably used a wood burner as a child, didn't you? So it's almost the same, only we will burn out the metal.
By the way, the thought came to me, and not to use instead of the etching method proposed by the author, heating the awl, really a wood burner, with a thin tip. It will be easier than rushing to the gas burner every time to heat the cooling awl.
So, we burn the outline of the picture and remove all unnecessary. It turned out something like this.
Now we need to remove traces of glue.By the way, we first need to make a special device for etching on metal. For this device, you need a power supply from 4 to 9 volts and a pair of copper wires. Any phone charger can be used.
To remove adhesive tape from the metal surface, put the negative wire on the knife, and the positive wire on a cotton swab dipped in a strong saline solution, and start blotting with a cotton swab. The glue should curl up.
Everything, having cleared the drawing of glue, we proceed directly to the etching of the drawing on the metal. To do this, we change the polarity of our device, that is, we attach the positive end of the wire to the knife. Put a piece of cotton wool in a piece of bandage and, after soaking it in a saline solution, attach it to the drawing so that it completely covers it. We put the negative wire on top, and fix it with adhesive tape. We turn on the power supply to the outlet and wait for twenty-five minutes. Be careful during the etching process and step aside for this time. Because with this, poisonous chlorine gas is released. And although it is released in a fairly small amount, it is still better not to inhale it.
If the quality of etching does not suit you, repeat the procedure again with fresh cotton wool. Naturally, it will take you much less time to re-etch.Here's the resulting image.
It remains to thoroughly rinse and clean the surface of the knife. Everything, the work is finished, and we got by etching, here is such an image of a bull on the surface of the blade.
Metal etching sometimes replaces casting and engraving, it makes the whole process much easier. You can get a picture as a concave - embossed, and a convex - bas-relief. Metal etching at home can be chemical and galvanic. The first option is more toxic when used at home, so for starters we will use the second, it is also called electrochemical.
Equipment
You need to take a power supply or a transformer that can output from 4 to 7 V. In addition, you will need a dielectric bath, it must contain the necessary part and a second metal object that is connected to the anode.
To carry out the etching of the pattern on the metal, it is necessary to use it as iron sulphate. If a drawing is needed on a copper or brass surface, then you can also use it. The main thing is that the water be distilled.
Preparing the part for etching
In order for the etching to be uniform and in the right places, the part must be cleaned of dirt and degreased. For more convenient work, copper wire is soldered to the part with tin, it will be convenient to hold the object for it. To clean the surface, you need to lower the converted object into 10% sodium hydroxide, the temperature of which is 50 ° C, then into a 15% sulfuric acid solution and hold it there for two minutes, then rinse it in hot water. When the procedure is completed, the surfaces of the object will be completely cleaned, and of course, you cannot touch them with your hands.
Electrochemical etching of metal
We need to protect the places that shouldn't be pickled. To do this, it is necessary to apply a special mastic to these areas of the surface. It is made from three shares of wax and two - rosin, they are melted in a tin, stirring. After everything turns into a homogeneous mass, it is allowed to cool and divided into fragments. Each of them is placed in gauze, so that when pressed, as much mastic as necessary can seep through it. After that, the workpiece, which we will pickle, heats up. Now we take the created mixture, which was placed in gauze, and rub the surface with an even layer.
After cooling, the mastic becomes solid. From above it is covered with light water-soluble paint. It can be watercolor or gouache white. After that, the coating should dry. Then you can apply a drawing, it will hold well on the paint. It can be drawn with a pencil or translated through carbon paper. Then this contour must be scratched with a needle to the metal itself.
Now the etching of the metal by electrolysis begins, we connect one rod to the anode - plus, the other to the cathode - minus. To the first we connect the part on which the image will be applied, to the second any steel plate. After that, the process of etching the metal begins where the image was scratched.

If you need to create a multi-level drawing, everything is done in the same way as described above. Only the contours are checked every time, and when the smallest of them are etched to the prescribed depth, the part is removed and painted over with heated mastic using a brush. When it hardens, everything is repeated again until the next level of the drawing. In the process, an image is gradually created.
In this way, metal is etched at home, after which the surface is washed with turpentine, and then polished, giving the product a finished look.
Etching chemical
Now let's look at how to create a pattern on a metal surface without the use of electrical appliances. To do this, we need chemicals that are freely sold in hardware stores. So, let's begin. For etching we need:
- "White Spirit";
- paint that does not dissolve in White Spirit;
- acetone;
- resin that is used to cover roofs;
- table salt;
- copper sulfate.
Part cleaning
To begin with, the part where the image is planned is cleaned with fine sandpaper and degreased. When the surface is ready, you need a place where the pattern will be applied, sealed with adhesive tape or something similar. After that, the rest of the surface, where chemical etching should not affect the metal, is painted over with paint. It can be of any color, as long as it is resistant to White Spirit.
When the paint dries, you can remove the adhesive tape. Beneath it is pure metal, ready to be painted on. Now on this "mini-canvas" you need to apply an image. It is made using resin, which is dissolved in White Spirit until it becomes liquid, like paint. She draws the desired image with a brush. What is good about such improvised paint is that if something does not work out in the drawing, then it will be possible to remove it by moistening a rag or cotton swab in White Spirit. If the drawing has very small details that did not turn out well with a brush, they can be corrected with a needle, scraping off the excess after drying.

In this way, you can etch a knife, keys, in general, any metal object. Now that the drawing is completely ready, you can proceed to the etching itself.
pickling solution
We need a liter of water, in which we need to dissolve 100 g of copper sulfate, and then add salt. It must be poured until it ceases to dissolve. The resulting mixture will have a blue color. However, after a metal object is immersed in it, the color will begin to change to green.
So, let's load the item. The chemical process starts immediately. In all this production, no substances harmful to health are emitted, so such metal etching at home is safe.
Actions in a chemical reaction
During the reaction, a plaque is formed, which will become more and more. It slows down the whole process, so you need to periodically wash it off with water. You should not do this with various brushes, brushes and other tools, because you can damage the paint. But she seems to be holding the whole drawing, and it would be a shame if, by etching a knife, for example, you inadvertently damage the drawing on it. This is a very delicate work that requires a firm hand and patience.

The depth of the pattern directly depends on the time during which the metal will remain in solution. There are no exact criteria, so each master must himself observe the course of a chemical reaction. And only after doing this several times, it will be possible to say with confidence how much time is needed for the manifestation of the desired pattern to the intended depth.

Advantages and disadvantages of electrochemical and chemical etching
The advantages of electrochemical metal etching at home include the fact that the pattern being created is clearer, this is clearly visible if you look at it with magnification. However, the downside is that this method requires an electrical device, which may not be for everyone.

The advantages of chemical etching include the fact that everything you need can be bought at a hardware store. These ingredients are cheap, and, most importantly, you don’t need to look somewhere for a power supply or other devices capable of delivering from 4 to 7 V. However, the imperfect edges of the pattern are a minus.
I share my personal experience in this simple as it turned out business.
Because I am engaged in amateur radio, then I often make printed circuit boards using the LUT technique (Laser Ironing Technology). Recently, a fellow biker asked me a question: is it possible to pickle steel to make different fuss and how exactly to do it. A rush of the Internet, I was convinced that a solution of ferric chloride in water eats not only copper on textolite, but also almost any iron. What I was able to verify when it spilled onto my galvanized balcony sheet and the very next day I saw decent holes there ... In short, I thought, purkua would not have been pa ...
So we need:
Ferric chloride 200g (70 rubles)
Water 0.5 liters (from the tap)
Printer LASER black and white.
A sheet of paper with text and the least number of pictures from Popular Mechanics or Iron magazine. For some reason, the printer chews paper from Lisa magazines and others ...
Iron.
Comp with Word or any graphic editor who cares. I did it in Word, where the drawing is easiest to stretch as you like.
Sample drawing - took on tattoo sites.
Technology.
Choose a drawing and stretch it as you like.
We take a knife or a piece of iron, we clean it with a zero sandpaper.
We print the drawing on the area with the text of the prepared sheet.
We put it on a knife and iron it with a hot iron until it sticks and the toner slightly comes through the paper.
If necessary, we do the same on the second side of the knife.
We put the knife under water (in a bowl or ladle) for 5-10 minutes.
Fingers begin to rub on paper. The paper rolls and the toner remains on the metal.
If the toner tears, then re-skin and make drawings on the new one and iron it harder and longer.
After that, we protect the rest of the surface of the knife where there will be no etching or by painting it with paint, NC varnish, bituminous varnish. I, in my immense laziness, completely wrapped it with tape ...
So so. IMPORTANT. If you want the etching to be of high quality, you will have to go over the drawing from above or with a marker with paint. Those. something to “strengthen” it, because the toner sticks with small holes and there will be undercuts. The same applies to minor flaws in the translation of the picture.
We put an object with a pattern into a solution of 200 g of ferric chloride in 500 ml of water. (Dissolve not all at once, but in parts - it heats up).
Periodically we take it out and pass it under running water with a paint brush. After a couple of hours, we get a noticeable etching of 0.3-0.5 mm.
Then we overwrite everything with sandpaper and polish or not polish ... Depending on laziness
A sample of the resulting bottom. As I said, it turned out to be undergrass, but this gave the ornament so to speak ... old or something ... 


Of course it turned out so-so, but not bad for the first time
P.S / Any etching and inscriptions make the knife less durable and it usually breaks just along the etching line.
All success. 73!