What is the name of the ball of flowers on the leg. How to make a topiary from artificial flowers and fruits. Topiary for the New Year
Today there are a huge number of ideas for decorating the interior. Looks great in the kitchen, bedroom and living room topiary made of artificial flowers, grass, models of fruits and vegetables.
Moreover, this small tree can be made from natural materials. It all depends on the flight of your imagination and financial capabilities.
Creating a tree of happiness
The history of the emergence of this type of art goes far into the past, during the existence of Ancient Egypt. To create an original tree, you can use various materials. Before starting work, you need to draw sketch of a future craft from artificial flowers. It is necessary to prepare all materials and tools, only then start work.
Materials and tools
An original and simple decoration of your room will be a do-it-yourself artificial flower topiary. If you use ready-made jewelry, then the process of making crafts will not take much time.
For work you will need the following materials and tools:
- glue gun or all-purpose glue;
- wooden sticks, wire for the barrel or a finished decorative bar;
- artificial flowers, leaves and grass;
- decorative or ordinary flower pot;
- gypsum or alabaster;
- a foam ball of the desired size (newspaper and tape can be used);
- adhesive tape;
- decorative insects (butterflies, ladybugs), various decorations (beads, rhinestones).
Operating procedure
The flower topiary looks great in combination with a decorative bicycle. There is no need to use a pot for this craft. The cost of such a masterpiece is approximately 1500-2000 rubles. A bicycle can be purchased at an online store or a specialized place that sells small items for needlework.
After all the materials are purchased, you can start working on a masterpiece.
- Prepare the tree trunk. If you use skewers, then you need to take at least five pieces, put them in a pile and glue them with green tape. If you use a ready-made wooden block - a trunk, you can simply paint it with acrylic paint, but a large diameter aluminum wire must be wrapped with floss threads.
- If you purchased an ordinary pot, you can decorate it with twine, twine, textiles, and paint with acrylic paints. Everything is up to you.
- You can make a ball from a newspaper by crumpling it and rewinding it with tape, and cover the finished foam ball with green acrylic paint or stick sisal on it. By the way, the latter option looks much richer, but such a craft at cost will be 300-500 rubles more expensive.
- Flowers can be purchased at the store or made independently from corrugated and colored paper, ribbons, fabric. For topiary, you can choose flowers such as: roses, daisies, chrysanthemums and others.
- Decorate the finished ball with artificial flowers, beads. Glue all the parts with a glue gun or all-purpose glue.
- Insert the barrel into the ball and be sure to fix it with glue.
- Prepare a solution of gypsum according to the instructions, place it in a pot. Pour the barrel into the mixture and hold it for a while so that the whole structure does not break.
- From above, gypsum can be decorated with coffee beans, artificial grass, decorative insects.
- Almost always there is material left, so the needlewomen have thoughts about what can be made from artificial flowers, except for the topiary. There are many uses for these materials. For example, artificial flowers can be used to decorate a planter (a pot without a hole) or create a flower arrangement that can simply be placed in a beautiful vase.

Crafts from artificial flowers with your own hands will be a great addition to the interior of the room. In addition to flowers, greens can also be used.
Today, topiary made of fruits and berries, artificial grass is gaining immense popularity.
Craft from fruits and berries
For a tree, you can use dummies of fruits and berries. This craft will look great in the kitchen. Do-it-yourself fruit topiary master class is presented below.
To create a fruit and berry tree, you need:
- paper clip - 6 pcs. (diameter 3.5 cm);
- foam ball - 8 cm;
- green sisal - 1 p;
- decorative insects (butterfly) - 1 pc;
- pot (400 ml) - 1pc;
- glue and gun and 5 rods;
- wooden sticks for the ladder - 4 pcs. (optional);
- artificial grass;
- models of fruits;
- a wooden block in the form of a trunk - 35 cm;
- acrylic paints;
- alabaster or plaster.

When all the materials are ready, you can get to work.
Fruit tree assembly instructions:

Topiary will be an excellent gift for a wedding, birthday, and other celebrations. Turn on your imagination, create masterpieces, decorate your home, delight your family and friends with your crafts.
Attention, only TODAY!
Do-it-yourself topiary can be made by anyone who has a desire. It only at first glance seems that you need to have a special talent. Such beauty decorates houses, apartments, summer cottages and everything that your imagination is capable of.
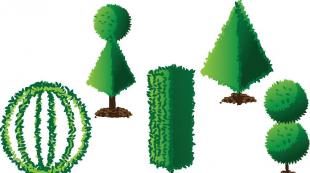
Artificial topiaries are much easier to make than their green ancestors. As you know, living topiary cultures, which have been known since the time of the Hanging Gardens of Babylon (IX century BC), are relatives of modern miracle trees from the windowsill. To make a curly haircut of plants in a summer cottage, you will need special skill, knowledge and practice. And everyone can “grow” their own tree of happiness from artificial materials.
What is needed for the topiary
Before you make a topiary with your own hands, you need to study its "anatomy". And it can be made from a wide variety of natural and artificial materials. It all depends on what you want to display in your art. After all, a tree can serve as an imitation of a real plant or acquire fabulous shapes and colors. Topiary sizes can also be different: from a dwarf composition a la bonsai to a solid indoor tree in human height.
An interesting gift option is a topiary made from fresh fruits or sweets. Its only drawback is its fragility, but such a masterpiece is not created in order to decorate a bookshelf. An excellent decoration of the interior can be a topiary of aromatic plants. Such handicraft not only decorates the room, but also fills it with pleasant smells.
To make a topiary with your own hands, you need to have a desire, not a special talent
The main materials for making a miracle tree:
- pot;
- crown ball;
- glue;
- stick for the trunk;
- cement (alabaster, gypsum);
- accessories for the crown and base of the tree.
All these materials for topiary are quite affordable and always on sale, and some of them you can do yourself.
Making a tree of happiness step by step
A pot is needed in order to “plant” a tree in it. Instead, you can use any other container: a glass jar, a cut plastic bottle, a wooden vegetable box, etc. The main thing is to properly decorate the future pot: paint, stick around with stones or cover with a cloth. If you bought a ready-made flowerpot, most likely, the idea of \u200b\u200bthe composition will have to be customized for it. And yet, when choosing a pot, you need to pay attention to its diameter, which should not exceed the diameter of the crown of the future tree.
Step two: make a ball
Crown balls are also often made from improvised materials. You can, of course, use a rubber ball, but it will definitely lose its shape when pierced. It is better to take a plastic one, and even more convenient - a foam ball. It is convenient to stick needles into it and floristic compositions are very durable. The easiest option is the basis for paper topiary. Making it is simple: you need to take paper, crumple it into a ball, wrap it with thread or coat it with paste.

A stick for the trunk can be of any unpretentious shape and from different materials.
Step three: attach the trunk
The stick for the trunk can be of different shapes, so it can be found among wooden branches and beautifully decorated with ribbons, rhinestones, or simply painted in the desired color. The main thing is that before use, it is advisable to free the twig from pieces of bark and make it smooth with sandpaper. Other materials can also be used as a trunk, but keep in mind that the length of the stick should not be very small. A short tree leg can spoil the whole presentable look. Therefore, cut off after you measure seven times, adding to the length of the trunk those centimeters that will be inside the ball and in the pot.
Glue is needed mainly for decorating the tree and the so-called soil from which the topiary will “grow”. Therefore, any universal adhesive is excellent. If your tree is huge and the decor is heavy, then stock up on liquid nails before making the topiary.
Cement, gypsum and alabaster are used to fill the pot and secure the tree trunk. A solution of any material is made of medium density, and you need to work with it very quickly. A flowerpot with a frozen solution will be quite heavy and will not allow itself to be outweighed by a crown ball. But if the pot weighs a lot even without cement, then mounting foam can be used instead of the solution.

It is very important to perform the crown and the base of the trunk in the same style.
Step four: decorate the product
Unlike the above materials, topiary accessories can be varied, so they will be discussed separately. They are the main ones in the manufacture of the tree of happiness. These can be beads, pebbles, rhinestones, plastic insects, shells, coffee beans, ribbons, dried flowers and artificial flowers.
How to decorate a topiary
For a tree of happiness, you can use any materials. After all, the topiary can be coffee, flower, sea, money.
For decoration most often used:
- dry flowers;
- flowers from ribbons, fabric or paper;
- quilling decorations;
- beads and beads;
- coffee beans;
- candies;
- coins;
- shells and stones;
- cereal grains;
- cones;
- artificial fruits and leaves.
How to combine materials
For the crown of a tree, flowers, nuts, coffee beans and dried fruits are more often used. The base is decorated with pebbles, rhinestones and beads. It is very important that everything is in the same style. For example, if a topiary ball is pasted over with shells and dried crabs, then the base must also be decorated in a marine spirit. Fill it with small pebbles or line it with dry algae, and wrap the pot with a piece of fishing net. Pearl beads for this style are also suitable, but they need to be interspersed pointwise. If your own imagination is not enough, do not be sad, they will help you arrange a topiary with photos that will give you interesting ideas.

Paper flowers make the tree of happiness truly magical
Most often you can find topiary made of artificial flowers. Roses, daisies, violets and orchids look charming on any handmade flower arrangements, especially if they are diluted with beads and rhinestones. Accessories can be bought in stores, but it is much more interesting to do everything yourself. Such flowers can be made from ribbons, paper or pieces of fabric. Ribbons of different widths are cut into squares, then the corners of the figure are removed and, depending on what kind of flower you want to make, form the petals.

Topiary of ribbon roses looks very nice, especially if it is diluted with beads
For example, if it is a topiary of roses, then the edges of the petals are cauterized and assembled with a needle and thread into one whole. Roses can be made in another way: the whole ribbon is bent in the middle and its two parts alternately overlap each other, and when everything is folded, you need to pinch it with your fingers at the base of the future flower and pull on one end of the ribbon - that's it, the rose is ready.
The art of topiary came to us from Ancient Egypt. In those days, the talent to give plants unusual geometric shapes was highly valued. An example of this is such a wonder of the world as the Gardens of Babylon.
Today, the topiary is a small tree made of natural and artificial materials. We will share decor ideas with you and tell you how to make a beautiful tree yourself.


Secrets for Beginners
Having created a tree of happiness, you can both decorate your own home with it and present it as a gift for a wedding, housewarming, anniversary. The dimensions of the product are different, depending on your preferences and range from 15 to 50 cm.
Important! Topiary has an exclusively decorative function. And it depends on your imagination whether you will make a small original tree in the shape of a heart, or unusual models of shells.


The simplest improvised materials for making topiary are as follows:
- pasta;
- money;
- branches;
- coffee beans;
- napkins;
- candies;
- cotton pads.


Advice! A popular option is a money tree. It is made for a gift using small bills. It symbolizes wealth, luck and success in business. Suitable for placement in the kitchen or any other room.

Typically, the money tree is made in mini versions for installation on window sills. Also, such a present can be in a small outdoor pot, which is placed near a coffee table or sofa in the living room.


How to make a do-it-yourself topiary
If you decide to decorate the house yourself, then before you make a composition, consider the design of the main components:
- bases for topiary;
- crowns;
- trunk;
- stands.
Paper, old newspapers, polystyrene foam, polyurethane foam, a children's ball are suitable as a basis. What to do, you decide.


Advice! Experienced craftswomen use foam plastic for figures in the form of letters, numbers, hearts.


To make a trunk simply from strong wire, branches, plastic tubes. When choosing what to make a trunk for a topiary, consider the size of the future product. If this is a small model, use a simple pencil, if it is a floor model, use one even thick branch.


The crown is the part of the craft that will attract the most attention. Suitable paper, polymer clay, beads, buttons, shells.


Depending on the size of the product and the idea, an ordinary flower pot, a toy bucket, a flat wooden board will serve as a stand. Decorate it with fabric, lace, decoupage or paint it with paints. How to do it is up to you.


Advice! An ordinary cup, which you no longer use in everyday life, is perfect for a stand.


Step by step instructions for crafts
For those who are carried away by this wonderful idea, we will tell you how to make a beautiful topiary step by step. Before you start crafting, think carefully about the idea of \u200b\u200bthe future tree and prepare all the necessary materials for the trunk, crown and stand.
When creating your topiary, follow the following sequence:
- prepare the crown. For manufacturing, use improvised materials or specially stocked shells, beads, beads. For a non-standard crown shaped like a number or letter, cut out the desired shape from the foam. Be sure to make a hole for the barrel;
- prepare the stem. Depending on the idea, use branches, sushi sticks, plastic straws. If you plan to make a large floor topiary that you will place in the garden or on the street in a private house, use wooden sticks wrapped with twine or varnished in the desired color. Install the crown on the trunk;


Advice! If the crown is round, just put the base on the trunk. If your topiary has a non-standard look, additionally fix it with glue.
- stand. Use pots or planters. Pre-place the foam in the pot and fill it with a weak cement mortar or alabaster, level and dry. This will serve as a reliable frame for crafts.


Advice! Since novice craftswomen do not always guess with the proportions of the solution, experienced needlewomen advise using the consistency of liquid sour cream - too thick a mass will not fill the space between the pot and the foam.
Such an interesting craft can be easily made with children to decorate the garden or any room in the house.


Simple master classes of topiary
Wonderful trees can be bought in souvenir shops, as well as made by hand. A common topiary model is created from foamiran. Master class on how to make an unusual tree, see the video
Gentle original foamiran topiary.


Make your own bead topiary. The master class includes the following steps:
- preparation of materials. Buy beads, ribbons, twine, barrel wire, pot, plaster, glue. Use tweezers to easily stick the beads to the base;
Advice! Use a regular ball as the basis for the crown or cut out another shape from the foam, for example, a heart. Such a topiary will be an excellent gift for St. Valentine's Day.
- glue the beads to the base;
- for the trunk, take the wire, wrap it with twine or ribbon, bend it as desired;
- insert the crown into the trunk and secure with glue;
- install the second end of the barrel in a previously prepared pot with pieces of foam;
- fill with plaster and leave to dry;
- decorate the stand.
The product is ready. This MK is used by many novice craftswomen.

The tulle topiary looks beautiful. Watch the video master class. You will be told step by step how to make a craft with your own hands.
A few more interesting ideas for tulle topiary.


Interesting do-it-yourself topiary from cotton pads. A step-by-step master class is presented in the video:
For advanced needlewomen, it is interesting to make a beaded topiary with your own hands. With this choice, various wood weaving techniques are used: knotted, French circular, dense oblique, American tourniquet. A detailed master class is offered in the video:
Below are two more works of art - beaded trees.


The easiest option is do-it-yourself pasta topiary. Indeed, in every kitchen there is pasta in the form of shells, horns, spirals. You can decorate the glued pasta on the base with various paints or spray it. The master class, according to the manufacturing principle, is similar to a tree made of beads.
Advice! Crafts from cones, buttons and threads look interesting and creative.


Which crown to choose
Among the common types of crowns, you can choose the option that suits you best. So, the shape of the crown of your topiary can be in the form of:
- hearts;
- flying cups;
- bicycles;
- Christmas trees;
- bird nests;
- ships;
- birdhouses;
- sun;
- apple trees;
- umbrellas;
- shoes;
- roosters;
- fairy houses with nests.
The craft made of beads in the form of a glued nest with birds looks beautiful. For lovers of non-standard solutions in any room or office, a floating cup will look great.

Flying cup idea
A heart-shaped design or a tree with dollars are suitable as a gift. For spring mood, make a fruit tree. For memorable events, build a product in the form of letters or numbers.


Marine crafts decorated with shells, sand and other natural materials look great. Craftswomen like to additionally decorate the crown with a nest of branches, flowers. An interesting option is a vintage burlap topiary decorated with a real small clock. Marshmallow topiary looks festive. If you don’t have enough indoor plants in your house, make a lagurus craft.

coffee tree

Ecology of knowledge. Interior design: Do you want to decorate your house or garden in an original way? Try to make a topiary with your own hands - a decorative miracle tree in the form of a fancy fantasy ball on a high leg, also called the tree of happiness.
Do you want to decorate your house or garden in an original way? Try to make a topiary with your own hands - a decorative miracle tree in the form of a fancy fantasy ball on a high leg, also called the tree of happiness.
Domesticated artificial topiaries are relatives of living topiary sculptures. For a curly haircut of plants in a summer cottage, a lot of skill will be required, but absolutely everyone can grow their own tree of happiness.
Buying a ready-made tree, and even in the most luxurious version of amethyst, citrine, coral or crystal, will not be difficult, but is it possible to buy happiness?It is in our hands! It is with them that we will “sculpt” our happiness.
Topiaries are created from a wide variety of natural and decorative materials - fresh and artificial flowers, coffee beans, beautiful shells, pebbles, dried flowers, paper, sweets, cocktail umbrellas ...
Topiary can serve as an imitation of a real plant, or acquire completely fabulous shapes and colors. Topiary sizes vary from miniature dwarf compositions a la bonsai to the dimensions of solid indoor trees. An excellent gift option is fresh fruit topiary. But such a masterpiece cannot boast of durability. Topiaries made from aromatic plants are very popular, serving not only as an excellent decoration for the interior, but also filling the air with marvelous aromas. Learning to make a topiary: the "anatomy" of the tree of happiness Mastering the art of creating homemade topiaries is not difficult. Even a beginner in hand-made will perfectly cope with this task. In addition, all the materials needed for the topiary are affordable and can always be found on sale.
To make a topiary, you will need:
pot
The diameter of the pot should not exceed the diameter of the crown ball. You can purchase a ready-made pot or make it yourself from a container of the desired shape, and then paint it, cover it with a cloth, or decorate it in some other original way. In fact, choosing a pot suitable for a product in terms of style and color is not an easy task, so if you first purchased a pot, most likely, you will have to come up with a composition for it.
Crown ball
To create a crown, you need a plastic or paper ball. You can make a paper ball from crumpled paper or newspapers, and then coat the ball with paste or wrap it with thread. Rubber balls are more difficult to use because they lose their shape when pierced. If the decorative elements are not glued, but stuck, a foam ball is perfect for floral arrangements.
Barrel stick
A branch or any suitable stick, for example, a stick from the blinds, which is subsequently painted or wrapped with ribbons, will do. It is advisable to choose a longer stick, because it will be attached almost to the base in a pot and a ball will be put on it. Too short a barrel can ruin the whole composition.
Glue
Any general purpose adhesive will work fine. For individual elements, you may need super glue, a glue gun or liquid nails.
Cement, plaster, alabaster
Glue a hole in the bottom of the pot. Having prepared the solution, quickly stir it, pour it into a pot and immediately insert the stick-barrel until the solution has hardened. Cement will not allow the crown ball to outweigh the pot. But if the pot is already heavy enough, cement can be replaced with polyurethane foam.
Pebbles, sand, shells, colored salt, beans…
Glued over the mortar at the base of the tree.
Wood decoration accessories
Dried flowers, artificial flowers, shells, pebbles, cones, bows, cocktail umbrellas, coffee beans, beans, pistachios, shells, crepe paper and whatever else comes to your mind.
Photo master class:
- Necessary materials:
- 100 grams of roasted coffee beans
- bast brush for whitewashing (can be bought at a hardware store, hardware store or on the market)
- 1 plastic ball, 8-9 cm in diameter (such balls are widely used in children's playrooms and are sold individually in the market)
- scissors
- spool of brown thread
- 2 rubber bands for money
- universal transparent glue
- clear super glue
- a glass of sand, cement or plaster
- wooden stick or branch 20 cm long and 1.5-2 cm thick
- twine rope 50 cm
How to do:
1. With scissors in a plastic ball, carefully make one hole, where a little later we will insert the “trunk” of our tree.

2. We take a whitewash brush and pull out a strand of bast from it or, having removed the ropes, we completely disassemble the brush.
3. With the help of an elastic band for money, we fix the bast thread at one end of the branch. Lubricate the branch with universal glue and spirally glue the future “trunk” with a thread. From the other end of the branch, we fix the thread again with a rubber band and insert the "trunk" into the ball, which will play the role of a crown.

4. Using universal glue, glue the ball with brown threads to greatly facilitate and speed up the process of gluing coffee beans. For pasting the ball, you can also use strands from a whitewash brush, but threads are much better and easier.
5. Now we start pasting the ball with the first layer of coffee beans. To do this, we need transparent super glue. It is desirable to glue the grains in a different order - with a groove, then down, then up. Glue is applied directly to each grain. Super glue should be used very carefully, because it leaves white spots on dark grains, quickly sticks tightly to the hands and has a pungent smell, so it is advisable to “grow” your tree of happiness in a well-ventilated area. You can also use a glue gun or liquid nails.
6. One layer of grains will not be enough, so be sure to make a second one. To give the surface texture more relief, do not forget to alternate the smooth side of the grains with the one with the groove.
7. It's time to start creating an original pot for our tree of happiness. First of all, we cut off a little bast from the brush, the length of which should be slightly larger than the diameter of the bottom of the glass. Then we grease the bottom with universal glue and put it on the prepared bast. We cut off the threads protruding beyond the edges of the bottom.

8. Now we cut the bast from the brush so that it is 3 cm longer than the height of the glass. We apply universal glue on the side surface of the glass, 2.5-3 cm short of the top, and gradually glue the glass with prepared bast. We tie the pasted glass with twine from below and cut off the excess edges. We trim the tips from above so that the threads are about 2 cm above the edge of the glass.


9. With the help of universal glue, with long strands of bast, we glue the funnel in a circle and screw the trunk of the tree into it.