Polymer clay: making at home, composition, technique, products. Cold porcelain products (40 photos): DIY miracles Video: DIY smooth beads made of polymer clay
Polymer clay, also known as plastic or cold porcelain, is widely used in small forms of decorative art. What the masters create from it defies description; in Fig. just a few examples. And all this is done at home, on the table, in a free moment, by people who were not former students of Michelangelo or Cellini. The technique of working with plastic is accessible to beginners and allows literally anyone to achieve outstanding, even phenomenal, results; the raw materials are inexpensive, and the finished products made from it are quite strong and durable.

Lovers who devote their free time to plastic arts prefer to use polymer clay made with their own hands. The fact is that the shelf life of self-hardening polymer clay is limited. In the original packaging that is opened and resealed, the quality of the mass continuously deteriorates and it becomes unusable long before its expiration date. If you need a little, say, yellow for your next project, then there is no point in buying a whole tube, jar or bag: by the time you get your hands on the next thing, the material may already have deteriorated.
Note: if you make plastic items regularly, for sale or for yourself, then it is better to use purchased raw materials. Especially when you need to get delicate colors and subtle transitions. See, for example, a master class on working with plastic arts using the “Watercolor” technique:
Video: master class on working with polymer clay
Plastic or porcelain?
Strictly speaking, cold porcelain and plastic are different materials. The first is the so-called. thermosetting polymer clay (bar plastic), requiring heat treatment (baking in the oven) of molded products. It is prepared under industrial conditions. The shelf life of the material is years and years, and the shelf life of finished items is almost unlimited. The author of these lines has not yet completely used up the stock of bar plastic made in the Soviet Union in the 1980s. It is still usable to this day.
Products made from thermosetting plastic are as durable as polycarbonate or carbolite and can withstand mechanical processing, painting, and varnishing. Heat resistance after baking - up to 180 degrees, non-hygroscopic. But it is difficult to knead it; you need to combine modeling with carving. Subtle color transitions cannot be achieved. In general, this is a material for the manufacture of lamp stands, front panels of the housings of some small home-made installations, handles for them, models of aircraft, etc.

Craftswomen, of course, pay more attention to elegant and beautiful things. Here, for lady fingers, another type of polymer clay - self-hardening, or simply soft - was created on purpose, because it is sensitive and pliable. Soft plastic allows you to imitate even stones such as Carrara marble, agate, Ork jasper (including landscape jasper) and jade. No additional processing is required, except for drying not in direct light at a temperature of 15-25 degrees. Thermal resistance when dried is up to 90 degrees.
From regular wetting or exposure to an atmosphere with a humidity of more than 85%, soft plastic items quickly deteriorate within 3-9 months. Protection – acrylic paints and water-based varnishes. Only completely dry products can be painted and varnished, see below. Body jewelry should be coated with acrylic varnish in 2 layers.; fat is the main enemy of soft plastic.
The shelf life of products made of self-hardening plastic worn on the body is up to 5 years; the same stationary ones, periodically illuminated by direct sunlight through glass, and in a shaded room - up to 12-15 years. Crafts made from self-hardening polymer clay are approximately as strong as PVC with filler. The range of colors is very rich, and very smooth color gradients are obtained without any difficulties, see below.
Note: During mechanical processing, self-hardening polymer clay is prone to chipping and cracking, so it is advisable to mold products from it immediately with holes, etc., see below about beads.
About stucco on furniture
Both types of plastic are well suited for decorating homemade or purchased furniture at home, see figure: decorative elements from them are firmly glued to PVA wood, and to any other hard material, including glass, with acrylic glue. Protection against fading in direct light - 3-4 layers of ordinary acrylic varnish or 1-2 layers of special UV (ultraviolet) protective varnish, the so-called. anti-UV or just UV varnish. The latter provides protection against fading in a room with a large south window for 10 years or more.

The use of plastic for decorating small furniture - cabinets, bedside tables, shelves, hangers, key holders, etc. – is well known. But with no less success, only with great difficulty can you make large stucco moldings from self-hardening plastic, laying it out in parts along a wire frame (if openwork) or a wooden base. For example, the bottom row of photos in Fig. – headboards of beds. The one on the far right is in Zhanna Friske’s bedroom, she herself once posted this photo. And what’s worse than the rest, fashioned little by little, but at many times lower costs?
Material
Let's move on to how to make polymer clay yourself at home. We won’t immediately get a subtle and rich range of colors, but for mastering the technique of plastic arts, a homemade starting mass is quite suitable. Its durability and consumer qualities, if carefully prepared, will not be inferior to store-bought ones. The initial mass consists of a filler – starch – a binder (PVA glue), and a plasticizer/stabilizer based on deeply refined vegetable oil. For coloring, pigments are added to it or the finished product is painted on top.
Note: The composition of the plasticizer-stabilizer is different for different types of starch, see below.
Ingredients
First of all - oil, The quality of the plastic mainly depends on it. Oil refining must be complete, i.e. – no traces of yellowness, transparent and colorless. “Yellow” components, even in weak diffused light, become bituminized over time, the part turns gray, like wood on the street, and begins to crumble. Therefore, to prepare plastics, you need to use baby or cosmetic oils; preferably based on cocoa butter.
Next is starch. Vegetable starch of different origins has different grain sizes, shapes and structures. Corn or potato starch is suitable for plastics. The first one (more precisely, plastic based on it) makes better small products, for example. bijouterie. It produces a mass that is more grainy when broken when dry, but also more resistant to chemical influences. Larger products made from homemade plastic made with corn starch may crack or wrinkle when dried.

The microstructure of potato starch is thinner, which is why plastic dries more evenly on it. The strength of plastic “on potatoes” is less chipped, so it is preferable to make figures from it that are quite large, about the size of a child’s fist. Bas-reliefs and stucco molding are also better made from plastic made with potato starch: it is more pliable when sculpted, and fine details are easier to produce. Also, color transitions in “potato” plastic come out smoother and more blurred.
Finally - glue. It is suitable if the bottle/jar has never been opened before. If the packaging has previously “taken a breath of air” even a little, then the mass will either not curdle and/or knead properly (see below), or defects will appear during drying. It is advisable to make toys and haberdashery from plastic with PVA for wood (sold in hardware stores), and for trinkets or stucco (except for the head of the bed) stationery PVA will do.
Preparation
Recipes and methods for preparing plastic vary depending on the type of starch. “Potato” plastic is made from the following components:
- Starch (potato starch, of course) – 100 g.
- PVA glue – 100 ml.
- Baby or cosmetic oil - 2 full teaspoons.
- Fatty colorless cosmetic cream - 1 full teaspoon without top.
Step-by-step instructions for preparing polymer clay using potato starch are as follows:

Note: Coloring of plastic in the mass, if necessary, is carried out immediately before use, see below.
“Corn” plastic can be prepared in the same way, but it turns out to be of better quality when heated throughout the entire volume at once. For this you need a microwave, and the recipe and technology are simplified:
- Prepare a bedding from repeatedly washed (clean old) cotton fabric, folded in 4-5 layers;
- Lubricate your hands with a non-greasy cosmetic cream, but only on a natural basis, without silicone;
- In a heat-resistant glass bowl (specially made for microwaves), mix starch (100 g) and PVA (100 ml). The glue is poured into a bowl and starch is added with continuous stirring;
- Without stopping kneading, add 2 tbsp. spoons of clarifier - lemon juice. Somewhat worse would be citric acid on the tip of a knife or 1/4 teaspoon of baking soda;
- Set the microwave to maximum heat (no grill!), time – 30 s. If this is not on the scale, the stove will need to be turned off manually;
- Place the dishes with the mixture in the oven and turn on the heat;
- After the indicated half a minute, take out the mass quickly, not allowing it to cool, but mix thoroughly;
- Heat again in the microwave for 30 seconds, remove;
- Remove and remove the crust;
- The mass is laid out on a mat and rolled into a thick sausage until excess water is absorbed into the fabric;
- After cooling to about 40-42 degrees (hands are hot, but not burning), grease the “sausage” with Vaseline or lanolin;
- Packaging in plastic, ripening and storage - as before. case.
Clarification with lemon juice (also, by the way, clarified for medical purposes or for baby food) using the highest quality starch and office grade PVA allows you to obtain a slightly translucent surface of the product, like jade. Citric acid and soda do not have this effect.
Note: For the first plastic pancakes, which will be lumpy, it is possible to prepare polymer clay without cooking, see the video below. It must be consumed immediately after preparation. Products made from it will not be strong and durable, but the mechanical properties of fresh ones are the same, and you can learn how to sculpt.
Video: making cold porcelain with your own hands without cooking
Paints, varnishes, holes
From the questions of actually preparing the plastic, it remains to decide how to paint and varnish it. Also about the holes in the beads, because... You cannot drill ready-made beads, the hole inside will be torn and the thread in it will quickly fray.
Dyes
Pigments are introduced into the plastic immediately before use: the mass is rolled out into a thin layer, sprinkled with coloring powder, rolled into a roll and kneaded, rolling between the palms until the dye disperses completely or as much as necessary. Colored ground food products (eg cocoa and coffee), food coloring and make-up paints are suitable for coloring plastic with mass. The disadvantage of all of them is their high cost. This is especially true for large products. In this case, they can be painted on top with acrylic paint, but its layer will wear off. You can also add finely ground dry watercolor or gouache paints, but the required fractions are not available for sale. There are 3 possible ways out of this situation:
- Pound it in a mortar and fluff it up – there’s not enough paint, there’s a lot of dirt.
- Grind on an electric coffee grinder - you will have to buy a new one for coffee and each subsequent color.
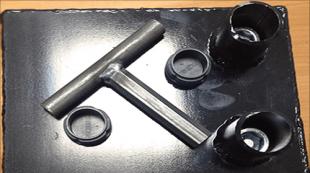
- Grind it in a homemade ball mill from pipe trim and balls from bearings - you will have to attract someone who is more drawn not to glamor, but to a mechanic's workbench.
Holes
Homemade plastic beads - shown in Fig. We'll talk a little about patterns later, but for now take a closer look: the thread will not fray in such holes. How to do them? You need to know that the drying speed of plastic is approx. 2 mm/day. That is, a crust with a thickness of 0.25-0.35 mm is formed approx. in 3-4 hours. A crust of this thickness will already be quite strong, but still elastic. It is from this that you need to form craters of holes, and then dry the parts as much as necessary. Pretty long; a plastic ball with a diameter of 10 cm, i.e. with a radius of 50 mm, at 20 degrees it dries completely in 25 days, almost a month.
Note: Just in case, let us remind you that you cannot dry the plastic in direct light or at temperatures above 25 degrees, it will crack. You can’t go below 15 degrees either, it will turn out brittle and crumble.
Drill beads from polymer clay as follows:
- We form holes with rounded edges with the tip of a toothpick, without piercing the crust;
- We draw glycerin into a medical syringe and release it back;
- We remove the needle and pass it through the hole, continuously rotating it;
- We drill alternately from 2 sides until the joint is made in the middle;
- We squeeze out a core (column) of viscous plastic from a needle with a thin, tight-fitting, rigid wire;
- for the next bead we repeat pp. 2-5.
Note: how to simply make smooth beads out of plastic using your hands on a board, see the story below.
Video: do-it-yourself smooth polymer clay beads
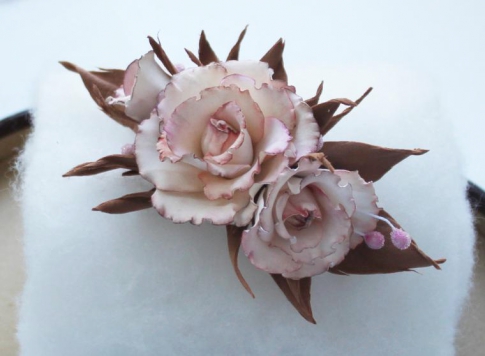
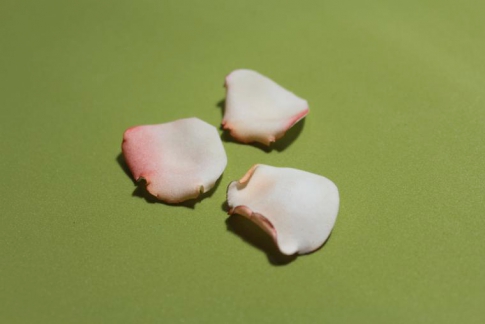
Salt and varnish
Often the surface of plastic products needs to be rough, for example, so that flowers and leaves made from it look more natural, as in Fig. on right. Also, a surface roughness, but finer, is needed for varnishing jewelry so that the varnish sticks. Both are achieved by the so-called. salt technology, see fig. below. The product is dried as described above, rolled in kitchen salt (it is convenient due to its good solubility in water and the fact that it comes in different grinds), then kept in water until the salt dissolves. If beads are made, holes are drilled in them right away, and other products are dried as needed.
A little about art
This article is actually technological, but artistic modeling from plastic is directly adjacent to the production cycle, because begins immediately after the volumetric coloring and even merges with it. Therefore, it is impossible not to say a few words about how to sculpt from plastic.
The simplest technique is puff pastry, or puff pastry. There are absolutely no difficulties in it, see fig. below. The layers can be straight, even, oblique, wedging out, and generally chaotic. But with a little skill and imagination, you can make things that can only be shown to hungry guests without warning on April 1st, and then not to everyone, see next. on right. However, on this day you can appear yourself, wearing a necklace made of such cakes and a new festive dress. I hope you understand - it's a joke.
Development of puff pastry – layered sticks, or round puff pastry. These 2 techniques are enough to do almost everything shown in Fig. at the beginning and much more. For example, very popular citrus slices, see next fig. Color transition to pos. 2 is obtained by inserting a wedge of an additional color into a cut on the main sausage. Then the sausage is rolled between the palms for a long time and energetically, but without squeezing it too hard. From the warmth of your hands, if the plastic is soft, the colors will diverge into each other. In the same way, get rid of cavities in pos. 6 and 7.
What is shown in Fig. on the right, it is done in the same way, but requires much more skill. It's called the internal contour technique. It is used to make blanks for surface painting; Each item comes out unique.


Ceramic floristry as a form of creativity appeared relatively recently, but has already managed to win fans around the world. Of course, with high-quality processing, cold porcelain produces flowers that cannot be distinguished from real ones without touching them.
Try sculpting ornamental plants - this activity is calming, and the results of creativity are pleasing to the eye.
Creativity Basics
Ceramic floristry as a creative direction began to take shape in Japan at the end of the twentieth century. In 1981, craftswoman Kazuko Miyai founded the world's first flower sculpting school, Deco Clay Craft Academy.
The date of creation of the first school of floristry was not chosen by chance: it was at this time that scientists created the main working material - cold porcelain.
In its solid state, cold porcelain can hardly be distinguished from real porcelain, which is worked with by firing. The second name for cold porcelain is polymer clay. It can be white and multi-colored, and the colors are as close as possible to the shades of the petals and leaves of living plants.
Ceramic floristry allows you to mold a wide variety of plants - from the smallest inflorescences of lily of the valley and lilac to lush buds of roses, asters and dahlias, stems and leaves.
Ceramic floristry: materials
In terms of the way it works, porcelain is similar to plasticine or salt dough. But it has a difference from these materials - after some time after the working process, it hardens in the shape that you gave it. However, it does not need to be fired in a kiln.

There is also thermoplastic, a type of polymer clay. But a product made of such material must be kept in a hot oven so that it retains its shape and hardens.
Cold porcelain - master class
An interesting fact is that polymer clay can be prepared at home - it contains ingredients that can be found in every home:
- PVA glue - 150 milliliters;
- water - 100 milliliters;
- colorless hand cream - 1 teaspoon;
- glycerin - 1 teaspoon;
- a glass of corn starch.
Don't forget to also prepare some starch for kneading.
- Mix liquid ingredients in a saucepan.
- Place the saucepan over low heat and stir continuously until you achieve a homogeneous consistency.

- Gradually add starch without ceasing to stir the mixture.
- Stir until the mixture becomes thick and begins to clump around a spoon.

- Remove the pan from the heat. Place the mixture on a clean towel and wrap it in it.
- Knead the substance in a towel until it cools.

- When the mixture has cooled, remove the towel and continue kneading, periodically sprinkling your palms with starch to prevent it from sticking to the dough.
Cold porcelain is ready for use when it becomes plastic, homogeneous and soft, and stops sticking to your hands.
Additional accessories
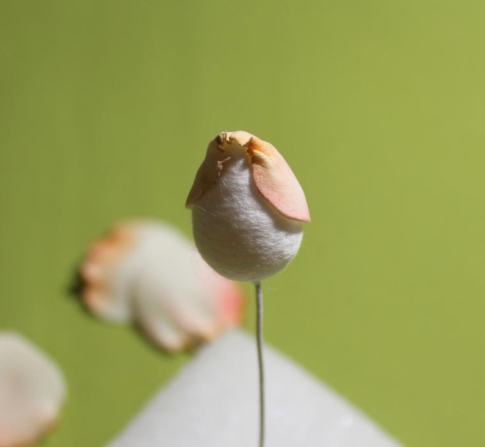
Ceramic floristry has given rise to a whole industry of creating auxiliary materials for work. For example, to make the finished flower look as realistic as possible, you can purchase the following items at craft stores:
- cotton blanks of buds and inflorescences of various shapes and sizes;

- plastic pistils and stamens of any flower variety;
- wire stems in different color variations.
While all of these items are designed to make creativity easier, you can easily get by without them. Use regular copper wire and cotton swabs if you cannot buy these materials in your city.
Ceramic floristry: tools
To process the material and give it a natural look, you need to purchase special modeling tools - they are sold in handicraft stores. With their help, you can create the same texture, shape and size of blanks as real plants.
Modeling molds
Ceramic floristry largely depends on the availability of molds such as molds, weiners and cutters.
Cutters are special shapes that cut leaves and petals of certain plants.

Viners are similar to seals and stamps - they help to recreate the texture of a real petal or leaf with all the irregularities and veins.

Molds are universal - these molds combine the functions of weiners and cutters.

There are entire sets created specifically for sculpting certain plants: orchids, roses or poppies, for example.
Paints and brushes
If you are working with white polymer clay, be sure to stock up on paints, otherwise your ceramic work will not look like the real thing. In the process you may need the following coloring materials: gouache, watercolor, oil pastel. Drawing small details can be done with various colored markers and pens.
Buy a set of painting brushes of different shapes and thicknesses. Sometimes you may also need seals and stamps, cotton swabs and disks, and napkins to apply paint.
If you want to get colored clay from white, add paint to cold porcelain before mixing. Details and individual parts must be painted after the product is ready.
Stacks and cutters
These devices help to cut out blanks, apply certain designs and give the desired shape. For example, floristry involves rounded - convex and concave - petals and leaves. Stacks of balls of different diameters will help you get this shape.

You may also find it useful to have cutter stacks with different shapes and a thin end when doing small jobs. Pay attention to roller knives - they are easier to work with cold porcelain than regular ones.
A replacement for stacks can be pliers with a smooth or grooved surface, round nose pliers of different lengths and diameters, scalpels, tweezers, and scissors.
Cold porcelain flowers
Ceramic floristry only at first glance seems to be a simple form of creativity, similar to modeling. In fact, it is quite difficult to recreate the natural appearance of petals and leaves with your own hands.
Therefore, first use a simple master class to practice your skills in working with cold porcelain. Try creating a simple flower - a rose.
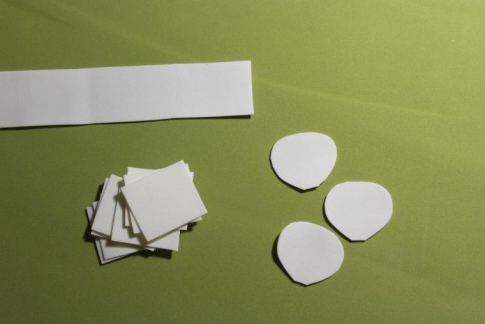
You will need oil paints in soft pink and peach colors, a cotton bud blank, and cream-colored polymer clay.
- Roll out the cold porcelain into a thin layer. Cut 12-14 rectangles measuring 3x5 centimeters, and from them - rose petals in the shape of a thick drop with a cut off sharp end.
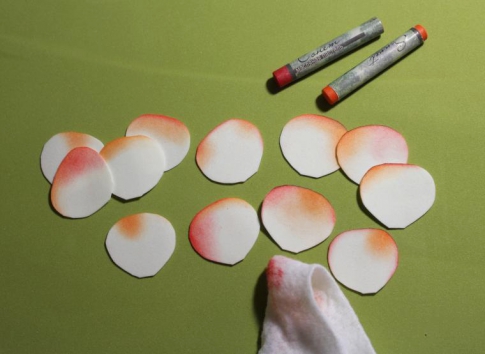
- Wrap your index finger in a napkin and apply an oil pastel of the desired color to it. Paint the petals by touching each one and rubbing it with your finger.
- To soften the molds and prepare them for further processing, use fire. Light a candle, take the petal by the uncolored edge and bring it to the fire for no more than 1 second.

- Squeeze the heated end with two fingers to flatten it and pull it slightly to the side. Now create a slight wave.

- Do this action with all the blanks.
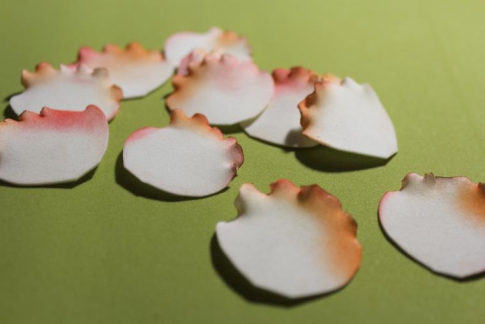
- Take 4 blanks and form the inner petals. Gather the edge of each piece with an accordion and lightly twist it between your fingers.
- Prepare the remaining petals as follows: slightly stretch the workpiece and, using a finger or a round stack, give it a slightly concave shape on the painted side. Bend the edges of the workpiece in the opposite direction.
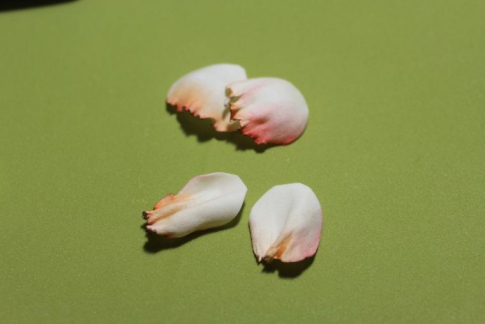
- Take a cotton bud blank and start gluing the petals using PVA or silicate glue. Use the first 4 petals to completely cover the bud.
- Now start gluing the remaining petals in a circle.
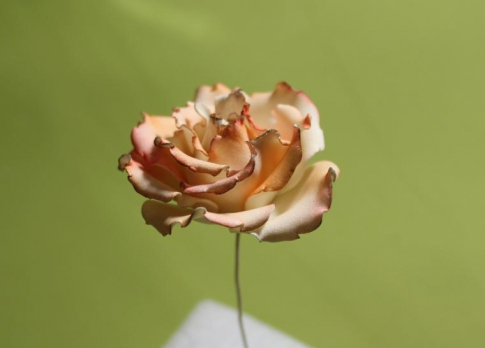
Your flower is ready! Leave it in a well-ventilated place until it dries completely - at room temperature, your product will dry in just a day. From several of these roses you can make a wonderful decoration using the kanzashi technique.
Now you can work on creating more complex inflorescences. For example, from the following video tutorial you will learn how to make a poppy from polymer clay.
After working with large flowers, try making compositions from small inflorescences. Add them to ready-made large flowers - you will get a luxurious bouquet that will be difficult to distinguish from the real thing.
The direction “Ceramic floristry” is gaining more and more popularity in the world. Flowers made using this technique can become a wonderful decoration, indistinguishable from real flowers.
Materials used in ceramic floristry
Polymer clay is an industrially produced plastic mass that feels and looks like plasticine and at the same time has a recognizable smell of grass. To harden, the product is usually subjected to heat treatment.

Polymer clay comes in a variety of colors and is sold in many craft stores.

Cold porcelain is a clay-like mass that dries fairly quickly in the open air. This mass is simply ideal for sculpting flowers or small figures.

Cold porcelain appeared in the middle of the 20th century. Initially, the composition was very simple: only PVA glue and starch were mixed.
Later, when professional florists paid attention to cold porcelain, the composition began to be refined and improved in pursuit of elasticity and softness. The name is related to its appearance: the dried mass looks like porcelain, but dries on its own and does not require firing in an oven.

Cold porcelain recipe
You can make cold porcelain at home yourself. The Internet offers a lot of recipes, for example this one:
- 2 cups PVA glue
- 2 cups cornstarch
- 2 tablespoons glycerin
- 2 tablespoons stearic acid
- 1 tablespoon sodium benzoate
All ingredients must be mixed and heated over low heat until the resulting mass stops sticking to the walls of the pan. The resulting mass should be stored wrapped in polyethylene or placed in a plastic container that does not allow air to pass through. It takes 1 to 3 days for the mass to harden.
Of course, the recipe is very approximate, and the ideal mass can only be obtained after several experiments. You can paint both the finished product from cold porcelain and the mass before sculpting.
What is better to choose: clay or porcelain?
There are a huge number of polymer clays. But cold porcelain has its advantages. The most important thing is the price. Factory-produced polymer clay is expensive, but the material for making porcelain yourself will cost you several times less. Another equally important quality is elasticity during sculpting. After several attempts at preparing cold porcelain, you may well end up with a material that is highly elastic.
Equipment for ceramic floristry
So, if you decide to try your hand at ceramic floristry (let me remind you that this is what the art of making flowers from polymer clay or cold porcelain is called in Russia), then you may need the following devices.
Paints
The most important of the secondary materials is paint. Paints can be used to color the finished product (if the clay was not colored initially), or it can be added directly to the clay to give it the desired color. Professionals usually prefer oil paints because they dry more slowly than acrylics. In addition, when tinting with oil paints, you can achieve beautiful and smooth transitions, which is impossible to achieve with acrylic.

Oil paints
Glue
Usually all flowers are made in parts, and then to connect these elements using ordinary PVA glue. But it is worth remembering that PVA perfectly connects parts made of raw material with the same raw material or already dried one, but several dried pieces of clay most likely will not stick together with PVA. More reliable - Super glue or Moment. The grip is immediate and strong. Some professional florists use latex glue instead of PVA. It is designed specifically for working with plastic; it looks very similar to PVA glue, and when it dries it becomes transparent.

Glue: PVA, Moment, latex
Wire
The basis of most flowers in ceramic floristry is a wire frame. The wire can be as thick as a pencil lead, or it can be very thin - it all depends on the size of the flower. You can buy it in craft stores or construction markets. Wire for beading is quite suitable. Or you can look for it in special floristry stores.

Tape
This interesting tape is needed to connect parts mounted on a wire with a frame. Externally it looks like double-sided adhesive tape. The tape connects the individual wires well. The result is a neat stem, which can then, at the master’s request, be covered with clay. You can try replacing this tape with construction paper tape, but the result may not be very beautiful.

Modeling mat and cling film
The film is needed to preserve the finished clay for a long time, and the mat keeps the work area clean. An airtight plastic container for storing pieces of cold porcelain wrapped in cling film would also be a good option. This keeps the little colorful pieces (which will accumulate) organized and provides extra protection against drying out.

Scissors, pliers, wire cutters, etc.
For the first experiment, ordinary nail scissors may also be suitable. But then you will definitely need several scissors: with long, straight and thin blades. The longer and thinner the better.
You may also need:
- round nose pliers - for making jewelry using fittings
- tweezers - for attaching small parts. In addition, you can quickly and accurately make a loop on a thin wire with tweezers.
- pliers - for bending or straightening thick wire.
- Side cutters are useful for cutting thick wire

A little advice: in construction and hardware stores, these tools are sold 2-3 times cheaper than in specialized departments of handicraft and creative stores!
In addition to special tools, you may find regular blades (only very sharp ones) and needles useful.
Syringe extruder
It works on the principle of a pastry syringe and is intended for squeezing out motifs. Fill the syringe with polymer clay, select the desired nozzle and push the clay using a piston. Nozzles for an extruder syringe can be very different: from geometric shapes to complex patterns.

Stacks
One of the last is stacks - small sticks for creating indentations and grooves. They come in the form of a simple stick with a sharp end or a stick with balls at the ends.

As a substitute for the first, you can use a knitting needle, an awl or a stick from Japanese cuisine.
A second stack of balls may seem indispensable, but this is not at all the case. Look in your supplies for a strong stick (pencil, brush or piece of thick wire) and glue a smooth bead of the size you need to it.
Molds and cutters
A mold is a print made from the texture of a leaf of a living flower or petal, which is used to obtain a realistic likeness when sculpted. It will be difficult to do without molds, but many elements can still be sculpted without them, so don’t rush to purchase molds.

As for cutters - molds for foliage and flowers, professional florists do not use them. Identical petals are boring and don’t look very natural. If you still decide to use this form, then do not forget to work on each petal and leaf by hand: by slightly changing the shape, you can add individuality and realism to it.

Many craftsmen make their own cutters from tin cans, cutting them into tin strips and then bending them to the desired shape. Some cutters are really quite useful, but you can still do without most of them: for example, make a pattern from cardboard, which is applied to a rolled out piece of plastic and carefully cut out with scissors or a roller knife.
The operating principle of the machine is the same as that of a noodle rolling machine. A slight movement of the hand and a block of clay turns into a thin plate.

Master class on ceramic floristry
And finally, several very visual master classes on sculpting flowers.

Rose made of fine porcelain

Polymer clay sheet

Polymer clay poppy
Whatever material you choose (cold porcelain or polymer clay), the result can be a wonderful product that is indistinguishable from real flowers!
Be sure to check out our forum topic
Categories,
Hello dear readers. Here is the second edition (the third edition is available in PDF) of my very first article on the topic of polymer floristry. Since the day I wrote this article, a lot of water has passed under the bridge. I learned a lot of new things, rethought some important points for me, and even changed my opinion on something almost radically. In this article I will try to tell you as much as possible of what I know about this fascinating activity - creating artificial flowers from cold porcelain, polymer clay or even ceramics.
Flowers. How much joy they bring us. They are given as gifts for the holidays, they are bought simply for the soul, and they are grown on windowsills. But no matter how beautiful they are, cut flowers fade sooner or later, and potted flowers sometimes require such painstaking care that not every person can handle it. For many years, people have replaced natural flowers with artificial ones, trying to solve the problem of the fragility of natural flowers. They made them from stone, clay, paper, fabric, leather... And in our time, flowers made from cold porcelain and polymer clays, created specifically for polymer floristry, are becoming most popular.

Despite the fact that many people are hearing about cold porcelain only for the first time, it appeared in the middle of the last century. Many sources prefer to pay tribute to the first discovery specifically in Argentina, but there is a lot of information that it was “discovered” at approximately the same time everywhere. After all, cold porcelain itself is a simple material to make - it is based on starch and PVA glue. And only over time, when florists turned their attention to it, it began to be refined and improved in pursuit of softness and elasticity. Why is a composition that essentially has nothing to do with porcelain (starch + pva) called cold porcelain? Everything is very simple and no frills. The dried mixture resembles porcelain in appearance, and since the material does not require firing and dries on its own quite quickly, it was given the name “cold porcelain.”
 I won't go into boring history or comparisons. I just want to say that today more and more polymer clays are appearing, which are similar in composition to cold porcelain, and even surpass it in technical qualities. But if you are just starting to be interested in polymer floristry, and are not sure that you are ready to spend an impressive amount on studying various types of plastic, as well as on purchasing a solid mountain of tools, then cold porcelain is what you need. The thing where polymer clays are unlikely to beat this simple mixture is price. Factory-made polymer clays are sold for relatively large amounts of money. For example, at the time of writing this article (beginning of 2013), polymer self-hardening clay Modena from the Japanese company Padico in Moscow costs 550 rubles per 250 grams, Sukerukun (Japan) - 900 rubles per 200 grams, Clear (Japan) - 450 rubles per 100g. Thai clays, which I put one step lower in quality, and also due to the absence or presence of a dubious non-toxicity certificate, cost from 300 to 450 rubles. While the material for making porcelain at home will cost you 5-10 times less. It all depends on what materials you buy and what effect you want to achieve. Of course, over time you will understand that the price problem is solved by purchasing clay in bulk for a year at once, but only those who decide to sell their products come to this. And even then, the price still remains higher, but you save in something else - the time you spend on the cooking process and your health, which few people think about, neglecting simple safety measures when preparing cold porcelain.
The second equally important quality is elasticity during sculpting. High-quality cold porcelain has an extraordinary elasticity of the material, which remains even when the clay begins to dry out a little and only particularly expensive clays (for example Sukerukun, Clear) can compare with it. This is very important, especially in cases where the master has to work for a long time with one piece of cold porcelain due to inexperience or due to the increased complexity of the product being created. Many masters do not pay attention to this point and consider accuracy an excess. I'm not going to argue with them. Everyone is free to follow the path that he likes best. I prefer the path of grace, precision and tenderness. With each of my new products, I slowly but persistently move on it and do not regret the time spent on all this accuracy. Because I see the joy in people's eyes when they receive my flowers and decorations, and this is the best indicator for me that I am doing everything right.

So, the time for lyrics has passed. I assume that since you started reading this article, you have heard something about artificial flowers made of polymer clay, flowers made of cold porcelain, ceramic floristry and the like. And you were wondering how to try to do something like this yourself? What is needed for this? How to start? Where? For what? How!!! Personally, I was overwhelmed with these questions when I realized that there wasn’t that much information on the resources I knew. No, of course, if you set a goal, you can always find what you are looking for, but how much time was spent in order to isolate what is paramount and what is not so important to begin with. I think that many creative people are familiar with the excitement that fills us when we get excited about a new idea. Without really knowing the technology and the essence, we go to the store and buy everything related to our chosen topic, and only after some time we realize that about two-thirds of what we bought is either simply not needed, or will not be needed soon. When I started writing this article, my first goal was not so much to talk about cold porcelain, polymer clays and polymer floristry in general, but rather to show what a novice master might need in his first steps. How you can make do with scrap materials and keep costs to a minimum in case your passion passes. After all, not everything we want to try suits us.
I want to say right away that if you are planning to move along the path of polymer floristry, then you simply must have unlimited patience, well-developed finger motor skills, as well as a desire for neatness. And if you dare to look towards white porcelain... Then you need patience, speed and accuracy like air! The absence of any of the components does not deprive you of the right and opportunity to engage in this creativity. In no case! But you must understand that realistic flowers are obtained only with the lion's share of patience, accuracy and dexterity of the fingers. Although all three of these qualities develop beautifully in the process. So, probably, the main thing is desire. Well, we have plenty of it!
Polymer and ceramic floristry
Artificial flowers made of porcelain, cold porcelain and polymer clays began to appear in our lives not so long ago. But every day more and more information is leaking out and becoming available. I would like to start, perhaps, with the fact that at the very beginning I, like many other people, was misled by the fact that cold porcelain and self-hardening polymer clay belong to ceramic floristry. This misconception was instilled in us by the first company to appear in Russia that sculpted flowers from polymer clay. Why such misinformation and confusion was created, I do not know. Perhaps the people who launched it really wanted to bring ceramic floristry to the CIS countries, but realized that distributing it to the masses is even more difficult than polymer floristry.
One way or another, remember that ceramic floristry is flowers created from clay, which must be fired. That is, made of ceramics. The most common material is white porcelain and certain varieties of it, which have very good elasticity. But, due to the high complexity of the modeling technique itself, the small circle of consumers (prices for such compositions reach hundreds of thousands of rubles) and the need to have a kiln on hand, this type of creativity is very rare, but I can assure you that the results are amazing.
With a big, very big stretch, cold porcelain, which as such is not porcelain, can be classified as ceramic floristry. Although, personally, I attribute it more to polymer floristry, which, in fact, is what we are talking about when we say “Flowers and decorations from cold porcelain” or “Flowers from self-hardening polymer clay.” Polymer floristry is the creation of flowers from various types of polymer clays. Whether it's baked polymer clay or self-hardening clay. Moreover, the degree of realism of polymer colors depends solely on the polymer clays you choose. Well, or, from the recipe for your cold porcelain. Some of them are not inferior to polymer clays in their properties and durability. But personally, I wouldn’t risk cooking these at home. I don’t recommend it to you either!
Cold porcelain and its analogues - self-hardening polymer clays
Since this article was first written, I have studied a huge variety of polymer clays and realized that my first conclusion was correct - there is no need to describe one hundred and one polymer clays in this article. But, perhaps, I will still tell you about a few of them as the ones that I remember the most. In all other cases, if you have a desire, you can go to a search engine and spend a couple of hours/days/weeks studying this material. You can spend money and buy yourself different types of clay, in practice, finding exactly the material that is most suitable for you. And here and now I will only briefly tell you what I consider necessary and what I am sure of.
First of all, it’s worth noting that all clay (in the future, let’s also call cold porcelain as one of the “brands” of polymer clay, although this is not true, but it’s easier for the story, and this does not contradict generally accepted concepts) can be divided into soft and hard, porous and smooth. There are many more different classifications, but for me they are not relevant. As I have already noticed, when it comes to sculpting techniques, people like to work either with very soft, elastic clay, or with harder, rubbery clay. My personal opinion is that elastic, soft clay allows you to make more realistic compositions that are closer to real flowers. My mind rears up when I get my hands on a clumsy rubber material that can be used to make decorative flowers, but nothing like the real thing. Someone may disagree with me, but this entire article is my personal conclusions and reasoning, which does not pretend to be a textbook or truism. I become my experience and my opinion. How to use it and what to learn from all this for yourself is up to you. So, it is for this reason that almost 80% of polymer clays are immediately eliminated. I didn't buy all the clays in a row. I read reviews about them, watched works made from them, and watched available videos. I just want to point out one thing. When buying clay, remember that almost all (or even all) of them are afraid of freezing. For this reason, do not buy clay by mail in the winter. If you want to try clay for the first time, buy it during the warm season or purchase it directly from the store. The clay will not die in the bag for a couple of hours in the cold. Frozen clay, after defrosting, loses its elastic properties and becomes “oaky” or “rubbery”. Some of them can be revived by mixing in water or glycerin cream, but in both cases the result will be, frankly speaking... a hundred times worse than the worst cold porcelain. Perhaps I’m exaggerating a little, but one way or another, flowers made from clay resuscitated after freezing do not look so “fresh.”
But let's return to our properties. The second attribute that is not unimportant for me is the texture of the material itself. I like the clay to have a smooth texture, reminiscent of Fimo polymer clays for firing/baking. That is, essentially, like very soft and elastic plasticine. For this reason, I immediately discarded two popular brands for ceramic floristry, Claycraft by Deco and Hearty by Padico. These clays have a more porous texture than I would like, although I do have the Hearty line, which I use in special cases where roughness and paperiness are needed. In addition, Claycraft is too fragile, and if you have to choose between it and cold porcelain, then the second is both cheaper and stronger. Although, if I choose between smooth polymer clays and cold porcelain, I will choose the first. Why? Because recently I believe that the polymer base is more flexible and durable. But if your main question is price at the initial stages, then I don’t see any reason for you to chase a well-known brand that you can replace with something that you can prepare yourself cheaper? The main thing is not to forget about safety precautions!
Of all the purchased polymer clays today, I liked Modena by Padico and Sukerukun clay. The second clay is just a dream! However, its price significantly reduces the excitement. The advantage of both clays over cold porcelain is that after drying, these clays become waterproof and flexible, which cannot be said about cold porcelain, although flexibility can still be achieved by adding rare types of PVA glue or elasticizers to the mixture. Modena clay is inferior in elasticity during modeling to cold porcelain and Thai polymer clays such as Thai Clay, Modern Clay, etc. But, in my personal opinion, no clay can surpass the elasticity of Sukerukun. Perhaps this alone justifies its cost. Although, it seems to me that the price, which is almost twice as high as that of Modena, is due to the dubious transparency of the clay. Yes, undoubtedly it is the most transparent, but do not expect to get currants or grapes from it. Unreal. That is why, due to such different properties of clays, I use combinations of different types in my compositions.


For jewelry, I always use only waterproof and flexible clays. The main clay for jewelry is Modena. In cases where this clay does not cope with its elasticity, I use Sukerukun. I use the well-known waterproof clay Luna Clay in cases where I need, on the contrary, a rigid structure in decoration or compositions.

For flower arrangements I use Thai clays, or rather one - Modern Clay Blue. It is softer and more flexible than Modern Clay Green, which can be obtained from blue by “weathering”.
When I started sculpting, my arsenal was limited to Modena Clay. I want to honestly tell you that even now I can safely get by only with it. But here only curiosity and the desire to experiment, to learn something new come into play, and therefore now in my box of clay there is a whole heap of various packages “of all the colors of the rainbow.” I’m scared to even think how much money was spent on this...
So. Well, now the main question! Where can I buy! It is already clear that cold porcelain can be welded yourself. Fortunately, there are an endless number of recipes on the Internet. The main thing here is not just to find a recipe, but also to see what comes out of it. Be careful and make sure that the photographs posted in the recipe were taken by the author from cold porcelain, cooked according to this particular recipe, and not collected from all over the Internet, which is more beautiful. For example, my tulips from Modern Clay Blue are now circulating on the Internet, showing the result of sculpting from cold porcelain without cooking. I very much doubt that something close to similar can happen there...
Self-hardening polymer clays can also be bought in the store. The best place to search is our native and unique Internet. Just enter the name of the brand of clay you are looking for and the word “buy”, and you will find many useful results. If you really try, you can search on Japanese and Thai sites. Clay is much cheaper there. But delivery will only pay off if you order a large batch. So, just a year in advance.
By the way, earlier in this article there was information about Fleur clay, which, as they say, is still the same Modern Clay. I still remain of the opinion that Fleur is inferior in quality to Modern Clay. And I don't plan to change it. At least until frozen or old clay with broken package seals stops appearing on the shelves. Of course, you can also find low-quality goods from other sellers, but Fleur is found here (at least in Moscow) more often than other polymer clays. Not to mention the fact that its price is twice as high as Modern Clay... In general, just be careful when buying clay, even in a tight package it should sag well under your fingers. And Modena is even more so - it completely flattens out at the corner. However, I am in no way saying that the “fresh” Fleur itself is bad material. It's just very difficult to find. Even if you buy directly from this company's store.
But regardless of the brand and the freshness of the clay, it must be stored in an airtight condition. Cling film allows air to pass through, so in addition to it, it is best to wrap the clay in plastic wrap. Then even the tinted pieces will last quite a long time.
Secondary materials and tools
The purpose of this subsection is not to list you all the existing options for tools and materials, but to tell you what will be useful to you at the very beginning, and what can be replaced with it.
Paints
The most basic of the secondary materials, which is difficult to refuse, is paint. Paints are applied on top of the finished product; they are also added directly to the clay, giving it the desired color. Professionals use oil paints because, unlike acrylic paints, they do not contain water and do not dry as quickly, and therefore do not speed up the hardening process of the clay, and do not require as much fiddling with them as with pastels, after which everything around is covered. a thin layer of colored dust. Also, when tinting with oil paints, you can make beautiful and smooth transitions that cannot be achieved when working with acrylic.
You can use both the cheapest oil paints and expensive ones. The only difference is that cheap paints can sometimes have unexpected effects on the clay. For example, many are faced with the fact, and I also experienced this, that the blue colors of Sonnet and Master Class, when added to cold porcelain in a samovar, lead to the appearance of a very unpleasant odor in the clay. This smell disappears after drying, but working with such material is unpleasant. Or, for example, a sonnet contains such an amount of linseed oil that it simply pours out of the tube instead of paint. You have to constantly monitor the process, and this is not always possible. One of the recommended firms is Winsor & Newton. Oil from this company can be bought in almost any art store. These are the paints I use. My color palette is quite large, since I paint pictures with the same paints. To get started, you can buy an inexpensive, small set of oil paints from Sonnet of 12 colors. It doesn’t cost much, and if you don’t like polymer floristry and don’t find another use for the oil, you won’t be so sorry for the money you spent.

I also use water-soluble oil from Winsor & Newton, but only for toning and texturing already dried products. This allows me to avoid using solvents and thinners, which then give me such a terrible headache. Adding such oil to clay reduces its elasticity time. Even in a sealed bag, the clay begins to lose it over time. But adding regular oil paints, on the contrary, increases elasticity. After you add a little color and mix the clay well until the shade is uniform, wrap it in film and let it sit for about five minutes. You can even warm it a little in your hands. Then stir the clay again and you will see how elastic it has become.
Please note that there are two types of white in oil paints. Zinc and titanium. In polymer floristry, zinc white is mainly used. They retain the porcelain quality of the clay and, in small portions, even transparency. Titanium white completely kills transparency, and also makes the clay look like plastic; in addition, such clay very quickly loses its elasticity during sculpting and often even begins to crumble. But sometimes you will still need titanium white.
Glue
Almost all flowers are made in parts, and these parts then need to be somehow connected. Usually, the most common PVA glue is used for these purposes. However, it is worth remembering that PVA glue perfectly connects raw material to raw or dried material, but two dried pieces of clay most likely will not be connected using PVA. And then you will need something more reliable. The simplest solution is super glue for a second or moment. They grip instantly and firmly. Especially fingers with clay... Usually both PVA and super glue are available in every home, and if they are not there, then purchasing them is not a problem.
Many florists use latex glue instead of PVA. Outwardly, it looks like PVA glue, when it dries it becomes transparent, and is specially designed for working with plastic. Although, like PVA, it is difficult to connect two dried parts made of cold porcelain or polymer clay. Personally, I don’t see much point in buying this glue in the early stages. If you decide to sell your work, then it’s worth looking for similar glue. I buy a large bottle and pour myself a little at a time. Since latex glue has a habit of drying out, becoming tighter or completely drying out. Because you always forget to close the glue jar while sculpting.

Wire
Most flowers are based on a wire frame. Depending on the size of the flower, the wire can be either very thin or as thick as a pencil lead. Perhaps this is a tool that is difficult to replace with something and which you will need sooner or later. And usually sooner rather than later. Therefore, if you are planning to get into polymer floristry, then you definitely need to probe the soil of your city to see where you can buy wire. You can buy it at construction markets and craft stores (I bought my first wire at a beading store)... I think you can find many more places if you try hard. In specialized floristry stores, the wire is sold in coils. Usually in green or white. To be honest, this winding is of no use to us. More inconvenience, most likely. But such wire looks more beautiful and is more pleasant to work with, although sometimes the winding has a habit of getting shaggy and untwisted at the ends, and it has to be glued, which, of course, is a little annoying. Personally, I prefer unwound wire. I really like the dyed wire that bead stores sell. Moreover, such wire is also cheaper.

Tape Tape
This tricky tape is not sold in every city. Several years ago it was difficult to find even in Moscow. Perhaps only in rare specialized floristry stores. Now things are simpler. In polymer floristry, tape is needed to connect parts to the frame if they are mounted on wire. Double-sided adhesive tape tightens all the wires very well, turning them into a neat stem, which can then, if desired, be rolled in clay. But even without running in, such stems already look pretty good. Without tape you will have a hard time. If you have no way to buy tape... well... then you'll have to improvise. You can try using construction paper tape. This, of course, is still a substitute, but it’s better with it than without anything at all. The main thing is, don’t forget to roll the stem afterwards, otherwise the flower won’t look very beautiful.
Tape comes in different colors. We will need the green ribbon most of all, but you can also buy brown if you find it or any other if you don’t find the colors you need. Better with tape than without it!

Cling film and modeling mat
I believe that it is not worth explaining the necessity and essence of these two items. You can do without them, but the film will help preserve your clay for a long time, and the mat will organize your workspace and allow you to keep it clean while you work. If you're really desperate, you can buy a paper cutting mat (they're usually green with centimeter dividers) and an airtight container for polymer clay wrapped in cling film. This will provide an additional guarantee against drying out and will organize the dozens of colorful pieces that will accumulate over time.


Scissors, wire cutters, side cutters, etc.
You will have a hard time working without small scissors. At first, ordinary nail scissors will suit you, but in the future I strongly advise you to find and buy small scissors with straight and long, thin blades. The thinner and longer the steel, the better. I had to spend several weeks before I could find the scissors I needed at an affordable price in the next store.

You will also find it useful in the future:
- round nose pliers - if you are going to make jewelry using fittings
- tweezers - sometimes the parts are so small that your fingers begin to seem thick and clumsy, and you can also quickly make loops on a thin wire with tweezers
- side cutters - for cutting thick wire
- pliers - for straightening and bending thick wire
Most tools can be easily found in any home. And if you don’t have them, then, in my opinion, it’s time to get them!
Stacks
The last series of important tools are stacks. Unfortunately, most sculpting stacks won't work. Here you need your own specific stacks. But over time, perhaps you will buy something from ordinary sculptor stacks, depending on your desires and needs. Our two main stacks look like this:
Knitting needle

In the form of a stick with balls at the ends

If you have the opportunity, it is better to immediately buy such stacks. Different sizes and more! If you have a sane person in your head, it's best to first understand what stacks you'll need.
The first basic stack looks a lot like a thick knitting needle. On one side the diameter of the circle is 1.5-2 mm, and on the other 4-5 mm. Despite its size, I can even roll out miniature lilacs and forget-me-nots with this stack. A smaller stack that I bought later and looks like a thin knitting needle is used by me to create very small flowers, for example, heather or miniatures. In general, to summarize, I want to say that first you should try out some available materials, and only then, based on this knowledge, buy yourself a stack. Although there is not much variety among them. As a substitute, you can use a knitting needle, a Japanese kitchen stick, or even an awl. For example, I started with sewing.
The second stack of balls seems indispensable, but it is not. Just find a strong stick (brush, pencil, thick wire) and glue smooth beads of the size you need to it. For example, for a very long time I used a cold porcelain ball mounted on a wooden stick. Only much later did I buy myself a set of different-sized stacks and, in fact, I didn’t feel much of a difference. Well, besides the fact that iron tools are still better than a light brush and an equally light ball.
A useful tool, in my opinion, is a roller knife. I remember studying it in surprise, not knowing where to use it, but then it turned out that with such a knife it was very good to cut out the necessary shapes from a rolled out layer of clay or to make indentations in the clay for rolling a stem. However, you can do just fine without this tool, but if you buy it for yourself, it definitely won’t be superfluous. The main thing is to buy steel immediately, not plastic.
Molds and cutters
This is where you can pour your money endlessly. Molds and cutters make the life of a florist much easier, but if you don’t have a bottomless bag of gold, then you should think ten times before buying a mold or cutter.
A mold is a texture imprint from a petal or leaf of a living flower, which we use to give a realistic resemblance when sculpting. It will be difficult to do without molds, but many flowers can still be sculpted without them, so don’t rush to buy molds. Firstly, they are expensive, and secondly, you can make them yourself.
To do this you will need:
- plasticine.
- epoxy or the most common silicone sealant.
- the leaf from which you want to make an impression.
First, roll out a piece of plasticine and attach a leaf to it. This way you will get a print. Around this print, stick more plasticine in the form of sides. Pour the prepared epoxy resin or silicone sealant into the resulting “container” (do not forget to carefully level the sealant so that it fills all the recesses). Let dry and remove the plasticine. That's the whole story. You can also order two-component silicone paste from the USA, which is suitable not only for creating various impressions, but also for making baking molds. So if you are also involved in decorating cakes, then you can safely create molds for yourself in this area. To create such a silicone mold, you need to mix two components and make an impression on the resulting mass, which is very similar to our polymer clay. After a few hours, the silicone will completely harden. And the mold can be used. Also, in summer and spring, you can simply use live foliage as molds, but closer to autumn, I still advise you to take care of the supply of necessary molds.
As for cutters - molds for flowers and foliage, I personally think that they kill the vibrancy of a flower, but sometimes you still can’t do without them. Identical, boring petals do not look very natural where nature allows disproportions. If you use cutters, do not forget to work on each leaf and petal after this, adding individuality to it, changing the shape a little. Cutters are very expensive, and many craftsmen make them by hand from tin cans, cutting them into strips and then shaping them into the desired shape. Some cutters are quite useful, but most can still be dispensed with or use cardboard patterns that can be applied to a rolled out piece of clay and then carefully cut out with scissors or a roller knife. You won't need cutters for the first few days, so you can safely forget about them.


Pasta machine
I won’t tell you which car is better to choose and how to use it. I can only say one thing - most pasta machines are simple machines for rolling out the most ordinary dough of different thicknesses. You won't need a paste machine for quite some time, but if you want to speed up the process of sculpting flowers whose petals and leaves need to be cut out with cutters, then a paste machine will save you a lot of time. Not only that, it will roll out your layer of clay evenly and, no less important, it will not leave your fingerprints on it. Don't forget that unlike baked plastic, our polymer clay is very sticky and can get wrapped around the rollers of your pasta machine. Therefore, it is best to roll the clay in a special film or “file”. Both can be bought at any polymer floristry store along with a pasta machine.

Cream
At my master classes, I often come across the fact that always at the very beginning, when I talk about tools, the question arises ahead of time: “Why do you need a cream and what kind?” Firstly, there is a misconception that cream can restore clay. I must say that I myself believed in this for a long time, until I realized in practice that the main meaning of the cream is completely different - it is used in cases where your clay sticks too much to your hands and tools. It also helps a little, very little, to restore the elasticity of the clay, but not its ductility. These are slightly different concepts. To restore the clay itself, you need to mix into it what it lost when it became hard, namely water. Cream, as a more liquid substance than the clay itself, can partially restore elasticity by replacing water, but in large quantities the cream leads to disruption of the structure of the clay. And great disappointment on the part of the creator.
Which cream is right for us? Yes, absolutely anything containing glycerin. I used Velvet Handles for a long time, and then I bought a pleasant-smelling Pond’s cream, which is available in large quantities in polymer floristry stores. Perhaps its main advantage is the wide neck of the jar.

Well then. That's probably all I wanted to say about the materials. As you can see, I spoke very briefly and little, but it seems to me that I said the most important thing:
- which clay is best to start with?
- what paints are best to buy?
— what tools may be useful in the beginning
You will find out the rest yourself, gradually learning techniques, tricks, and tricks.
In the next part I will tell you about.

In the meantime, you should stock up on the materials necessary for it:
- In the meantime, you should stock up on the materials necessary for it: Polymer clay (you can weld it yourself or buy Modena, Modern Clay, Thai Clay polymer clay)
- Set of oil paints “Sonnet” 12 colors small, brushes No. 1, 2, 4 (synthetic or kolinsky, preferably flat or oval), N8 (fluffy round brush made of very soft synthetic), thinner
- Wire No. 28x12 - 22 pcs (wire for beads of medium thickness is also suitable, it should withstand the weight of the flower and not bend in half from it)
- Wire No. 18x12 – 1 pc.
- PVA glue (or latex glue)
- Green or brown tape
- Nail scissors (preferably with straight tips)
- Basic stack (or something that can replace it, such as a spoke)
- Patience and good mood!
If you have any questions, please ask! If I know the answers to them, I will definitely share the information.
When copying a lesson to other resources, remember that you agree that the lesson should be posted as is. You are also required to indicate the original source - that is, establish a link to this resource.
vakharaCold porcelain is the cheapest, most pliable and accessible material for modeling. It is completely safe to work with it, and it is not at all necessary to have special skills and knowledge - even a small child can do such creativity. You don't need to look for something special in stores to create a unique decoration or other thing with your own hands. You can prepare cold porcelain at home.


In appearance, cold porcelain resembles plasticine or clay, but after complete drying it is an absolutely solid substance. During sculpting, you can use any accessories, jewelry, beads, small beads, buttons, branches or dried flowers, as well as fabrics of any structure. The surface of cold porcelain products can be varnished, painted or sprinkled with beads, sparkles, sand, etc.


The history of cold porcelain
In the first years of the 19th century, the first products made from this material appeared. According to dated records, it became known that cold porcelain was invented by the Argentines, but there is no exact information about its origin. There is much more information about the Russian master Pyotr Ivanov, who worked at the imperial porcelain factory and at the beginning of the 19th century made unique objects from a special class of porcelain. According to documents from the St. Petersburg Porcelain Factory, it was he who made the first decorative flowers from cold porcelain, which were intended to decorate special perfume bottles that were supplied to the imperial family.


There are earlier facts confirming the existence of this material. Chinese treatises on sculpture and art describe many varieties of cold porcelain stucco, but it is called somewhat differently. But still, its recipe is identical to the one used by Pyotr Ivanov.

Cold porcelain products: features and nuances of use
This material makes incredibly beautiful products, but at the same time they require the right approach to use. Places where there is no direct sunlight and moisture are acceptable for them. Cold porcelain is the same polymer clay that can absorb moisture, become limp and lose its original color when exposed to sunlight.


In rooms that are decorated with items made of cold porcelain, it is necessary to maintain the optimal temperature regime for it. So, if it is less than 10º C, the structure will gradually collapse due to the crystallization of moisture particles contained in such porcelain. High temperatures are also destructive - it will simply dry out and crumble. Lacquer coatings will help extend the life of cold porcelain products. They will protect against moisture and maintain the color, shine and shape of the surface.


What can be made from cold porcelain
From this material you can create anything you want - from a variety of jewelry for women to cute accessories for the interior:
Many needlewomen decorate pots of indoor plants or create a complete composition with a cold porcelain flower.


Dishes decorated with such stucco molding will become a real highlight of the kitchen interior.


All kinds of frames, flowerpots, stands, lampshades, candlesticks made of cold porcelain will dilute the usual interior and give it a touch of individuality.


Hairpins, hoops, jewelry and other feminine attributes decorated with flowers made of cold porcelain look charming. 


Thematic compositions made from this material, figurines of animals, little houses, garlands of flowers and greenery will certainly become a unique interior decor.


Together with your baby, you can create characters from your favorite cartoons or fairy-tale characters that will decorate the children's room.


In addition, you can make an amazing gift for dear people.


Cold porcelain: cooking at home
Making polymer clay is not at all difficult. The easiest traditional recipe is corn or rice starch, PVA glue, the most common baby cream and glycerin. The proportions are as follows:
- 1:1 cups starch and glue;
- 1:2 tablespoons of cream and glycerin.

Mix the ingredients thoroughly and leave for 15-20 minutes until the mass reaches a consistency ideal for modeling. It is strictly forbidden to put the prepared mixture in the refrigerator or store it for more than 2 hours at room temperature. You need to sculpt at once, trying to use all the material.
Some people add citric acid to the mixture, which works on the principle of preservation, which extends the shelf life of products.

There are recipes using water. However, such compositions are short-lived and fragile. Under the influence of external irritants, water reacts with the other components of polymer clay, due to which the shape of the products may change, their strength may decrease, and an unpleasant odor may appear.

To give a certain color to a product, chalk and food coloring are often used. But even after finishing the work and completely drying the product (in a day), its surface can also be painted.

Modeling tools
- scissors and rolling pin;
- toothpicks or stacks;
- nippers and tweezers;
- decorative cosmetics;
- paints and brushes;
- wet wipes;
- cutting board and gloves;
- glue for installation and thin wire.

Sakura flower: master class from cold porcelain
It is easier for beginning “sculptors” to make flowers from cold porcelain, for example, sakura.
Step 1. Leave part of the workpiece white, and paint part soft pink. From each we make small blocks (future petals). The white block should be slightly thicker than the tinted one. We connect the blanks along the length and cut them into small rectangles.

Step 2. Sculpt the petals. Make their bases pink and their edges white. We glue the petals together with PVA and use a toothpick or knitting needle to make a small hole in the middle, where we will then insert the stem.


Step 3. We attach the finished buds to a leaf cup with a green base and place them on a wire stem. Such a branch should look like a real sakura, perfectly repeating its structure.

Step 4. According to this scheme, we make several branches, leave them to dry completely, and then twist them into a single composition using wire.
Tags: