Do-it-yourself vibrating machine for the manufacture of paving slabs. Do-it-yourself vibrating table - various manufacturing options. Main technical characteristics
Paving slabs or paving stones, which recently appeared on the building materials market, are rapidly gaining more and more popularity. After all, it is ideal for finishing and, artificial reservoirs, floors in garages and parking spaces. Sites lined with paving slabs give the site a well-groomed appearance and remain dry after any downpour.
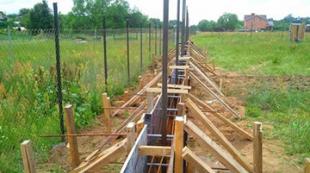
The concrete base for laying paving slabs is strong, reliable and durable.
Perhaps the only drawback of such coverage is its high price. On average, the cost of selling 1 square meter is about 400 rubles. But still, there is a way to significantly reduce the cost of this beautiful and modern product - to make it at home with your own hands. This article provides detailed instructions for those who decide to make a vibrating table for the production of paving slabs.
What is a vibrating table?

Vibrating table for the production of paving slabs can be of various sizes and configurations.
In order to independently, in addition to various forms and mixtures, you will need a simple design called a vibrating table. With it, from a concrete (mostly) solution, any shape can be.
The scheme of the vibrating table is simple and clear, but when making it, you must clearly follow the instructions and carefully look at the drawings.
Necessary materials for work:
- 4 metal pipes and a corner (channel);
- metal sheet (tabletop);
- vibration motor (any 220 V motor with acceptable power);
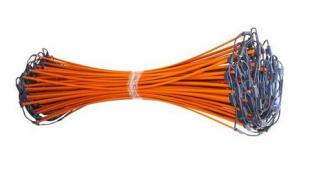
- steel springs.
Necessary tools for work:
- welding machine;
- bolts (4 pieces, for fixing the engine);
- drill;
- grinder or electric scissors for adjusting the size of metal materials.
Back to index
Device and principle of operation
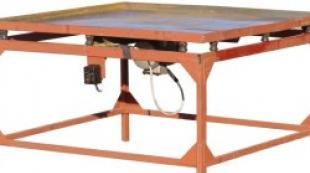
A self-made vibrating table consists of an upper plate movably fixed on a metal frame and an engine that drives the upper working plate. When the slab is vibrated, all the air is removed from the molds filled with the mixture, which are located on the slab, so that the paving slabs are durable and of high quality. When choosing materials in order to make a vibrating table yourself, it is very important to find a perfectly smooth tabletop and an engine with uniform vibration. Otherwise, there is a risk of getting uneven products that will be difficult to lay.
Back to index
Vibrating table manufacturing process

In almost all major cities of Russia, you can find places where vibropressed paving slabs, made back in the 70s, have a beautiful appearance.
As you can see, the vibrating table drawing does not seem very complicated. you can make it yourself by simply following our instructions. First of all, pay attention to the base of the table. It is made from a metal corner (enough "fiftieth") or a channel. The ideal dimensions for the base are 700 x 700 mm, but they can be changed depending on the needs of the master. In addition, it must be borne in mind that the larger the homemade table for making paving slabs, the more powerful the engine should be.
Metal pipes welded to the base are used as table legs. In order for the table to be as stable as possible, it is necessary to weld plates on the legs or dig them into the ground, fixing them with concrete mortar. In the first case, your vibrating table will be portable, in the second - “stationary”. When choosing the height of the table, only two requirements should be taken into account: the engine should not touch the floor and the master should be comfortable working behind it. Carefully take measurements so that the table top is even, as shown in the drawing, otherwise the mixture will pour out of the molds during manufacture!

The next step is the manufacture of a movable countertop. At the corners of the structure and in the center of the base (in case you are making a large vibrating table, as the drawing shows), 6 steel springs must be welded. You can buy springs at the automotive market or dismantling, springs from mopeds, cut into two parts, are best suited for this purpose.
Then a metal sheet with a width of at least 8 mm is superimposed on the table springs, and the engine is bolted to the sheet from below. The drawing shows in detail where it is best to place it.
A form is placed on top of the sheet into which the solution is poured. You can either buy a mold or make your own. If you need small tiles, then several products can be placed on one table at once.
We will understand the design of the vibrating table and consider in detail the procedure for manufacturing this unit at home, which is necessary for the formation of concrete products.
How the vibrating table works
The device consists of three main parts:
- Rigid metal frame.
- Tabletop mounted on shock absorbers.
- Electromechanical vibrator.
Forms with a solution are placed on the table top, which begins to vibrate after starting the engine. After a short period of time, the mixture is compacted and freed from air, and the concrete components are evenly distributed throughout the volume.
Tools and materials
To make the device you will need:
- welding inverter;
- Drill;
- Bulgarian;
- Locksmith tool.
Materials used:
- Steel corner 50x50x4 - about 6 m;
- Rectangular pipe 20x40 - 6 m;
- Sheet metal 120x75 4–6 mm thick;
- Springs or rubber pads - 4 pcs.;
- Small pieces of pipes with a diameter smaller than the internal size of the springs;
- Bolts and nuts.
Bed construction
The main requirement for the supporting part of the machine is strength, and there can be any ways of implementation. A simple course of work on the manufacture of a reliable foundation looks like this:
- Four table legs 75–80 cm long are cut from the corner.
- Two blanks of 60 cm and two of 1 m are prepared from a profile pipe.
- from the pieces of the profile, the upper frame and the legs are welded.
- The lower crossbars are cut to size and the table racks are connected by welding.
- “Glasses” are fixed at the corners of the base under springs made from pipe scraps.


Making a lid with your own hands
The tabletop of the machine will lie on spring cushions and be held by the sides.
Work order:
- The frame is constructed similarly to the stationary surface of the table, reinforcing the structure with additional stiffening ribs.
- Arrange a platform for placing the engine based on its dimensions.
- Retaining limiters are welded at the corners - rings of a steel pipe.
- Sheet metal is welded onto the ribs.
Making a vibrator
The power unit is selected depending on the size of the movable tabletop - approximately 1500 W of electric motor power is needed per 1 m² of surface. Eccentrics are welded onto the motor shaft - bolts with a diameter of 12–14 mm with screw nuts, which subsequently regulate the vibration amplitude by shifting along the thread. An easier way is to purchase a factory platform type vibration motor. Its design already provides for the possibility of changing the strength of oscillatory movements.
Vibrating table assembly
The engine is screwed into place with bolts, fixed with locknuts and install the cover on the springs. It is desirable to weld plates for anchors to the table legs. Next, an electrical circuit is assembled by connecting the power cable through circuit breakers and arranging the grounding of the unit. The finished vibrating table is tested for performance, the vibration amplitude is corrected and the stability of the structure as a whole is checked.
The described device is suitable for private households, and its engine can be used on a homemade one in the process of concrete work.
"Today we will analyze how to make a vibrating table for the manufacture of paving slabs, paving stones and curbstones with our own hands. , the surface of the table is covered with sheet metal 1-2 mm. The edges of the tabletop must have sides 2 cm high, and there are slots in the corners so that the solution that has flowed out of the mold can drain and not remain on the surface. Next, the table frame and the tabletop must be assembled into a single whole, for which steel springs are welded at the corners, they are necessary to create the very vibration created when the electric motor is running with an eccentric.
Vibration motor: it can be both factory-made and home-made, basically, of course, the guys do it themselves, there is nothing particularly complicated here. Any electric motor is taken (for example, from a washing machine), a thick metal plate with a welded bolt is put on the shaft and tightened with a nut. Further, during operation, such an eccentric will create vibration.
Vibration: what is it for? And it is necessary so that by setting the form with the solution on the vibrating table, the contents spread evenly over the form, and most importantly, so that air bubbles come out. The main task of vibration is to release air from the cement slurry. The fewer pores and air, the higher the strength and quality of paving slabs made on a homemade vibrating table.
Form for paving slabs: today, mold(s) can be purchased at almost every major building super market, or ordered online in any shape, size, or pattern. The material is also different: silicone, plastic, fiberglass.
And so, let's look at how to independently make a vibrating table for the manufacture of paving slabs?
materials
- corner 20x20
- rectangular tube
- steel spring 4 pcs
- electric motor
- sheet metal 1-2 mm
- dye
Tools
- welding machine
- Bulgarian (UShM)
- drill
- ruler
- corner
- hammer
Step-by-step instructions for making a vibrating table.
So let's first look at the drawings of vibrating tables.
 ???????????????????????????????????????????????????????????????????????????????????????????????


 Immediately it is worth making a revision and a rationalization proposal, in view of the fact that home-made vibration motors often fail, namely the eccentric drives the shaft into spacing and the engine wedges. So, in order for the alignment of the motor shaft to remain in a constant working condition, you should do the following, place the shaft with the eccentric separately, and transmit the torque through a belt drive, thereby significantly extending the engine life. Here's a little sketch for you to illustrate.
  Well, guys, let's go further;) From a rectangular profile pipe, you should weld a table frame (or from a corner). The dimensions in each individual case will be different, depending on your production capabilities. welded from a corner of 20x20, the surface is sheet metal 1-2 mm, please note! The boards must be mandatory, they are needed so that the forms do not fly off the table during the operation of the vibration motor. Slots in the corners of the table contribute to the natural removal of the solution spilled during the molding process.
  The springs at the corners of the vibrating table are welded by welding, such springs can be taken, for example, from motorcycle shock absorbers. They serve to transmit vibration to the vibrating table top.
  The length of the legs of the table must be strictly the same, so that there is no distortion and in the process of work everything is clear and even.
  Next, a vibration motor is installed on the table frame. You can make it yourself (pay attention to the photo)
 Well, or buy a factory vibration motor with a large supply of resources, such an engine will last for a long time.
  I hope you figured out a little with the creation of a vibrating table for the manufacture of paving slabs. And now let's talk about how to make this very paving slab on your own, what is required for this, what subtleties and nuances await you in this matter? We'll tell and show you everything ;)
Forms for the manufacture of paving slabs.
And so, first of all, you will need molds for tiles, today you can buy them at any large building super market, or you can order them on the Internet in any shape and configuration. By the way, the material can also be different - it is mainly plastic, silicone, fiberglass. As usual, silicone molds have the longest resource, but the price will be correspondingly higher. Also, the pattern on the form is varied.  We now know where to get the finished forms, then the resulting molds need to be lubricated! Yes, comrades, just lubricate) this is necessary so that the solution poured into the mold does not stick to the wall and, after solidification, safely comes out in the form of a finished paving slab with a smooth and even surface. You can lubricate the forms with both special lubricants and folk, time-tested. 1.- these are detergents (for example, Feri or AOC), a soapy solution is made and the inside of the matrix is \u200b\u200blubricated with it.
  But not all masters accept this method, and many guys practice the use of used engine oil. Its efficiency is an order of magnitude higher, but a small oil mark remains.
  You can take used oil at the nearest car service, where they will give it to you for free, well, or for a nominal fee, because these guys have such good stuff, because, according to the specifics of their work, they often change the oil in cars and fill in new.
  By and large, buckets or canisters of oil will last you for a long time.
  The resulting oil is poured into a more convenient dish (you can use a spray bottle)
  And then everything is simple, we lubricate the mold and lay the cement / sand / fine gravel / and water prepared in advance, a pigment dye is added to give color, which can also be bought at a hardware store or ordered via the Internet.
It is necessary to fill the forms not full, so that when the table vibrates and spreads, the solution does not spill over the edges  Vibration is carried out until the solution is completely spread over the form, and it is also necessary for air bubbles to come out of the solution so that the paving slabs are the most durable. After the vibrating table, the molds with the future tiles are sent to the racks. and pallets must be set strictly according to the level, so that in the end the tile turns out to be even and smooth, without distortions.
  In this position, the molds with the solution must lie for at least 24 hours, so that the cement hardens and the paving slabs take on their final form, then the contents are removed and transferred for further drying for another 2 weeks, and only then can they be stacked and prepared for shipment.
  This is how you can independently make a vibrating table for the manufacture of paving slabs and cast your own tile, curb stone. If you have any questions, then ask them in the comments (see below) We will try to answer everyone.
Thank you very much for your attention, see you soon!
The implementation of the idea of own production of artificial stone or paving slabs begins with determining the list of necessary equipment. The most expensive purchase will be an electric vibrating table. Do-it-yourself manufacturing will reduce financial investments in your own business.
It is a product for paving walkways, playgrounds in parks and around houses. The material is:
- Concrete.
- Rubber.
- Natural stone.
- Clinker clay.
- Tree.
The most affordable is the manufacture of concrete by vibrocasting or vibrocompression. In both cases, the forms with the solution are installed on a vibrating table with an electric motor - a device that performs oscillatory movements. Vibration provides:
- strength;
- removal of air bubbles from the mixture, compaction;
- homogeneity.
Main elements:
- The base is a structure for fastening the table top.
- Vibrator - an electric motor with an eccentric mounted on a shaft.
- Tabletop - frame with sheet material (metal, chipboard, fiberboard).
- Shock absorbers - a unit designed to transmit vibration.
How to assemble a vibrating table yourself?
The embodiment of the idea begins with the creation of diagrams, drawings with dimensions.
1. Making the base.
As a support are used:
- Welded metal profile construction.
- Car tires.
- Washing machine.
Metal frame - welded from a corner, a square (rectangular) pipe, a channel. The optimal section size: 50-80 mm, depends on the dimensions of the table, the total mass of the molds filled with the mixture.

The height of the bed is selected, taking into account:
- Operator growth.
- Installing the table on the foundation, pedestal.
- Digging into the ground.
The width and length of the base is equal or slightly, downwards, differs from the dimensions of the countertop. Dimensions are made in accordance with the parameters, the number of molds for paving slabs in one batch.
2. Choice of vibration device.
To make a motor with an eccentric on your own or purchase a finished product is up to the master to decide. Making from an engine lying around in a pantry or garage is suitable for a one-time production of a small batch of paving slabs. Production on an industrial scale will require the use of more reliable electromechanical devices with the ability to adjust the frequency of oscillation.

The modification of the vibrator is selected according to the mass, dispersion, number of batch forms:
Vibrating device mounting methods:
- To the vibrating table top.
- To an additional horizontal plane from a sheet of metal or a channel.

It is more convenient to mount on a welded channel or a rectangular pipe. When purchasing a vibrator, carefully read the instructions. Compliance with safety requirements during operation will reduce the likelihood of unforeseen, dangerous situations for the operator's life.
3. How to make a countertop?
The horizontal plane for placing molds with a concrete mixture can be made of durable sheet material:
- Most often, metal with a thickness of 6-10 mm is used.
- The use of plywood, chipboard, OSB will save money, but will shorten the service life.
The side along the edge will prevent slipping, falling forms. The design differs depending on the type of depreciation. The tabletop in drawing No. 2 provides an additional frame for fastening belts, chains.

4. Installation of shock absorbers.
Vibration damping is necessary to reduce the transmission of vibrations from the tabletop to the base, increasing the amplitude. Types of shock absorbers:
- Steel springs for automobiles are new, used. They are installed on a piece of pipe, a bar welded to the bed. Quantity - from 4 pieces, in the corners. Glasses fixed to the tabletop are put on a spring, there is no rigid fixation (scheme No. 1).
- Rubber - bushings, spacers. Fasteners, as in the previous version.
- Frame hangers with tabletop - belt, chain, metal cable, tension spring. It is advisable to use for tables with horizontal (circular) oscillations (drawing No. 2).
The lack of a rigid mount is explained by the need to periodically change worn, deformed shock absorbers. The weight of the worktop does not allow the connection with the bed to be broken.
5. Technology of assembly of structural elements.
Homemade vibrating table can be attributed to production equipment. The requirements for its assembly and operation do not depend on the place of application: at home, at the factory. For the safety of the operator, perform grounding.

Assembly step by step:
- Preparing the platform for the table. Compliance with the horizontal surface is mandatory.
- The installation of the bed is carried out mobile or stationary. The choice of option depends on the need for movement during operation. Rigid fasteners are important for small-sized, low-weight options.
- The engine and vibrator are mounted to the tabletop.
- Springs (rubber bushings) are put on pipes (rod) welded to the frame.
- The table top is placed on the base. Shock absorbers are located inside the glasses on the frame.
- The surface is leveled horizontally using a level. This will ensure uniform distribution of concrete in the form, the correct geometry of the tile.
- Conduct tests, adjust the amplitude of oscillations.
There are nuances that are important to consider:
1. The height of the table should correspond not only to the height of a person, but also to the way the forms are filled with concrete mortar. Take into account the large mass of the container for manual pouring of the mixture.
2. Large equipment may require the installation of 2 vibrators. In this case, it is important to avoid the occurrence of resonance.

3. Determination of the oscillation amplitude:
- Fix the pencil on the surface, the stylus should protrude beyond the edge of the table.
- Turn on the engine.
- Bring a sheet of paper attached to a rigid base. The trace from the pencil will allow you to determine the amplitude.
4. To prevent corrosion, metal parts are coated with primer, paint or varnish.
5. Before buying, perform an analysis of the cost of the product, consider options for replacing expensive items with cheaper ones:
- Replace a sheet of metal with plywood or a piece from old furniture.
- Buy springs at car "collapses".
- Replace the vibrator with an engine from a washing machine, use a hammer drill or impact drill.
- Used tires can play the role of a bed.
- Instead of a table, use an old washing machine in spin mode, with a blanket in the tub.
6. Vibrating table with minor modernization can be used as equipment for screening bulk products (sand, cement).
7. Don't skimp on making tiles for sale. The higher the culture of production, the better the quality of the product, the lower the cost. It may make sense to purchase off-the-shelf equipment with fine-tuned process technology.
| Articles |
How nice it is to enter the yard in bad weather, when a long rain has turned the soil into slurry, and in the yard there are clean paths and platforms made of paving slabs or concrete blocks. Or take a walk in your garden in early spring, watching the awakening of your well-groomed trees from their winter sleep, when your feet step on a hard surface.
A vibrating table on springs can be made independently, since the design is not complicated, the main thing is the availability of the necessary materials and skills in working with metal structures.
But to achieve this bliss, it is necessary to lay out these sections of such tiles and blocks of concrete, which are not cheap today. Their cost includes, in addition to consumables, the cost of the hired labor of workers, taxes, trading costs, a considerable profit for the owner of the production, and many more expenses that we would rather not know about. But we pay for all this when buying ready-made tiles or blocks of concrete. Therefore, when producing, we pay only the cost of materials with their delivery to the house, energy costs, the cost of water, forms.
But for the manufacture of paving slabs, a vibrating table is needed.
Buying it is an additional cost. But what if you make a vibrating table for paving slabs with your own hands, especially since its device is quite simple?
Vibrating table and its device

When self-manufacturing a vibrating table, it is necessary to provide protective covers for the engine.
Paving slabs are made of concrete, which, in addition to water, includes binder Portland cement, sand, solid fine-grained filler and additives (mainly plasticizers). This mixture is mixed with a concrete mixer or manually, and then poured into polymer molds. But the filling of molds, with the removal of air bubbles from it, is slow and uncontrollable by the manufacturer.
To do this, it is necessary to shake the concrete in the molds. There are many forms for tiles and blocks of concrete, and manually performing this process will be unprofitable. Therefore, for such work, a vibrating table (vibrating table) is used, which mechanizes the process of shaking forms, as well as blocks and tiles in them.
The vibrating table consists of a table cover, which is movably attached to the bed on springs or suspensions. The cover must be in a strictly horizontal position and have limited ability to move in horizontal and vertical positions. For continuous shaking, an electric motor of the required power is attached to it, on the shaft of which an eccentric is attached. When the motor rotor rotates, the eccentric radially shifts the center of gravity of the motor, which leads to its vibration. This vibration of the engine rigidly fixed to the table cover is transmitted to the forms with concrete mixture standing on it.
Equipment manufacturing

Blanks for the vibrating table: 1) matrix scan; 2,3,4) pallet blanks; 5,6,7) framing the matrix from below (corner 25x25); 8) bar for fastening voids; 9) void; 10) upper plug of the void; 11) the lower plug of the void.
In order to make a vibrating table for paving slabs with your own hands, in addition to the hands themselves, you will need:
- electric welding transformer (you can use any: AC, DC, semi-automatic, as long as the power allows you to weld metal, 4 mm thick) with cables, clamps and a welding mask;
- welding electrodes Ø 3 mm or welding wire for semiautomatic devices Ø 0.8 mm;
- metal corner with a shelf up to 60 mm for the table top. The length of the corner is equal to the perimeter of the table lid and the length of the transverse or longitudinal jumpers in the case of using thin tin or plywood for the lid;
- tin with a thickness of more than 2 mm for the table top, plywood, OSB or chipboard based on the area of the cover;
- corners (channel) or pipes of any size and profile for the bed along the length, depending on the design of the latter. It is desirable to take a corner with a shelf of 30 mm or more, and pipes: round section - from 1 inch (2.54 cm), square - from 25x25 mm;
- four springs (can be from car engine valves, cut moped or car springs, shock absorbers, etc.);
- electric motor: single-phase at 220 V or three-phase at 380 V with a power of about 50 W with wires and a starter;
- fastening bolts with nuts;
- angle grinder ("Bulgarian") with cutting and cleaning wheels;
- hammer;
- roulette.

It is most convenient to make the frame (frame) of the vibrating table from a profiled pipe of square (rectangular) section.
First you need to make a frame with your own hands. To do this, we prepare 4 straight sections of a channel, corner or pipe for legs, the length of which is slightly (10 centimeters) shorter than the height of the planned table. In the same way, we take 4 segments with a length equal to the width of the bed and 4 segments with a length equal to the length of the bed itself.
The choice of table height is a purely individual matter. With large volumes of produced paving slabs and blocks, when the vibrating table will work for a long time, it is desirable that the worker does not bend down. The height of the table is therefore 90-100 cm, but you can make it low - from 40 cm. The length and width of the bed depends on the size of the cover and should be equal to its dimensions or slightly less.
There are many options for the design of the bed: it can be a parallelepiped (ribs of the box), an ordinary metal table with spacers between the legs or without them (then saving metal is obvious). If the table is not planned to be moved over long distances, then its elements are connected by electric welding. If you need to make a collapsible structure, then we use the bolted connection of its parts, but then its rigidity may decrease.
After the manufacture of the frame, we proceed to the cover of the vibrating table. It is a rectangular steel frame with a protruding side, inside which a sheet of tin, plywood, OSB, chipboard or, in extreme cases, edged boards of the same thickness is placed and reinforced. In the middle of the cover to the frame, we weld the corners for mounting the electric motor. You can make a lid by folding the edges of a sheet of sufficient thickness to the desired height.
Fastening the table top to the frame also has many options. You can weld the springs to the tabletop, and install cylindrical cups about 1/3 of the height of the spring on the bed frame. The springs are simply inserted into the glasses. Or vice versa, the springs are at the bottom, and the glasses are on the tabletop frame. Instead of glasses, it is allowed to weld pins with a diameter slightly less than the inner diameter of the spring and a height of about 1/3 of its length, which are inserted into the springs. Or a one-piece connection, in which both ends of the springs are welded to parts of the vibrating table. Instead of springs, you can make a vibrating table on a suspended tabletop with your own hands, but at the same time, the suspensions wear out very quickly.
Vibrator mount

The motor (vibrator) mount must be secure and protected from vibrating materials on the table.
To create vibration, a powered electric motor is fixedly bolted to the bottom of the cover. It is very common to use a ready-made vibrator IV-98 or IV-99 with the eccentrics set to a minimum (they are designed for low-voltage power). But the vibration is strong enough and the table top must be made massive (for example, from a 10 mm sheet with corners or weighted with concrete ballasts). But it is best to take an ordinary household electric motor, instead of a pulley of which a specially machined or home-made eccentric is installed.
A self-made eccentric is a sleeve with a fixing screw and a bolt transversely attached to the threaded end. It is desirable to make sure that the bolt can move in the transverse direction with a strong fixation - this will make it possible to adjust the vibration power. You can unbalance the native pulley by cutting off parts of it or by drilling holes in it.
The motor can be installed horizontally and the vibration will be vertical or the rotor vertically and we will get horizontal vibration. Better yet, install it at an angle of 45º, then the vibration will be in two planes.